Everything in Ironloom POS, ordered by who does it: cashier, manager, stock keeper, accountant.
Signing in and the main screen
How do I sign in?
Type your user name or your short user ID, then your PIN, and press Sign in. On a touch screen the number pad is enough: user ID, then PIN.

- Start Ironloom POS from the Start menu or the desktop icon.
- In the box User name or user ID, type your user name, or your user ID: a short number such as 3. The screen greets you by name as soon as it recognises you.
- Type your PIN. The number pad on the screen types into the box you touched last.
- Press Sign in.
Other ways
- Password: press Use password to type your password in place of the PIN. Use PIN goes back.
- Badge: if you have a staff badge, scan it on this screen.
- No keyboard: touch the first box, tap your user ID on the number pad, touch the PIN box and tap your PIN.
After several wrong tries the account is locked for a while. Wait, or ask a manager. If you do not remember your PIN, see I forgot my PIN or password. How do I get back in?.
After signing in you land on your home page: the Dashboard for an owner or manager, the Checkout for a cashier or supervisor, Inventory for a stock clerk, Reports for an accountant.
What is on the main screen?
The menu on the left opens each part of the program, the bar at the top shows the store, the till, the open shift and who is signed in, and the line at the bottom shows your devices. You only see the parts your role allows.
The menu on the left
- Each line opens one part: Checkout, Dashboard, Products, Inventory, Purchasing, Customers, Promotions, Shifts & Cash, Reports, Returns, Smart Import, Hardware, Users & Roles, Plugins, Settings, About.
- A part your role may not use is not shown. If something is missing, ask the owner or a manager: see How do I decide what each person may do (roles and rights)?.
- The arrow under the logo shrinks the menu to icons and opens it again.
- The arrow beside the name at the top of the menu goes back one screen, like the Esc key.
The bar at the top
- The store, the till and since when the shift is open.
- During a trial, a small box with the days left.
- An orange button with the number of products that are low in stock, for users who may see stock. Press it to open the list.
- The date and time, the keyboard language, the on-screen keyboard button, the light / dark switch, help (?) and your name.
- Lock and Logout.
The line at the bottom
Each device (scanner, receipt printer, cash drawer, scale, customer display, card terminal) has a dot. A filled dot means the device is ready.
Messages
Short messages appear at the top, one at a time. They go away by themselves, or as soon as you press a key, touch the screen or scan.
How do I lock the till when I walk away?
Press Lock at the top, or F12 (Ctrl+L on a laptop). The sign-in screen covers everything until someone signs in. The till also locks by itself after a time without use, which the owner sets.
Lock it yourself
- Press Lock in the top bar, or the F12 key. On a laptop whose F-keys change the volume or brightness, press Ctrl+L.
- The sign-in screen appears. While it is shown the menu is hidden and no screen can be opened.
- To continue, sign in again with your user ID and PIN.
The automatic lock
The till locks by itself when nobody touches it for a set number of minutes.
- Open Settings, then Checkout rules.
- In Auto-lock after minutes (0 = off), type whole minutes. 0 switches the automatic lock off.
- Save.
Locking is not the same as lock mode. Lock mode keeps the program full screen and on top of Windows: see How do I keep the till full screen so staff cannot leave the program (lock mode)?.
How do I sign out so another person can use the till?
Press Logout at the top. The sign-in screen opens and the next person signs in with their own user ID and PIN, so every sale is recorded under the right name.
- Finish the sale on the screen, or put it on hold: see How do I put a sale on hold and bring it back?.
- Press Logout in the top bar.
- The next person signs in: see How do I sign in?.
- Signing out does not close the shift. The drawer and its cash stay open for the next cashier until someone closes the shift: see How do I close the shift and count the drawer?.
- If your store uses the time clock, the till may ask to clock you out, or do it by itself: see How does the employee time clock work?.
- For a short break, Lock is quicker: see How do I lock the till when I walk away?.
Never sell under another person's name. Discounts, voids and the cash count are checked per user.
I forgot my PIN or password. How do I get back in?
Staff ask the owner or a manager, who sets a new PIN in Users & Roles. An owner who forgot their own PIN presses Forgot your PIN? on the sign-in screen and gets a one-time unlock code from Ironloom support.
You are a cashier or other staff
Ask the owner or a manager. They open Users & Roles, select you and set a new PIN or password: see How do I set a new PIN or password for someone, or unlock their account?.
You are the owner
- On the sign-in screen, type your user name and press Forgot your PIN?.
- A window shows a Request number of 6 digits, with the computer's ID and name. The number stays the same for 24 hours.
- Contact Ironloom support at support@ironloomtechnologies.com and give the request number. Support checks your name, email and phone against the store's record, then gives you an unlock code of 8 digits.
- Type it in Unlock code, then type your new PIN twice (4 to 8 digits).
- Sign in with the new PIN.
- The code fits only this till and this request, and works once. It is checked on the till itself, so it works without internet, as long as the till has reached the Ironloom server at least once before.
- After 5 wrong codes the window closes. Start again to continue.
- Every reset is written in the audit log, and the owner receives an email saying the owner PIN was changed.
There is no master password in Ironloom POS. Nobody, Ironloom included, has one code that opens every till.
How do I go back to the previous screen or to my home page?
Press Esc, or the back arrow at the top of the menu. You return to the screen you came from; when there is nothing to go back to, your home page opens.
- Esc first closes an open side panel or clears the search box. Press it again to go back.
- Esc never leaves a sale that has items in it. Finish, hold or void the sale first.
- On a touch screen, use the arrow beside the name at the top of the menu: it does the same as Esc.
Home page per role
| Role | Home page |
|---|---|
| Owner, Manager | Dashboard |
| Supervisor, Cashier | Checkout |
| Stock Clerk | Inventory |
| Accountant | Reports |
For a role your store created itself, the owner chooses it in Users & Roles, in the role's field Home page (after login and with Esc).
How do I switch between light and dark, change the keyboard language or open the on-screen keyboard?
Use the buttons at the right of the top bar: the sun switches light and dark, the language button (for example EN) moves to the next Windows keyboard, and the keyboard icon shows or hides the on-screen keyboard.
- Light or dark: press the sun icon. The choice is also in Settings, Language / Theme.
- Keyboard language: the button shows the keyboard in use, for example EN. Press it to move to the next keyboard installed in Windows. To have the keyboard follow the language of the screen, see How do I set the keyboard language and the on-screen keyboard?.
- On-screen keyboard: the keyboard icon shows or hides it. The icon appears only on a PC with a touch screen. The on-screen keyboard has English, Arabic and French letters, numbers and a page of symbols (?123). Where a number pad is already on the screen (quantity, amount, PIN) it does not open.
- Language of the screens (English, Arabic, French) is changed in Settings: see How do I change the language of the screens, and choose the languages my store uses?.
A barcode scanned while the keyboard is set to Arabic is turned back into digits by the till. If a barcode is still not found, press the language button until it shows EN: see A barcode is not found when the keyboard is set to Arabic (or another language). Why?.
How do I get help inside the program?
Press F1, or the question mark at the top. The help opens on the articles about the screen you are on. Type your question in the box at the top to search all articles. It works without internet.
- Press F1 on any screen, or press the question mark in the top bar.
- Under About this screen, tap a question to read its answer on the right.
- To search, type a few words of your question in the box at the top, for example "refund" or "drawer". The matching questions are listed while you type. Press Enter to open the first one.
- To read everything on a subject, open a chapter under All chapters.
- Press Close or Esc to return to your work. Nothing you were doing is lost.
Good to know
- The words in colour and bold are the names of buttons and screens, written as the program shows them.
- Underlined text opens another article. The arrow at the top goes back to the one before.
- Keyboard shortcuts opens the list of keys: see What are the keyboard shortcuts?.
- The help is in the language of the screen: English, Arabic or French.
- The help is part of the program, so it matches your version and needs no internet. The Ironloom POS site has the same articles, with pictures, and guides to print.
- Small typing mistakes do not matter in the search.
If the help does not answer
- A fault of the program: send a problem report, see How do I report a problem to Ironloom?.
- A question: contact support, see How do I contact Ironloom support?.
Selling
How do I make a sale, from the first product to the receipt?
Open Checkout, scan the products, press PAY (F10), take the money and press Complete sale. The receipt prints and the drawer opens for cash.
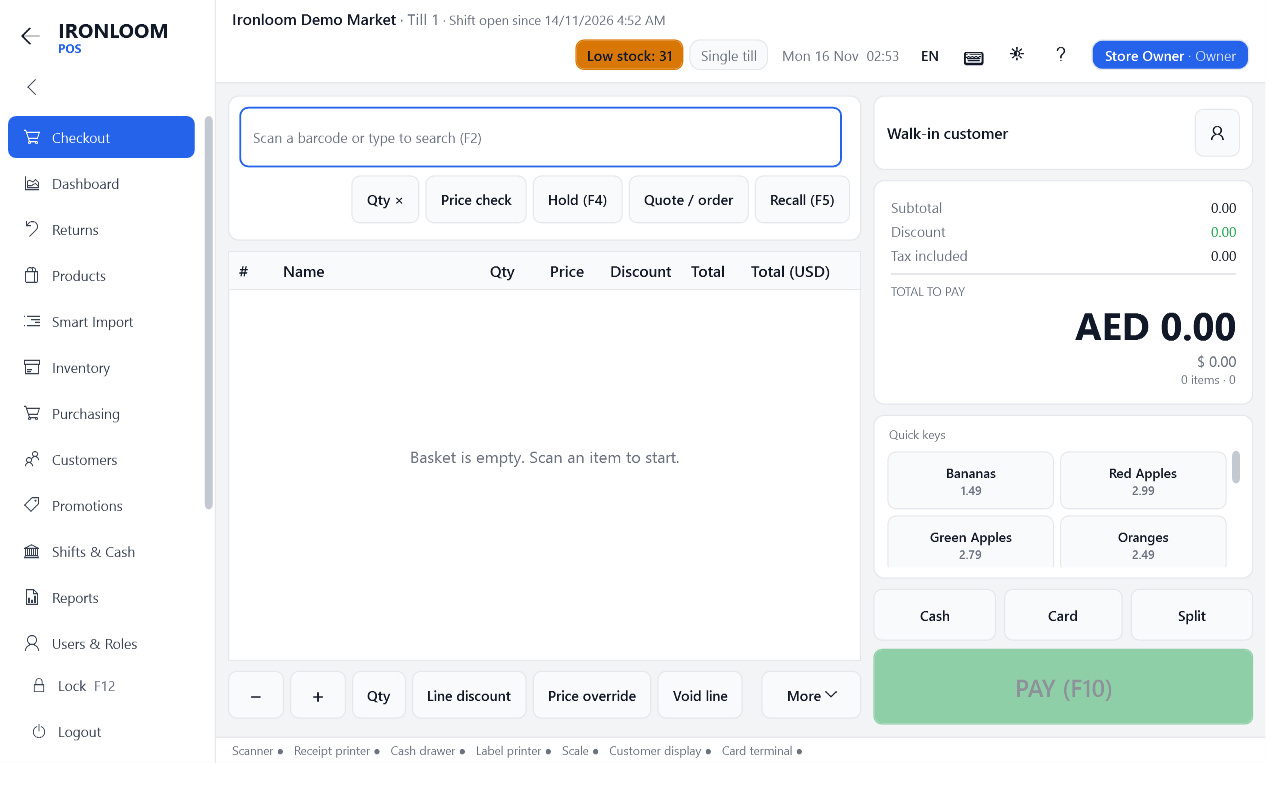
- Open Checkout in the menu. If no shift is open yet, the till asks for the cash in the drawer first: see How do I open a shift?.
- Scan each product. It appears as a line in the basket with its price. No barcode? See How do I add a product to the sale?.
- Check the total at the right, under TOTAL TO PAY.
- Press PAY (F10). For a simple sale you can press Cash or Card directly.
- Take the payment: see How do I take a cash payment and give change? or How do I take a card payment?.
- Press Complete sale. The receipt prints, the drawer opens when cash was paid, and a new empty basket is ready.
- A wrong line? Select it and press Void line: see How do I remove a product from the sale, or cancel the whole sale?.
- The customer has to fetch something? Park the sale with Hold (F4): see How do I put a sale on hold and bring it back?.
- The sale is saved while you work. If the program or the PC stops, the basket comes back: see The program or the PC stopped in the middle of a sale. Is the sale lost?.
How do I add a product to the sale?
Scan its barcode. Without a barcode, type part of the name in the box at the top and pick the product from the list, or tap its button under Quick keys.
- Scan: point the scanner at the barcode. You do not have to click anywhere first: the till catches a scan on every screen.
- Type the barcode: if the label does not scan, type its digits in the box at the top and press Enter.
- Search by name: type two letters or more. The matching products are listed while you type. Tap one, or use the down arrow and Enter. F2 puts the cursor in the box.
- Quick keys: tap the product's button at the right. They are meant for products without a barcode, such as fruit or bread.
- PLU code: for a product with a short scale code, type the code and press Enter.
When the same product is added twice, the till adds it to the line already in the basket.
What can happen next
- The till asks for a weight: the product is sold by weight. See How do I sell a product by weight?.
- The till shows several products: the barcode is shared. See After a scan the till asks me to choose between several products. Why?.
- The till says the barcode is not known and looks it up online: see The barcode is not known. What do I do?.
- The till asks for a serial number, a size or the customer's age: see The till asks for a serial number. What do I do?, How do I choose a size or colour at the till?, The till asks about the customer's age. What do I do?.
How do I sell several of the same product, or change the quantity of a line?
Before scanning, press Qty × (F7), type the number, then scan once. After scanning, select the line and use +, − or Qty.
Before you scan
- Press Qty × or F7 (Ctrl+M on a laptop).
- Type the number, for example 6, and confirm.
- Scan the product once. The line is added with quantity 6.
A quick way with the keyboard: type 6* or 6x in the box at the top, press Enter, then scan.
After the product is in the basket
- Select the line.
- Press + for one more or − for one less. The + and − keys of the keyboard do the same.
- Or press Qty, type the quantity and confirm. On a touch screen, one tap on a line opens its quantity.
- Bringing the quantity down to zero removes the line.
- For a weighed product, + and − change the weight by 0.1.
- A product with serial numbers is always one unit per line: scan the next unit to add another. See The till asks for a serial number. What do I do?.
How do I sell a product by weight?
Put the product on the scale, then tap its quick key or type its code: the till reads the weight and works out the price. With no scale connected, the till asks you to type the weight. A label printed by a labelling scale is scanned like any barcode.
With a scale connected to the till
- Put the product on the scale and wait until the weight is steady.
- Tap the product's button under Quick keys, or type its name or PLU code.
- The line shows the weight and the price for that weight.
If the weight on a line is wrong, put the product back on the scale, select the line and press Read scale.
Without a scale
The till opens a box asking for the weight in the product's unit (kg, g, lb or oz). Type it and confirm.
With a label from a labelling scale
Scan the barcode on the label. The till takes the weight, or the price, from the barcode. The layout of these barcodes is set once by the owner: see How do I make the till read the weight or price labels of my labelling scale, and set the containers for tare?.
- A container on the scale? Take its weight off with Tare: see How do I take off the weight of a container (tare)?.
- Read scale and Tare are in the button row or under More. In a clothing store or a café they show only when the store sells by weight.
The weight shown on the till is for the sale only. Whether your scale may be used for selling by weight is a matter for your country's weights and measures rules, and for the store.
How do I take off the weight of a container (tare)?
Press Tare and choose the container, or type its weight in grams. The till takes that weight off the next weighed product, so the customer pays for the net weight only.
Before weighing
- Press Tare. It is in the button row or under More.
- Choose a container from the list, or Type the container weight and enter the grams.
- A badge shows the tare that is waiting. Weigh and add the product as usual: see How do I sell a product by weight?.
After the product is already in the basket
- Select the weighed line.
- Press Tare and choose the container. The weight comes off that line.
- No tare removes a tare that is waiting.
- A product can have its usual container saved on it. Then the till takes the tare off by itself every time: see How do I set up a product that is sold by weight?.
- The list of containers is set by the owner in Settings, Scale labels: see How do I make the till read the weight or price labels of my labelling scale, and set the containers for tare?.
- If the weight is not more than the tare, the till refuses the line and tells you.
- The receipt prints the tare and says that the weight shown is net.
How do I remove a product from the sale, or cancel the whole sale?
Select the line and press Void line (Del key) to remove one product. Press Void sale to empty the whole basket. Both are recorded with your name.
Remove one product
- Select the line in the basket.
- Press Void line, or the Del key.
Cancel the whole sale
- Press Void sale (the red button).
- The till asks Void the whole sale? Confirm.
- If your role may not void, the till asks for a manager's approval: a manager types their PIN and you continue. See The till says "Manager approval needed". What do I do?.
- Every void goes into the audit log with the user, the product and the amount. The owner sees them in Reports and on the Dashboard: see How do I keep an eye on discounts, voids and other ways money can be lost?.
- The sale is already paid and finished? That is a return or a void of a finished sale: see A finished sale was a mistake. Do I void it or return it?.
How do I give a discount?
For one product, select its line and press Line discount. For the whole sale, press F8. Type a number for a percentage (10), or a number followed by the letter a for an amount (2.50a).
Discount on one line
- Select the line.
- Press Line discount. It is in the button row or under More.
- Type the discount: 10 means 10 %. 2.50a means 2.50 off the line.
- Type the reason, or leave it empty, and confirm.
Discount on the whole sale
- Press F8 (Ctrl+D on a laptop).
- Type the discount the same way: 5 for 5 %, 5a for an amount of 5.
- Type the reason and confirm.
To remove a discount, do the same and type 0.
Limits
- Each role has a highest percentage. Above it, the till asks for a manager's approval: see How do I limit the discounts and refunds a cashier may give? and The till says "Manager approval needed". What do I do?.
- Some products are set to never take a discount. The till says so.
- An item sold once from Smart Scan cannot be discounted.
- Promotions apply by themselves; you do not type them: see A promotion did not apply at the till. Why?.
- Every discount is kept with its reason and shown in the discounts report.
How do I change the price of one line in a sale?
Select the line, press Price override, type the new price and confirm. It changes the price for this sale only, needs the right to do so, and is recorded.
- Select the line.
- Press Price override. It is in the button row or under More.
- Type the new price for one unit and confirm.
- If your role may not change prices, the till asks for a manager's approval: see The till says "Manager approval needed". What do I do?.
- A price under the product's cost needs a second right, selling below cost. Without it the till asks for a manager.
- The old and the new price go into the audit log, and the owner sees price changes on the Dashboard under the loss watch: see How do I keep an eye on discounts, voids and other ways money can be lost?.
- The product keeps its normal price for the next sale. To change it for good, edit the product: see How do I change a product's price or details?.
How do I check a price without adding the product to the sale?
Press Price check or F3, then scan the product or type its name. The till shows the name, the price and the stock on hand, and adds nothing to the sale.
- Press Price check at the top of the Checkout, or F3 (Ctrl+P on a laptop).
- Scan the barcode, or type the barcode or part of the name, and confirm.
- Read the name, the price and the quantity in stock. For a weighed product the price is per unit of weight.
- Close the window. The basket is unchanged.
- With a customer attached to the sale, the price shown is that customer's price.
- The price is also sent to the customer display, if you have one.
How do I put a sale on hold and bring it back?
Press Hold (F4) to park the basket and serve the next customer. Press Recall (F5) and choose it from the list to continue.
Put the sale on hold
- Press Hold (F4), or the F4 key (Ctrl+H on a laptop).
- Type a label so you recognise it, such as the customer's name, and confirm.
- The basket empties and you can start the next sale.
Bring it back
- Press Recall (F5), or the F5 key (Ctrl+R on a laptop).
- Choose the sale from the list. Each line shows the label, the total and the time.
- If you are in the middle of another sale, the till offers to hold that one first.
- A held sale is not a sale yet: nothing is paid and stock has not moved.
- Held sales are also listed in Shifts & Cash: see Where do I see the recent sales and the sales on hold?. Finish or void them before closing the shift.
- For a customer who will come back another day, use a quote or an order: see How do I give a customer a quote?. In a café, use tables: see How do I open a table, add to it and come back to it later?.
How do I attach a customer to the sale?
Press the person button or F6, type the customer's phone, name or card number, and pick them. The customer then earns points, gets their own prices and can buy on account.
- Press the person button at the right of the Checkout, or F6 (Ctrl+U on a laptop).
- Type the phone number, part of the name or the card number, and confirm.
- One match is attached straight away. With several, choose from the list.
- The customer's name, level, points and balance appear above the totals.
- Customer card: scanning the card attaches the customer in one step.
- New customer: when nobody matches and your role may create customers, the till offers to add one: name, phone and email.
- Prices: lines already in the basket change to the customer's price level, except lines whose price you changed by hand.
- Tax-exempt customer: the till says that no tax is charged on this sale: see How do I sell to a customer who does not pay tax?.
- Remove the customer: press the person button again and confirm.
What a customer on the sale allows: points (How do I use a coupon or the customer's loyalty points?), payment on account (How do I sell on account, or use a customer's store credit?) and the sale in their history.
How do I use a coupon or the customer's loyalty points?
For a coupon, press Coupon and type or scan the code. For points, attach the customer first, then press Redeem points and type how many points to spend.
Coupon
- Press Coupon. It is in the button row or under More.
- Type the code and confirm. A printed coupon barcode can be scanned directly.
- The message line says whether the coupon was applied. If it says there is no matching promotion, the code is wrong, out of date, or the basket does not meet its conditions.
A voucher code typed here is recognised too. A voucher for an amount is used later, in the Payment window: see How do I take a gift card or a voucher as payment?.
Loyalty points
- Attach the customer: see How do I attach a customer to the sale?.
- Press Redeem points, under the customer's name.
- The window shows the points the customer has and what they are worth. Type the number of points to spend and confirm.
- Their value comes off the total as a discount.
- A customer cannot spend more points than they have.
- Points for this sale are earned when the sale is completed. How many points per amount, and what a point is worth, is set by the owner: see How do loyalty points work, and how do I set them up?.
The till asks about the customer's age. What do I do?
The product has a minimum age. Check the customer's age, asking for an identity document when in doubt, and answer yes to continue. If you answer no, the product is not added unless a manager approves.
- When you add a product with a minimum age, the till asks whether the customer is at least that age.
- Look at the customer. When you are not sure, ask for an identity document.
- Answer yes: the product is added. Answer no: the product is not added.
- After a "no", the till offers a manager's approval, for the case where the manager has checked the customer personally.
- The minimum age is set on each product by the owner: see How do I set a minimum age, a deposit, an expiry date or a discount rule on a product?.
- The owner can switch the question on or off in Settings, Checkout rules.
The law on selling age-restricted goods is your country's, and the person who sells is responsible. The till only reminds you.
The barcode is not known. What do I do?
The till looks the barcode up by itself and opens a window with what it found. If you may create products, check the details, type the price and import it. If not, press Sell once as pending item, type a name and a price, and a manager approves the product later.
- You scan a barcode that is not in the store's catalogue. The till says it is looking it up online. This takes a few seconds and does not block the till.
- A review window opens. It shows the name, brand, size and picture that were found, or empty boxes when nothing was found.
- Then:
- You may create products: correct what is wrong, type the selling price and import the product. It is added to the sale and stays in the catalogue. See How do I check and import a product that Smart Scan found?.
- You may not: press Sell once as pending item, type or correct the name, type the price. The item is sold in this sale and waits for a manager under Products, Pending imports. See What does "Sell once" do?.
Other messages
- Offline: barcode queued for lookup: there is no internet. The barcode is kept and searched later; you can still sell the item once. See What does Smart Scan do when there is no internet?.
- Invalid barcode (check digit). Scan again.: the scan was read badly. Scan again, or type the digits under the bars.
- Scanning the same code again while the search runs does nothing: wait for the window.
Ask before guessing a price. An item sold once is checked by a manager afterwards.
The till asks for a serial number. What do I do?
The product is sold with a serial number per unit. Scan or type the serial number printed on the box or the device. Each unit is its own line, and the receipt prints the serial number and the warranty date.
- Add the product. The till asks: Scan or type the serial number of this unit.
- Scan the serial barcode on the box, or type the number, and confirm.
- The line is added with quantity 1. For a second unit, add the product again and give its own serial number.
Messages
- This serial number is already in the basket. You scanned the same unit twice.
- This serial number was already sold. The till refuses it. Check that you have the right box, then call a manager.
- This serial number is not known. The unit was never entered as received. The till asks before selling it anyway.
- The quantity of such a line cannot be changed: one serial number per line.
- After the sale the unit is marked sold, with the customer if one is attached and the warranty end date. Staff can look a serial number up later: see How do I sell products with serial numbers and keep track of the warranty?.
How do I choose a size or colour at the till?
Scan the label of the piece: each size and colour has its own barcode, so the right one is added. If you tap the article's quick key instead, the till shows its sizes and colours with price and stock, and you pick one.
- By scanning: the barcode on the label belongs to one size and colour. Nothing else to do.
- By quick key: tap the article. A list opens with each size / colour, its price and its stock. Tap the one the customer takes.
- By name: type the name. Each size and colour is listed as its own product.
Each size and colour has its own stock, so sell the one that is really in the customer's hand. Selling "M" for an "L" makes both counts wrong.
To swap a size or colour for a customer who comes back, a clothing store has Exchange size or colour: see A customer wants another size or colour. How do I exchange it?.
I cannot find a button on the till. Where is it?
The row under the basket holds the buttons chosen for this till. Every other button is under More. Some buttons exist only for a type of business, and the shortcut keys work whether a button is shown or not.
Where to look
- The row under the basket: the buttons your store uses most.
- More, at the end of that row: All the other buttons. On a small window, buttons that do not fit in the row move here by themselves.
- The top of the screen: Qty ×, Price check, Hold (F4), Recall (F5), Quote / order.
- The right side: the customer, the totals, Quick keys and the payment buttons.
Buttons that depend on the store
| Button | Shown when |
|---|---|
| Read scale, Tare | the store sells by weight |
| Exchange size or colour | the store has products in sizes or colours |
| Send to kitchen, Save table, Line note, Modifiers, Course, Move, Split the bill, Tip, Kitchen screen, Reservations | the type of business is café / restaurant |
In a café or restaurant the Returns button reads Refunds.
The owner chooses which buttons are in the row, per till, in Settings, Checkout buttons: see How do I choose which buttons are in the row under the basket?.
How do I print a receipt again?
Press Reprint, choose the sale from the list of recent sales, and the receipt prints again as a copy.
- Press Reprint. It is in the button row or under More.
- The window Recent sales lists the last 30 sales with receipt number, total and time. Choose one.
- The receipt prints, marked as a copy. The drawer stays closed.
- Reprinting needs the right to do so; otherwise the till asks for a manager's approval.
- For an older receipt, the owner or a manager finds it in Reports, Receipts, by date, hour or payment method: see How do I find an old receipt and print it again?.
- Nothing prints at all? See The receipt does not print. What do I check?.
How do I open the cash drawer without a sale?
Press Open drawer or F9. It needs the right to open the drawer without a sale, unless the owner allowed everyone on this till, and every opening is recorded with your name and the time.
- Press Open drawer (in the button row or under More), or F9 (Ctrl+O on a laptop).
- If your role may not do it, the till asks for a manager's approval.
- The drawer opens. Close it as soon as you are done.
- Money put in or taken out must be recorded, or the count at the end of the shift will not match: see How do I record cash put into or taken out of the drawer?.
- The owner sees drawer openings without a sale on the Dashboard, in the loss watch.
- Who may open the drawer is set per till by the owner: see How do I decide who may open the cash drawer without a sale?.
- The drawer did not open? Press Open drawer again within 10 seconds. The till asks Did the drawer not open? and offers the drawer test, which tries the common settings one by one and keeps the one that works: see How do I set up the cash drawer, and what is the drawer test?.
The till shows "Low stock" or "Out of stock after this sale". Can I still sell?
Yes. The message only warns that the product is at or under its reorder level, or that none will be left after this sale. It never blocks the sale. Tell the person who orders stock.
- Low stock: … left appears on the message line after you add a product whose remaining stock is at or under its reorder level.
- Out of stock after this sale means the count reaches zero, or goes below it, with this basket.
- The orange button at the top of the screen shows how many products are low. It is shown to users who may see stock, and opens Inventory on the low-stock list: see How do I see what is running low, and what has not sold for a long time?.
If the till says nothing is left but the product is in the customer's hand, the stock count is wrong. Sell it, and tell a manager so the stock is corrected.
The owner can switch both warnings off in Settings, Checkout rules.
Why does the till show prices in two currencies?
Your store uses a second currency. Each line and the total are shown in the main currency and in the second one, at the rate the owner set, so you can tell the customer the amount in either.
- Each line of the basket shows its price in both currencies. The total at the right does too.
- The amounts in the second currency are worked out with the store's rate: the daily market rate, or the store's own rate. The owner chooses in Settings, Currencies: see How do I set up a second currency and its exchange rate?.
- On the product form the price can be typed in either currency: see How do I enter a product's price in the second currency?.
- Currency symbols follow the language of the screen.
The customer can pay in either currency, or part in each, and you can give change in either: see The customer pays in the second currency. How do I take it and give change?.
The program or the PC stopped in the middle of a sale. Is the sale lost?
No. Start Ironloom POS again and sign in: the open basket comes back with its lines, and the till tells you it was recovered. Sales that were already completed are safe too.
- Start Ironloom POS again and sign in.
- Open Checkout. The basket is back, and a message says it was recovered.
- Check the lines with the customer, then continue to payment.
- If the stop happened during payment and you are not sure the sale went through, look at the last receipts with Reprint before taking the money a second time: see How do I print a receipt again?.
- A card payment is made on the card terminal, not in the program. If the terminal printed an approved slip, the customer has paid, whatever the till shows.
- After an unexpected close, the program offers to send a problem report to Ironloom. Sending it helps find the cause: see How do I report a problem to Ironloom?.
Ironloom POS cannot be closed while a sale is open: finish the sale, hold it or void it first.
How do I use the till with a touch screen?
Every button is large enough for a finger. Drag a finger over a list or a page to scroll it, tap a basket line to change its quantity, and use the on-screen keyboard and number pads to type.
- Scroll: drag a finger over any list, page, drop-down or window. It moves with the finger and glides on. A short tap still presses the button under the finger.
- Quantity: one tap on a basket line opens its quantity with a number pad.
- Numbers: wherever an amount, a quantity or a PIN is asked, a number pad is on the screen. Typing replaces the number that is selected.
- Text: the on-screen keyboard opens when you touch a text box, depending on the store's setting. Its button is in the top bar: see How do I switch between light and dark, change the keyboard language or open the on-screen keyboard? and How do I set the keyboard language and the on-screen keyboard?.
- Search: type a name on the on-screen keyboard; the matching products are listed while you type. Tap one.
- Back: the arrow at the top of the menu does what the Esc key does: see How do I go back to the previous screen or to my home page?.
- Small screen: buttons that do not fit in the row are under More: see I cannot find a button on the till. Where is it?.
Taking payment
How do I take a cash payment and give change?
Press PAY (F10), type the amount the customer hands you (or tap the button with that amount), press Cash, then Complete sale. The till shows the change in large figures and opens the drawer.

- Press PAY (F10) on the Checkout. The Payment window shows Amount due.
- Enter what the customer gives you:
- tap one of the amount buttons: the exact amount, or the next notes above it. This adds the cash payment in one step;
- or type the amount on the number pad and press Cash. Exact fills in the amount still due.
- Remaining shows what is still to pay, Change what to give back.
- Press Complete sale, or Enter.
- The drawer opens and the change is shown in large figures. Give the change and the receipt, and close the drawer.
- Quick way: with the Payment window open and nothing typed, Enter takes the whole amount in cash; Enter again completes the sale.
- Wrong amount entered: double-click the payment in the list and confirm to remove it, then enter it again.
- Money boxes add the thousands separators while you type (89,500).
- If the store rounds cash totals, the rounding is shown on the receipt.
How do I take a card payment?
Press Card. The till shows the amount in large digits: type it on your card terminal, let the customer pay, then press APPROVED on the till. Only then is the payment added.
Ironloom POS works with a stand-alone card terminal: the terminal from your bank is not connected to the till, and you confirm the result on the screen.
- In the Payment window, press Card (or F2). To take only part by card, type that amount first.
- The till shows: Type this amount on the card terminal: with the amount in large digits.
- Type the amount on the card terminal and let the customer tap, insert or swipe the card.
- Look at the terminal:
- it says approved: press APPROVED;
- it says declined: press DECLINED and see The card was declined. What now?;
- the card was never tried: press Cancel (card not tried).
- If the store asks for them, type the Approval code printed on the terminal slip, and the Last 4 card digits.
- Press Complete sale. The drawer stays closed for a card-only sale.
- The till never asks for the full card number. Do not type it anywhere.
- Whether the approval code and the last 4 digits are asked, optional or required is the owner's choice: see How do I set the rules for card payments?.
- At the end of the shift, the card total of the till is compared with the terminal's own total: see At closing the till asks for the card total. What do I type?.
Press APPROVED only after the terminal has said so. A sale completed by mistake as a card payment makes the card total wrong at the end of the day.
The card was declined. What now?
Press DECLINED. The Payment window stays open with the amount unchanged, so the customer can try again, use another card, pay in cash, or split. Nothing is lost and no payment was added.
- The terminal says the card is declined. On the till, press DECLINED.
- The Payment window shows Card declined and waits. Choose with the customer:
- try again or another card: press Card again;
- cash: take the cash as usual: see How do I take a cash payment and give change?;
- part by card, part in cash: see How do I split a payment between two methods?;
- no payment now: press Cancel. You are back at the Checkout with the basket intact, and can hold the sale: see How do I put a sale on hold and bring it back?.
- A decline is not an error of the till. The reason is between the customer and their bank; the terminal slip may say more.
- Every decline is written in the audit log with the amount and the till.
How do I split a payment between two methods?
In the Payment window, type the first amount and press its method, then do the same for the next. Remaining shows what is still due after each one. Press Complete sale when it reaches zero.
- Press PAY (F10), or Split on the Checkout.
- Type the first amount, for example 20, and press the method, for example Card.
- The payment appears in the list and Remaining shows the rest.
- Enter the next payment the same way. For the last one you can leave the amount empty: the till takes what remains.
- When Remaining is zero, press Complete sale.
- Only cash may be more than the amount due; the difference is the change. A card, gift card or account payment is never more than what remains.
- To remove a payment entered by mistake, double-click it in the list and confirm.
- Any methods can be mixed: cash, card, gift card, voucher, account, store credit, wallet, cheque.
- The receipt lists each payment.
Splitting a restaurant bill between guests is something else: see How do I move guests to another table, or split the bill?.
The customer pays in the second currency. How do I take it and give change?
In the Payment window, choose the currency with the two buttons above the amount box, then type what the customer hands you in that currency and press Cash. The till shows what remains and the change in both currencies.
- Press PAY (F10). Above the amount box are two buttons with the currency codes, for example USD and LBP.
- Press the currency of the money in your hand. The label Amount received and the amount buttons change to that currency.
- Type the amount, or tap an amount button, and press Cash.
- Remaining and Change are shown in both currencies, worked out exactly in each, not rounded from one to the other.
- Part in one currency and part in the other? Enter the first, switch the currency, enter the second.
- Press Complete sale.
Change
- When the store allows change in the second currency, the change window lets you choose: all in the main currency, all in the second, or split between them.
- Give exactly what the screen shows, in the currency it shows. The drawer count at the end of the shift is kept per currency: see How do I count the notes and coins, and what if the drawer holds two currencies?.
The rate is the store's rate of the day, set by the owner: see How do I set up a second currency and its exchange rate?. The receipt shows what was paid in each currency.
How do I take a gift card or a voucher as payment?
In the Payment window, press Gift card or Voucher and scan or type its code. The till checks it, takes what it covers, and shows what is still due.
Gift card
- Press PAY (F10), then Gift card.
- Scan the card's barcode or type its code.
- The till takes the amount due, or the card's balance if that is less, and shows the balance left on the card after this sale.
- If something is still due, take it with another method: see How do I split a payment between two methods?.
Voucher
- Press Voucher and type or scan its code.
- A voucher for an amount pays that amount, at most what is due. A voucher for a percentage takes that share of the sale.
- A voucher is used once in a sale.
Messages
- Gift card expired or Voucher expired: its date has passed.
- "Not found", or a status such as used or void: the code is wrong, or the card or voucher can no longer be used.
- Balance used: nothing is left on the gift card.
- Already used in this sale: the voucher was already entered.
A gift card keeps what is not spent, for next time. Issuing gift cards and vouchers is done in Customers: see How do I issue a gift card or a voucher?.
How do I sell on account, or use a customer's store credit?
Attach the customer to the sale first. In the Payment window, On account puts the amount on the customer's account to be paid later, and Store credit uses money the store already owes the customer.
Sale on account (the customer pays later)
- Attach the customer: see How do I attach a customer to the sale?.
- Press PAY (F10), then On account. To put only part on account, type that amount first.
- Press Complete sale. The amount is added to what the customer owes.
- Selling on account needs the right to do so; otherwise the till asks for a manager's approval.
- If the sale would take the customer above their credit limit, the till refuses and shows the balance and the limit. Take another payment, or ask the owner to change the limit: see How do I let a customer buy on credit and record what they pay back?.
- When the customer comes to pay what they owe, the payment is recorded in Customers: see How do I let a customer buy on credit and record what they pay back?.
Store credit (the store owes the customer)
A customer has store credit after a return refunded as credit, or a deposit on an order.
- Attach the customer.
- Press PAY (F10), then Store credit. The till uses the credit up to the amount due.
- If No store credit available appears, the customer has none.
Without a customer on the sale, both buttons ask you to attach one first.
How do I record a payment by mobile wallet or by cheque?
In the Payment window, press Wallet or Cheque, type the reference or the cheque number, and complete the sale. The till records the payment; the money itself moves outside the till.
Wallet
Use it for money the customer sends with a phone app or a transfer.
- Check on your own phone or terminal that the money has arrived.
- In the Payment window, type the amount if it is only part of the sale, and press Wallet.
- Type a reference, such as the transaction number or the sender's name, and confirm.
- Press Complete sale.
Cheque
- Press Cheque.
- Type the Cheque number and confirm.
- Press Complete sale and keep the cheque with the day's takings.
- The till does not connect to any wallet service or bank: it records what you tell it. Confirm the money yourself before completing the sale.
- Wallet and cheque totals are shown on their own lines in the X and Z reports, apart from the cash in the drawer.
How do I print, email or skip the receipt?
The receipt prints by itself when the sale is completed. To email it too, tick Email receipt in the Payment window and check the address. Whether the till prints always, asks first or never prints is a store setting.
Printing
The owner chooses in Settings, Receipt:
- always: every sale prints a receipt;
- ask: after each sale the till asks whether to print;
- never: nothing prints unless you use Reprint.
When cash was paid the drawer opens either way.
By email
- In the Payment window, tick Email receipt.
- A box opens for the address. With a customer attached, their email is filled in. Correct or type it.
- Complete the sale. The receipt is sent after the sale.
Email needs the store's mail settings to be filled in once: see How do I set up email, so the till can send receipts and the daily summary?.
Later
- Print a copy of a recent receipt with Reprint: see How do I print a receipt again?.
- A business customer who needs a full-page invoice gets an A4 tax invoice: see How do I give a customer a full-page tax invoice?.
How do I sell to a customer who does not pay tax?
Attach the customer to the sale. If their record is marked tax exempt, the till removes the tax from the whole sale by itself and prints the exemption on the receipt. You cannot remove tax by hand at the till.
- Attach the customer before payment: see How do I attach a customer to the sale?.
- The message line says Tax-exempt customer: no tax on this sale. The totals change at once.
- Take the payment as usual.
- With prices that do not include tax, no tax is added. With prices that include tax, the tax part is taken off each price.
- The receipt prints the note "Tax exempt" with the customer's certificate number.
- A business customer marked as reverse charge is treated the same way: the till says Reverse-charge customer: no tax on this sale. and the invoice carries the customer's tax number.
- A customer becomes tax exempt in their record, where a manager ticks the box and enters the certificate: see How do I mark a customer as tax exempt?.
Who may buy without tax, and which proof is needed, is decided by your country's tax law. Keep a copy of the certificate.
How do I leave the Payment window without completing the sale?
Press Cancel in the Payment window, or Esc. You are back at the Checkout with the basket unchanged. Payments typed into the window are dropped, and nothing is recorded as paid.
- In the Payment window, press Cancel.
- The basket is as it was. Add or remove products, then press PAY (F10) again.
- Complete sale can be pressed only when the whole amount is covered. Until then the sale is not finished.
- To correct one payment without leaving, double-click it in the list and confirm its removal.
- If the customer already paid by card on the terminal and you then cancel, the terminal has taken the money but the till has no sale. Open Payment again and record the card payment, or refund on the terminal. Tell a manager.
- The customer leaves without paying? Hold the sale or void it: see How do I put a sale on hold and bring it back? and How do I remove a product from the sale, or cancel the whole sale?.
Returns and exchanges
How do I take a product back when the customer has the receipt?
Open Returns (F11), scan the QR code on the receipt or type its number, choose the items and quantities coming back, then press Refund and choose how the money is given back.
- Open Returns in the menu, or press F11 at the Checkout (Ctrl+T on a laptop). Scanning a receipt's QR code at the Checkout opens it directly.
- Scan the QR code on the receipt, or press Find receipt and type the receipt number. The sold items are listed, with what was already returned.
- Choose what comes back:
- Return all takes every line;
- or select a line, press Set qty and type the quantity returned.
- For an item that cannot be sold again, select its line and press Damaged: see Does a returned product go back into stock, or is it damaged?.
- Press Refund. Choose Refund to, type the Reason and confirm: see How is the money given back for a return?.
- The return receipt prints. For a cash refund the drawer opens.
- You cannot return more than was sold, and what was returned before is counted.
- A refund above your limit needs a manager's approval: see How do I limit the discounts and refunds a cashier may give?.
- In a café or restaurant this screen is called Refunds.
The customer has no receipt. Can I still take the product back?
First try to find the sale: Reports, Receipts lists every receipt by date, hour and payment method. If it cannot be found, a user with the right to do so uses Blind return (no receipt) and scans the product.
Try to find the sale first
A return against the real sale is safer: the price, the tax and the payment method are known.
- If the customer paid by card or is a known customer, a manager can find the receipt in Reports, Receipts: see How do I find an old receipt and print it again?.
- Recent sales are also in Shifts & Cash. Select the sale and press Returns: it opens here, loaded.
Return without a receipt
- Open Returns and press Blind return (no receipt). The button is shown only to users whose role allows it.
- Scan the product, or type its barcode or SKU. It is added at today's price, quantity 1.
- Repeat for other products. Use Set qty to change a quantity.
- Press Refund and continue as usual: see How is the money given back for a return?.
- The refund is at today's price, not the price the customer may have paid. If the store's policy is store credit for returns without receipt, choose that.
- A return without a receipt is recorded as such, with the user and the reason, so the owner can review it.
Whether to accept a return without a receipt is the store's policy, and in some countries the law's. The till lets authorised staff do it; it does not decide.
How is the money given back for a return?
In the Refund window, choose Refund to: cash, card, store credit or a new gift card. The till proposes the method the customer paid with. A reason is required.
| Refund to | What happens |
|---|---|
| Cash | The drawer opens. Give the amount shown. Needs the right to refund in cash. |
| Card | The till records a card refund. You must also make the refund on the card terminal: the till does not send it. |
| Store credit | The amount is kept on the customer's account for a later purchase. Needs a customer: the one on the sale, or type their phone number in the window. |
| Gift card | A new gift card is created for the amount and printed with its code. |
- Press Refund in Returns. The window shows the total and the number of lines.
- Choose Refund to.
- Type the Reason. It is required and is kept with the return.
- Leave Restock ticked when the goods go back on the shelf: see Does a returned product go back into stock, or is it damaged?.
- Confirm. The return receipt prints with its own number.
- Store credit needs a customer: no customer was found for that phone number. Add the customer first: see How do I add a customer?.
- Refund above your limit: a manager approves with their PIN: see How do I limit the discounts and refunds a cashier may give?.
- If the sale had an A4 invoice, the till offers to print an A4 credit note: see How do I give a credit note for a return?.
Does a returned product go back into stock, or is it damaged?
A returned product goes back into stock when Restock stays ticked and the line is in good condition. Mark a line Damaged when it cannot be sold again: the customer is refunded, and the stock does not go up.
- Good condition: leave the line as it is and keep Restock ticked in the Refund window. The quantity is added back to stock.
- Damaged, opened or faulty: select the line and press Damaged before you press Refund. Press it again to change it back.
- Nothing goes back on the shelf: untick Restock in the Refund window. No line of this return is restocked.
Marking returned goods as damaged needs the right to do so; otherwise the till asks for a manager's approval.
The customer's refund is the same either way. The difference is for the store: a damaged return is a loss. Other stock losses are recorded in Inventory: see How do I record stock that was damaged, expired, stolen or used by the store?.
How do I exchange a product for another one?
An exchange is a return followed by a sale. Take the product back in Returns and refund it as store credit, then sell the new product and pay with that credit. The customer pays, or receives, only the difference.
- Take the old product back: see How do I take a product back when the customer has the receipt?.
- In the Refund window choose Store credit as Refund to. The amount is now on the customer's account. Without a customer on the sale, type their phone number.
- Go to Checkout, attach the same customer and scan the new product.
- Press PAY (F10), then Store credit. The credit is used first.
- If the new product costs more, take the rest in cash or by card. If it costs less, the rest stays as credit for next time, or refund the difference in step 2 by returning in cash.
- For a customer with no record, refund in cash and take the cash again for the new sale. Two receipts are printed.
- In a clothing or shoe store, a size or colour of the same article is swapped in one step with Exchange size or colour on the till: see A customer wants another size or colour. How do I exchange it?.
A finished sale was a mistake. Do I void it or return it?
Void the sale when the whole sale was a mistake and it is still the same day: Shifts & Cash, the recent sales tab, Void sale. Use a return when the customer brings goods back, when only part comes back, or when the month is already closed.
Void a finished sale
- Open Shifts & Cash and the tab with the recent sales.
- Select the sale and press Void sale. It needs the right to void; the button is not shown otherwise.
- Type the reason. It is required.
What the void does:
- the products go back into stock;
- loyalty points earned are taken back, points spent are given back;
- an amount put on the customer's account is taken off it;
- the sale stays in the list, marked as voided, with the reason and who did it. Nothing is deleted.
What it does not do: it does not move money. Hand back the cash yourself, and refund a card payment on the card terminal.
Use a return instead when
- only some of the products come back;
- the customer comes back another day;
- the sale is in a month that the accountant has closed: the till then refuses the void.
See How do I take a product back when the customer has the receipt?.
How do I give a credit note for a return?
When the returned sale had an A4 invoice, the till offers an A4 credit note as soon as the refund is done. You can also print it later from Reports, in the returns list, with Credit note.
At the moment of the return
- Make the return as usual: see How do I take a product back when the customer has the receipt?.
- If the original sale had an A4 invoice, the till asks: The sale had an A4 invoice. Print an A4 credit note for this return?
- Answer yes. The credit note opens in a preview. Print it, or save it as PDF.
Later
- Open Reports and the tab that lists the returns.
- Select the return and press Credit note.
- Credit notes have their own number series, without gaps. A number is given once and never reused.
- The credit note refers to the original invoice, lists the returned lines and shows the tax being reversed.
- Opening the credit note of the same return again shows the same number.
- Returns reduce the sales and the tax in the tax return figures: see Where are the figures for my tax return (VAT, GST, sales tax)?.
What a credit note must show differs by country. Check the layout with your accountant before you rely on it.
Shifts and cash
How do I open a shift?
Count the cash you put in the drawer, open Shifts & Cash, press Open shift and type that amount as the Opening float. The till also asks for it by itself at the first sale when no shift is open.
- Count the notes and coins placed in the drawer to give change. This is the float.
- Open Shifts & Cash and press Open shift.
- Type the amount in Opening float. A store with two currencies types the float of each currency.
- Confirm. The top bar now shows since when the shift is open.
- A shift belongs to one till. Each till has its own shift and its own drawer.
- If you start selling without a shift, the till opens this window first. A user who may not open a shift is told No shift is open on this till. Open a shift to start selling. and must ask a supervisor.
- The float is counted back at the end, so type what is really in the drawer: see How do I close the shift and count the drawer?.
- A shift can stay open while cashiers change. Whoever closes it counts the drawer.
How do I record cash put into or taken out of the drawer?
Open Shifts & Cash, press Cash in or Cash out, type the amount and the reason. The drawer opens, and the movement is counted in the cash the till expects at closing.
- Open Shifts & Cash.
- Press Cash in when money is added to the drawer (more change), or Cash out when money is taken out.
- Type the amount. A store with two currencies also chooses the currency.
- Type the reason and confirm. The drawer opens.
- Every movement is listed in the second tab of Shifts & Cash, with the time, the amount, the reason and the user, and is printed on the X and Z reports.
- Each needs its own right; without it the till asks for a manager's approval.
- A shift must be open.
Use the right tool
| What happened | Use |
|---|---|
| Change added, or cash removed for safekeeping during the shift | Cash in / Cash out |
| Something was bought with drawer money (bread, cleaning, a taxi) | an expense, so the accountant sees what it was for: see How do I record an expense, such as something paid from the drawer? |
| Cash goes to the safe or to the bank | Safe & bank: see How do I record money moved to the safe or deposited at the bank? |
Money that leaves the drawer without being recorded shows up as "short" when the shift is closed.
What is an X report and how do I print one?
An X report shows the shift's totals so far without closing it: sales, payments by method, cash movements and the cash expected in the drawer. Open Shifts & Cash and press X report. You can run it as often as you like.
- Open Shifts & Cash and press X report. The button is shown to users whose role allows it.
- The report opens on the screen.
- The till asks whether to print it. Answer yes for a paper copy.
X or Z?
| X report | Z report | |
|---|---|---|
| When | any time during the shift | once, when the shift is closed |
| Closes the shift | no | yes |
| Cash counted | no | yes, with over / short |
| Number | none | its own Z number, in sequence |
A store with two currencies sees each currency on the report.
To close the shift and get the Z report, see How do I close the shift and count the drawer?.
How do I close the shift and count the drawer?
Open Shifts & Cash, press Close shift (Z), count the notes and coins in the drawer and type how many of each. The till compares your count with what it expects, prints the Z report and makes a backup.
Before you start: finish or void any sale on the screen, and deal with held sales: see Where do I see the recent sales and the sales on hold?.
- Open Shifts & Cash and press Close shift (Z).
- The counting window opens. For each note and coin, type how many are in the drawer. The total adds up as you type. See How do I count the notes and coins, and what if the drawer holds two currencies?.
- The count is blind: the expected amount is not shown, unless your role may see it.
- Add a remark under Notes if something happened, and confirm.
- The till shows your counted total and asks to close. Confirm.
- If the store uses the card check, type the card total printed by the card terminal: see At closing the till asks for the card total. What do I type?.
- The Z report prints, the drawer opens so you can take the cash out, and a backup of the data is made.
- A message shows the Z number and the difference between the count and the expected cash: see The drawer count does not match. What does over / short mean and what do I check?.
- Closing a shift opened by another user needs an extra right.
- A closed shift cannot be opened again. Mistakes are corrected with the next shift, and the difference stays on the Z report.
- Selling is not possible until a new shift is opened.
How do I count the notes and coins, and what if the drawer holds two currencies?
The counting window has one card per currency in the drawer. On each card, type how many of each note and coin you have; the till multiplies and adds. Each currency is counted and compared on its own.
- One card per currency: the main currency, the second currency, and any other currency taken in cash during this shift.
- Banknotes and Coins: each value has a box. Type the number of pieces, not the amount: 7 notes of 20 is typed as 7.
- Other / coins total: a box for an amount you do not want to count piece by piece, such as a bag of mixed coins.
- Totals: each card shows its counted total. Staff allowed to see it also see Expected cash and Over / short for that currency.
- All currencies together, at today's rate: one line adds everything up in the main currency, for information.
- Notes: write what the next person should know, for example a note set aside as doubtful.
The notes and coins listed are those of each currency as issued; 155 currencies are built in. If your store does not use a value, or uses one that is missing, the owner edits the list per currency in Settings, Checkout rules.
Count each currency separately and never convert in your head. The Z report prints each currency with its own expected amount, count and difference.
The drawer count does not match. What does over / short mean and what do I check?
Over / short is your count minus the cash the till expects. A minus means money is missing, a plus means there is more than expected. Look first for cash that moved without being recorded, and for change given in the wrong currency.
How the till works out the expected cash: opening float + cash sales − cash refunds + cash in − cash out − expenses paid from the drawer − money moved to the safe or bank.
What to check, in this order
- Recount. Most differences are counting mistakes, often a bundle of notes counted as one.
- Cash in and cash out. Was change added or money removed without being recorded? See How do I record cash put into or taken out of the drawer?.
- Expenses. Was something paid from the drawer and not entered? See How do I record an expense, such as something paid from the drawer?.
- Card pressed for cash, or cash pressed for card. The sale total is right, but the drawer and the card total are each off by the same amount: see At closing the till asks for the card total. What do I type?.
- Two currencies. Change given in the other currency than the one shown on the screen leaves one currency over and the other short by the same value.
- Refunds. A cash refund made without a return in the till leaves the drawer short.
- A sale not rung up. Money in the drawer with no sale gives a plus.
- The difference is printed on the Z report and stays in the list of shifts. It cannot be changed afterwards.
- Write what you found under Notes in the counting window, before you close.
- The owner sees drawer openings without a sale, voids and discounts per user on the Dashboard and in Reports.
At closing the till asks for the card total. What do I type?
Run the settlement (end of day, batch close) on the card terminal and type the card total printed on its slip. The till compares it with its own card total and tells you if they differ, and why that usually happens.
- Close the shift as usual: see How do I close the shift and count the drawer?. After the cash count, the window Card check opens.
- On the card terminal, run the settlement. It prints a slip with the total of the day's card payments.
- Type that total in Card total on the terminal slip and continue.
- The result:
- Card totals match. Nothing more to do.
- Card difference with an amount. The till explains the likely cause and asks whether to keep this total and close, or to type it again.
What a difference means
- The terminal is higher: a card was charged on the terminal, but the sale was not finished in the till, or it was finished as cash.
- The till is higher: APPROVED was pressed for a card that was not charged, or a cash sale was recorded as card.
Compare the terminal's list of payments with the receipts of the day in Reports, Receipts, filtered on card.
- The difference is printed on the Z report and written in the audit log.
- The owner chooses whether this check is off, optional or required in Settings, Card payments. When it is required, the shift cannot be closed without it: see How do I set the rules for card payments?.
How do I print a Z report again, or see an old shift?
Open Shifts & Cash. The first tab lists every shift with its Z number. Select a closed shift and press Reprint Z.
- Open Shifts & Cash. The first tab lists the shifts, newest first.
- Each line shows the Z number, the till, the user, when it was opened and closed, the Opening float, Expected cash, Counted cash and Over / short.
- Select a closed shift and press Reprint Z.
- Z numbers run in sequence and are never reused. A missing number would mean a missing day, so keep the printed reports in order.
- The reprint shows the same figures as the day it was closed. A closed shift is never recalculated.
- For totals over several days, use Reports: see How do I see my sales for a period, by day, product, department or cashier?.
Where do I see the recent sales and the sales on hold?
Open Shifts & Cash. The tab Recent sales lists the last 300 sales, where you can view, reprint, invoice, void or return one. The tab Held sales lists the baskets waiting on hold.
Recent sales
Each line shows the receipt number, the date and time, the total, what was paid, the status, the number of lines and the user. Select a sale, then:
| Button | What it does |
|---|---|
| Reprint | prints the receipt again as a copy: see How do I print a receipt again? |
| View | shows the receipt on the screen without printing |
| A4 invoice | opens a full-page tax invoice for this sale: see How do I give a customer a full-page tax invoice? |
| Void sale | cancels a finished sale, for users who may: see A finished sale was a mistake. Do I void it or return it? |
| Returns | opens the Returns screen with this sale loaded: see How do I take a product back when the customer has the receipt? |
For older receipts, or to search by hour or payment method, use Reports, Receipts: see How do I find an old receipt and print it again?.
Held sales
Each line shows the label, the time and the total of a basket put on hold.
- To continue one, go to the Checkout and press Recall (F5): see How do I put a sale on hold and bring it back?.
- To throw one away, select it here and press Delete.
Look at this tab before closing the shift, so that no customer's basket is forgotten.
How does the employee time clock work?
Open Shifts & Cash, tab Time clock, and press Clock in when you start and Clock out when you leave. The store can also have the till ask, or do it by itself, at sign-in and sign-out. Managers print the hours per employee with Hours report.
Clock in and out
- Open Shifts & Cash and the tab Time clock.
- Press Clock in at the start of your work, Clock out at the end.
- The list shows the entries of the last 31 days. You see your own; managers see everyone's.
At sign-in and sign-out
In Settings, Checkout rules, the owner sets Employee time clock at login and logout:
- off (the default): staff use the buttons above;
- Ask to clock in / out: the till asks after you sign in and when you sign out;
- Clock in / out automatically: signing in clocks you in, signing out clocks you out.
Hours report
- Press Hours report and choose the period.
- The report gives, per employee, the hours as hours:minutes and as a decimal number, and the days worked, with the detail lines.
- Export it to Excel, CSV or PDF.
Corrections
A user who may manage users can Edit or Delete an entry, for example when someone forgot to clock out. Every correction is kept in the audit log with the values before and after.
The time clock records hours. Pay, overtime and breaks follow your country's labour law and your contracts; the till does not calculate them.
How do I record an expense, such as something paid from the drawer?
Open Shifts & Cash, tab Expenses, press Add expense and enter the category, the amount, where the money came from and the receipt number. An expense paid from the drawer is taken out of the cash the till expects at closing.
- Open Shifts & Cash and the tab Expenses.
- Press Add expense.
- Fill in:
- Date and Category (rent, electricity, cleaning, transport and so on);
- Amount paid (tax included);
- Tax inside the amount: the tax the store can claim back, or No tax to claim back;
- Paid from: Cash drawer, Safe, Bank, Card or Owner (own money);
- Supplier, Receipt / invoice number and a Note;
- Photo of the receipt (optional): a picture of the paper receipt, kept with the expense.
- Save.
- From the drawer: a shift must be open on this till. The money leaves the drawer in the till's books, so take it out of the drawer for real.
- A wrong expense is never deleted. Select it and press Void expense, with a reason. If it was paid from the drawer of the shift that is still open, the amount goes back into the drawer's expected cash.
- The line under the list shows the expenses of this month.
- Expense categories (for users who see the finance reports) adds categories, with names in Arabic and French, and links each to its account for the accounting export.
Expenses go into the daily journal, the profit and loss report and the tax return figures: see What is in the daily journal?, How do I see whether the store made a profit (profit and loss)? and Where are the figures for my tax return (VAT, GST, sales tax)?.
How do I record money moved to the safe or deposited at the bank?
Open Shifts & Cash, tab Safe & bank, press Move money, and choose where the money comes from and where it goes: drawer, safe, bank or card settlement. The till keeps the safe's balance and prints a deposit slip.
- Open Shifts & Cash and the tab Safe & bank.
- Press Move money. Two shortcuts fill in the usual cases: Drawer to bank and Card money to bank.
- Fill in From and To: Cash drawer, Safe, Bank or Card settlement.
- Type the Amount, the Date, the Deposit slip / bank reference and a Note.
- Save. The till offers to print a deposit slip with a place for the signature.
The usual cases
| What happens | From | To |
|---|---|---|
| Too much cash in the drawer during the day | Cash drawer | Safe |
| The day's cash goes to the bank | Cash drawer or Safe | Bank |
| Change is taken from the safe for the drawer | Safe | Cash drawer |
| The bank pays out the card payments | Card settlement | Bank |
- Card settlement: type the amount the bank's statement shows as paid, and the Bank fee kept back (card settlements only). The fee is recorded as a cost.
- From or to the drawer: a shift must be open on this till, and the move is counted in the drawer's expected cash, like a cash in or cash out.
- Safe balance is shown under the list.
- A wrong entry is never deleted: select it and press Void, with a reason. Deposit slip prints the slip of the selected entry again.
These movements go into the daily journal for the accountant: see What is in the daily journal?.
Products
How do I add a product?
Open Products and press New product, or scan the product's barcode on that screen. The till looks the barcode up, fills in what it finds, and you add the price. A product without a barcode is filled in by hand.

- Open Products and press New product.
- The till asks: Scan or type the barcode (leave empty to fill in everything by hand).
- With a barcode, Smart Scan looks it up and opens the review window with the name, brand, size and picture it found: see How do I check and import a product that Smart Scan found?. Without one, the product form opens empty.
- Fill in at least the name, the Price, the Department and the Tax.
- Save. The product can be sold at once.
The other fields
- Barcodes (one per line): one per line; a product can have several: see Can a product have several barcodes, and can two products share one?.
- Cost: what you pay for it. Only users who may see costs see this box.
- Unit, Sold by weight, PLU (scale code): for goods sold by weight: see How do I set up a product that is sold by weight?.
- Track stock, Reorder point, Reorder qty: whether the stock is counted, and when to reorder.
- Quick key and Short name (quick keys): a button on the till: see How do I put a product on a quick key of the till?.
- Allow discount, Allow price override, Minimum age, Has expiry (FEFO): see How do I set a minimum age, a deposit, an expiry date or a discount rule on a product?.
- Product picture and names in other languages: see How do I add a picture to a product? and How do I give a product a name in Arabic or French?.
To add many products quickly, scan them one after another in Smart Import: see How do I add many products quickly by scanning them?. To bring a list from a file, see How do I import or export my products as a spreadsheet?.
How do I change a product's price or details?
Open Products, find the product by typing its name or scanning it, then double-click it or press Edit. Change the price or any other field and save. The new price applies from the next sale.
- Open Products.
- Find the product: type part of its name, SKU, barcode or PLU in the search box, or scan it. A scan filters the list to that product and selects it.
- Double-click the line, or select it and press Edit (Enter also opens it).
- Change what is needed and save.
- The list shows every product, with its picture, SKU, barcode, department, brand, price, cost, stock and whether it is active.
- A changed price does not touch sales already made, or a basket already on hold.
- To change many prices at once, see How do I change many prices at once?. For a price that starts on a date, see How do I set a price that starts and ends on dates I choose?.
- Changes to products are written in the audit log with the user.
- Editing needs the right to edit products; without it the list can be read but not changed.
How do I give a product a name in Arabic or French?
Each product has a name box for every language your store uses. Fill them in on the product form. On a screen in Arabic or French the product is shown, searched and printed under that name; an empty box falls back to the main name.
- Open the product: see How do I change a product's price or details?.
- Next to the main name are the boxes for the store's other languages. Type the name in each.
- Save.
- Which boxes are shown depends on the store's languages, chosen in Settings: see How do I change the language of the screens, and choose the languages my store uses?.
- The cashier can type either name in the search box; both are found.
- Departments and categories have the same boxes. Customers and suppliers can have an Arabic name too.
- When Smart Scan finds a product, it suggests Arabic and French names from a built-in word list. Check them before saving: they are suggestions: see How do I check and import a product that Smart Scan found?.
- A name left empty in a language is not an error: the main name is used on that screen and on receipts.
Can a product have several barcodes, and can two products share one?
Yes to both. Type each barcode on its own line in the Barcodes (one per line) box of the product. If a barcode is already on another product, the till tells you and asks whether to keep it on both; the cashier then chooses at the till.
Several barcodes on one product
- Open the product: see How do I change a product's price or details?.
- In Barcodes (one per line), type or scan each barcode on its own line. The first is the main one, shown in the list and printed on labels.
- Save.
Use this when the maker changed the packaging, or when the same item comes from two suppliers.
One barcode on two products
When you save, the till checks the other products. If it finds the barcode, it lists them under These barcodes are also on other products: and asks Keep them on both? At the till the cashier chooses the product.
- Answer yes when both really carry that code, for example two flavours with one barcode: see After a scan the till asks me to choose between several products. Why?.
- Answer no to go back and correct the barcode.
No barcode
A product needs no barcode. Sell it by name, quick key or PLU, or print your own label: see How do I print shelf labels?.
- A scanned barcode with a wrong check digit is refused, so typing mistakes are caught.
- A pack, such as a case of 12, can have its own barcode: see How do I sell the same product by the piece and by the pack?.
How do I set up a product that is sold by weight?
On the product form, tick Sold by weight, choose the Unit the price is for (kg, g, lb or oz), and type the price for one unit. Give it a PLU (scale code) or a quick key so the cashier can call it up without a barcode.
- Open or create the product: see How do I add a product?.
- Tick Sold by weight.
- Choose the Unit. The list offers the units of your store's measurement system: see How do I switch between kilograms and pounds (the measurement system)?.
- Type the Price for one unit, for example the price per kg.
- Optional: a PLU (scale code), the short number of the product on your labelling scale, and a Quick key for the till.
- Optional: Usual container weight (tare, grams) when the product is always weighed in the same container. The till then takes that weight off every time: see How do I take off the weight of a container (tare)?.
- Save.
- At the till the weight comes from the scale, from a typed weight, or from a label printed by a labelling scale: see How do I sell a product by weight?.
- For labels from a labelling scale, the PLU typed here must be the product's number on the scale, and the label layout is set once in Settings, Scale labels: see How do I make the till read the weight or price labels of my labelling scale, and set the containers for tare?.
- Stock of a weighed product is counted in its unit, with decimals.
How do I sell the same product by the piece and by the pack?
Keep one product and add its packs on the product form, one per line: name, how many pieces it holds, the pack price and the pack's barcode. Scanning the pack's barcode sells the whole pack and takes that many pieces from stock.
- Open the product: see How do I change a product's price or details?.
- In Pack unit: name|factor|price|barcode (one per line), type one pack per line, the four parts separated by the | sign. Example: Case|12|10.80|5012345678900
- name: what the receipt shows next to the product name;
- factor: the number of pieces in the pack;
- price: the price of the whole pack. Leave it empty to charge the piece price times the factor;
- barcode: the barcode printed on the pack.
- Save.
- At the till, the piece barcode sells one piece and the pack barcode sells one pack.
- Stock is always counted in pieces. A case of 12 takes 12 from stock.
- Unit at the top of the form is the unit of one piece (each, kg, litre and so on).
What are departments, categories and brands, and how do I manage them?
They are three ways to group products: a department is a section of the store, a category is a smaller group inside a department, and a brand is the maker. Manage each in its own tab of Products. Reports can total sales by any of them.
Departments
- Open Products and the tab Department.
- Press New, or select one and press Edit.
- Fill in the name (and the names in the store's other languages), the Default tax for new products of this department, a Color (#RRGGBB) and its place in the order.
Categories
In the tab Category, press New, type the name and choose the department it belongs to.
Brands
In the tab Brand, press New and type the name. Smart Scan also adds the brand of a product it imports.
- A product has one department, and optionally a category and a brand. Choose them on the product form.
- Deleting a department or category does not delete its products; they are left without one.
- Some rules use departments, for example promotions for a department, and tax holidays.
- Sales by department, category or brand: see How do I see my sales for a period, by day, product, department or cashier?.
How do I add a picture to a product?
On the product form, under Product picture, press Browse and choose an image file from the PC. The picture is copied into the till's own data folder and shown in the Products list and on the form. Smart Scan can also download a picture when it finds one.
From a file
- Open the product: see How do I change a product's price or details?.
- Under Product picture, press Browse and choose a picture (JPG or PNG).
- A preview is shown. Save.
The till keeps its own copy, so the original file can be moved or deleted afterwards.
From Smart Scan
When a product is found online and a source has a picture, the review window shows it and offers to download it. When no source has a picture, the window says so: see How do I check and import a product that Smart Scan found?. A store that has its own Google search key can also search for a picture there: see How do I choose the sources Smart Scan uses, and add my own keys?.
- Pictures are reduced in size when saved, so they do not slow the till.
- Pictures are included in the backups of the store's data.
- A picture found online may belong to someone else. For anything beyond showing it on your own till, check that you may use it.
How do I change many prices at once?
In Products, press Bulk price change, choose a department (or leave it empty to change the products shown in the list), type a percentage or a fixed amount, up or down, and choose whether to round to .99.
- Open Products.
- To change only some products that are not one department, type in the search box first so the list holds only those, for example a brand.
- Press Bulk price change.
- Choose the Department, or leave it empty: then the change applies to the products shown in the list (all products when the search box is empty).
- Type the change:
- Change % (e.g. 5 or -10): 5 raises prices by 5 %, -10 lowers them by 10 %;
- or fixed amount +/-: adds or takes off the same amount on every product.
- Tick Round to .99 if the new prices should end in .99, and type the Reason.
- The till says how many products will change and asks you to confirm.
- It needs the right to change prices in bulk.
- There is no undo button. Make a backup first (Settings, Backups), or reverse it with the opposite change. A percentage up and then the same percentage down does not give the old price back exactly.
- Prices in the second currency follow the new prices.
- Print new shelf labels afterwards: see How do I print shelf labels?.
How do I set a price that starts and ends on dates I choose?
In Products, tab Scheduled prices, press New, choose the product, type the price and the first and last day. The till changes the price on the first day and puts the old price back after the last day.
- Open Products. Select the product in the list first, then open the tab Scheduled prices and press New. With no product selected, the till asks you to search for it.
- Type the Price, the From date and the To date. The price is valid through the whole last day. Leave To empty for a price that stays.
- Save. The line appears in the list.
- The till applies scheduled prices by itself when their day comes. Apply now does it at once, for example after starting the till late.
- When the period ends, the product goes back to the price it had before.
- Delete removes a scheduled price that has not started.
- Every change made this way is written in the audit log.
- A scheduled price changes the product's price for everyone. For "buy two, get one" or a discount for members, use a promotion: see How do I create a promotion?.
How do I enter a product's price in the second currency?
When the store has a second currency, the product form shows two linked price boxes. Type the price in either one and the other fills itself at the store's rate. The price is kept in the main currency.
- Open the product: see How do I change a product's price or details?.
- Type the price in Price (main currency) or in the box of the second currency next to it.
- The other box changes as you type. Save.
- The Products list shows a column with the price in the second currency.
- Because the price is kept in the main currency, the second-currency amount moves when the rate moves. With a daily market rate, the amounts shown at the till change each day; the main-currency price does not.
- If your prices are really set in the other currency, make that one the main currency. Changing the main currency converts every price exactly: see How do I change the main currency of the store?.
- The rate and the choice of second currency are in Settings, Currencies: see How do I set up a second currency and its exchange rate?.
How do I print shelf labels?
In Products, select the product, press Print labels and type the number of copies. The label is printed on the label printer set up for this till, with the name, the price and the barcode.
- Open Products and select the product.
- Press Print labels.
- Type the number of copies and confirm.
- Labels are printed one product at a time. Repeat for each product whose price changed.
- It needs the right to print labels, and a label printer set up in Hardware: see How do I set up a label printer for shelf labels?.
- The label shows the name, the price, the SKU and the main barcode. A weighed product shows its price per unit; a product with sizes or colours prints as a hang tag with the size and colour.
- After a price change, replace the shelf label the same day, so the shelf and the till agree. In many countries the customer may ask for the price shown on the shelf.
How do I import or export my products as a spreadsheet?
In Products, Export CSV writes the product list to a file you can open in Excel. Import CSV/Excel reads a CSV or Excel file: products whose SKU already exists are updated, the others are created.
Export
- Open Products and press Export CSV.
- Choose where to save the file. Open it in Excel or any spreadsheet program.
Import
- Prepare a file with one product per line and the column names in the first line. The easiest way is to export first and keep the same columns.
- In Products, press Import CSV/Excel and choose the file (.csv, .txt or .xlsx).
- The till shows how many products were created and updated, and lists the lines it could not read.
Columns the till recognises (other names for the same thing are accepted too):
| Column | Meaning |
|---|---|
| sku | your product code; decides whether a line updates or creates |
| name, name_ar, name_fr | the names |
| barcode | one or several barcodes |
| price, cost | selling price and cost |
| department, category, brand | created when they do not exist yet |
| tax | the name of the tax rate |
| unit, weighed, plu | for goods sold by weight |
| stock | opening stock for a new product |
| reorder_point, active | reorder level; active yes / no |
- It needs the right to import products. Make a backup first when the file is large.
- To move everything from another point-of-sale program (products, customers, suppliers), use the import wizard: see How do I bring my products and customers over from another point-of-sale program?.
How do I create a product in several sizes or colours?
Create the product once, select it in Products and press Variants. Type the first option and its values (Size: S, M, L), and a second option if needed (Colour). The till creates one product per combination, each with its own stock and barcodes.
- Create the product with its price, department and tax: see How do I add a product?.
- Select it and press Variants.
- In First option (e.g. Size) type the name of the option, and in Its values, separated by commas (e.g. S, M, L, XL) its values.
- If there is a second option, fill in Second option (e.g. Colour), or empty and its values.
- Press Create variants. The till says how many will be made and asks you to confirm.
What happens: the product becomes the first variant, and one more product is created for every other combination, with the same price, department and tax. No barcodes are copied: give each variant its own. At most 200 variants per article.
- Later: press Variants on any variant to see all of them with SKU, price and stock, and to add more values.
- Selling: scanning a variant's barcode adds that size. A quick key of the article opens a chooser: see How do I choose a size or colour at the till?.
- Stock, purchasing and reports work per variant, because each one is a product.
- A clothing or shoe store has extras for this: one price for all sizes, ordering by size, seasons: see How do I change the price of an article in all its sizes and colours at once? and How do I order an article from a supplier, size by size?.
How do I sell products with serial numbers and keep track of the warranty?
In Products, select the product and press Serial numbers. Tick Ask for the serial number of every unit sold, set the warranty in months, and enter the serial numbers you received. The till then asks for the serial at every sale and prints it with the warranty date.
Switch it on for a product
- Open Products, select the product and press Serial numbers.
- Tick Ask for the serial number of every unit sold.
- Type Warranty (months from the sale, 0 = none).
- Under Add serial numbers received (one per line, or scan them one after the other), scan or type the units you have in stock.
- Save.
The same window lists the units In stock, Returned and Sold.
Look a serial number up
Press Find a serial number in Products and scan or type it. The till shows the product, its status, the receipt and the date of sale, the customer if one was on the sale, and until when the warranty runs.
- At the till each unit is its own line: see The till asks for a serial number. What do I do?.
- A serial number already sold is refused. One that is not in the list can be sold after a question, and is added.
- Serial numbers can be entered when a delivery is received: see How do I receive a delivery into stock?.
- Put the returned units back in stock (checked and fit for sale) moves returned units back to the stock list, once you have checked them.
What are pending imports, and how do I approve them?
A pending import is a product a cashier sold once from an unknown barcode. It waits in Products, tab Pending imports, until a manager approves it into the catalogue with the right details, or rejects it.
- Open Products and the tab Pending imports. Each line shows the barcode, the name the cashier typed, the price it was sold at, the date and the status.
- Select a line and press Approve. The review window opens with what Smart Scan knows about the barcode.
- Correct the name, choose the department and tax, set the real price and import. The product is now in the catalogue: see How do I check and import a product that Smart Scan found?.
- Or press Reject and type the reason, for an item that should not be sold or was a mistake.
- Approving and rejecting need the right to approve imports.
- The Dashboard shows the number of pending imports to users who may see it.
- Look at the price the item was sold at. If it was far from the real price, talk to the cashier.
- The sale already made is not changed by approving or rejecting.
How do I delete a product, or stop selling it?
Select the product in Products and press Delete. A product that was never sold is removed. A product with sales cannot be deleted, because the receipts need it: the till offers to make it inactive, which hides it from the till and keeps its history.
- Open Products and select the product.
- Press Delete and confirm.
- If the product has sales, the till says so and asks whether to make it Inactive. Answer yes.
- An inactive product cannot be sold and is not found at the till. It stays in the Products list, marked as not active, and in all reports of past sales.
- To sell it again, open it and tick Active.
- You can also make a product inactive directly: open it, untick Active and save.
- Deleting is written in the audit log.
- To remove the demo products of a trial, do not delete them one by one: see How do I remove the demo data and start with my own store (Demo ON / OFF)?.
How do I put a product on a quick key of the till?
Open the product, tick Quick key and save. Its button appears under Quick keys on the Checkout. Give it a Short name (quick keys) so the text fits on the button.
- Open the product: see How do I change a product's price or details?.
- Tick Quick key.
- Type a Short name (quick keys), a word or two, for example "Baguette". Without one, the product name is used.
- Save. The button is on the Checkout the next time it is opened.
- Quick keys are meant for what has no barcode or is sold very often: fruit and vegetables, bread, coffee, bags.
- The Checkout shows up to 16 quick keys. Keep them for the products the cashier needs most.
- Tapping the button of a weighed product reads the scale; tapping an article with sizes opens the size chooser.
- To take a product off the quick keys, untick the box.
- These are product buttons. The action buttons under the basket (discount, void and so on) are chosen elsewhere: see How do I choose which buttons are in the row under the basket?.
How do I set a minimum age, a deposit, an expiry date or a discount rule on a product?
These are tick boxes and fields on the product form. Each changes what the till does when the product is sold: an age question, a deposit added to the price, stock sold oldest date first, or a refusal of discounts and price changes.
Open the product (see How do I change a product's price or details?) and set:
| Field | What the till does |
|---|---|
| Minimum age | Asks the cashier to check the customer's age before the product is added. 0 = no check: see The till asks about the customer's age. What do I do?. |
| Deposit | Adds this amount to each unit sold, on its own line of the totals, for returnable bottles and containers. |
| Has expiry (FEFO) | Stock is kept in batches with expiry dates, and the batch that expires first is sold first: see How do I keep track of expiry dates?. |
| Allow discount | Unticked: the till refuses any line discount on this product. |
| Allow price override | Unticked: the price cannot be changed at the till. |
| Track stock | Unticked: the product has no stock count, for services and fees. |
- The age check as a whole can be switched off in Settings, Checkout rules.
- Promotions still apply to a product that does not allow discounts, unless the promotion excludes it.
- Which goods need an age check, and what deposit applies, is set by your country's law. The till applies what you enter.
Smart Scan: unknown barcodes
What is Smart Scan?
Smart Scan is what the till does when you scan a barcode that is not in your catalogue: it looks the barcode up, first in the Ironloom product database and then in open product databases on the internet, and shows the name, brand, size and picture it found, ready to import.
The order of the search
- Your own catalogue. A known product is added to the sale at once and nothing is looked up.
- What the till remembers from earlier lookups.
- The Ironloom product database: products that other stores have already entered.
- Open databases on the internet: Open Food Facts, Open Beauty Facts, Open Pet Food Facts, Open Products Facts, then UPCitemdb.
- Paid sources, only if the store entered its own keys for them: see How do I choose the sources Smart Scan uses, and add my own keys?.
The whole search has a time limit of about 3 seconds, and the till stays usable while it runs.
What is never looked up
Barcodes that only mean something inside your store are not sent anywhere: in-store codes, PLU codes and the weight or price labels of your scale.
What happens with the result
- Found: a review window shows the details and where they came from: see How do I check and import a product that Smart Scan found?.
- Not found: the same window opens empty, to fill in by hand or to sell the item once: see What does "Sell once" do?.
- No internet: the barcode waits and is searched later: see What does Smart Scan do when there is no internet?.
Smart Scan works on the Checkout, in Products, in Inventory, when receiving a delivery, and in Smart Import.
How do I check and import a product that Smart Scan found?
The review window shows what was found and where it came from. Correct anything that is wrong, choose the department and tax, type your selling price and press Import. Nothing enters your catalogue until you do.
- Read the Source and the Confidence. A product entered the same way by several stores, or agreed by several sources, has a high confidence.
- Check the name, the Brand and the size. When the sources disagree, Matches found lists each answer: pick the right one.
- Check the names in the store's other languages. The window says Arabic / French name suggested from a word list: check it before saving.
- Choose the Department and the Tax.
- Type the Price, and the Cost if you know it. When receiving goods, also the quantity received or the Opening stock.
- The picture loads in the background. Download image keeps it with the product: see How do I add a picture to a product?.
- Press Import.
Other buttons
- Create product: ignore what was found and fill in the product yourself.
- Sell once as pending item: on the Checkout, sell the item without creating it: see What does "Sell once" do?.
- Cancel: nothing is created.
When the barcode already belongs to a product
The window says so. Importing then shows the differences field by field under Overwrite which fields?, and changes only what you tick. Nothing is overwritten silently. To keep both, choose Add as a separate product (keep the other one): see After a scan the till asks me to choose between several products. Why?.
The details come from other stores and from public databases. They are a starting point: the name, the tax and above all the price are yours to check.
What does "Sell once" do?
It sells an item whose barcode is not in the catalogue, without creating the product. The cashier types a name and a price, the sale goes on, and the item waits in Products, Pending imports, for a manager to add it properly.
- A barcode is not known and the review window opens: see The barcode is not known. What do I do?.
- Press Sell once as pending item.
- Check or type the name. What Smart Scan found is proposed.
- Type the price and confirm. The line is added to the basket, marked as a pending item.
- It needs the right to sell pending items; otherwise the till asks for a manager's approval.
- The line is taxed at the store's default tax rate and cannot be discounted.
- No stock moves, because the product does not exist yet.
- Afterwards a manager approves or rejects it: see What are pending imports, and how do I approve them?. Once approved, the next scan of that barcode is an ordinary sale.
It exists so that a queue is not held up by a missing product, and so that the price typed by a cashier is always seen by a manager.
What does Smart Scan do when there is no internet?
Your own products sell as usual: they are in the till. An unknown barcode cannot be looked up, so the till puts it in a queue, tries again every 5 minutes, and tells you when it has been found. Meanwhile the item can be sold once.
- The message is Offline: barcode queued for lookup, followed by the barcode.
- The till offers to sell the item once, so the customer does not wait: see What does "Sell once" do?.
- When the connection is back, the queue is worked through in the background and a message announces each product found. Open Products to import them.
- A slow connection is treated the same way after the time limit: the till never waits on the internet.
Selling, payments, returns, stock and reports do not need the internet at all. What does need it, now and then: the licence check, Smart Scan lookups, exchange rates, emails and updates: see Does Ironloom POS work without internet?.
How do I add many products quickly by scanning them?
Open Smart Import and scan the products one after another. Each barcode becomes a row that the till fills in from its sources. Set the prices, tick the rows you want and press Import selected.
- Open Smart Import in the menu.
- Scan the products one after another, without waiting for each answer. Add code is for typing a barcode by hand.
- Each row shows the barcode, the name, brand and department found, the source, the confidence and a status. Products you already have, and in-store codes, are marked and not looked up.
- Correct a row with Edit row: name, department, cost, price, opening stock.
- Set the prices:
- Set price for selected gives the ticked rows one price;
- or type Markup % on cost to work the price out from each cost, with End in .99 if you want;
- or type each price in its row.
- Tick the rows to import (Toggle select ticks or unticks) and press Import selected.
- The till warns when ticked rows have no price.
- Nothing is created before you press Import selected.
- It is the fastest way to start a store: walk along the shelves with the scanner and a laptop.
- Products without a barcode are added one by one: see How do I add a product?. A list from another program is imported from a file: see How do I bring my products and customers over from another point-of-sale program?.
Smart Scan did not find a product. Can I make it search again?
A barcode that no source knows is remembered as "not found" for 7 days, so the till does not search for it at every scan. To search again sooner, open Settings, Smart Scan, and press Search again for products not found.
- Open Settings, then Smart Scan.
- Press Search again for products not found.
- The till confirms: Barcodes that were not found will be searched again on the next scan.
- A "not found" is only remembered when every source really answered. If a source was down or too slow, the till searches again at the next scan by itself.
- A product that is found is remembered for about six months.
- Many local products, store brands and fresh goods are in no public database. Create them by hand; it takes a minute: see How do I add a product?.
- Once several stores have entered the same product, the Ironloom product database knows it, and the next store finds it: see What does my store share with the Ironloom product database?.
How do I choose the sources Smart Scan uses, and add my own keys?
Open Settings, Smart Scan. Each source is a line you can switch on or off, with its order and a daily limit. The free sources work without a key; paid sources and the Google picture search need the store's own key.
- Open Settings, then Smart Scan.
- Select a source to change it:
- on or off;
- Priority: a lower number is asked first;
- Daily limit (0 = none): the most lookups per day, to stay inside a free allowance;
- API key (stored encrypted; leave empty to keep): for sources that need one.
- General settings holds the Total lookup timeout (ms): how long the till waits for all sources together.
The sources
| Source | Cost |
|---|---|
| Ironloom product database | included with the licence |
| Open Food / Beauty / Pet Food / Products Facts | free, no key |
| UPCitemdb | free trial allowance per day; more with your own key |
| Go-UPC, Barcode Lookup | paid; the store buys its own key from them |
| Google picture search | free allowance per day with the store's own Google key and search engine ID; used only when no source has a picture |
- Keys are stored encrypted on this PC and are not shown again.
- Accounts and keys with these services are the store's own. Ironloom does not sell or manage them.
- A longer timeout finds more but makes an unknown barcode slower at the till. 3 seconds is the usual value.
What does my store share with the Ironloom product database?
Product facts and shelf prices of products with a worldwide barcode, and nothing else: the name, brand, size, category and the price on the shelf. Never customers, sales, stock, costs or suppliers. In return the till finds products that other stores have already entered.
What is shared
- For products with a global barcode (the kind printed by the maker): name, brand, size, category, and the shelf price.
- It is sent in the background about every half hour, when the till has internet.
What is never shared
- Customers, sales, receipts, takings, stock quantities, costs, margins, suppliers, users.
- Products without a global barcode: weighed goods, in-store codes, PLU products.
- Demo products.
- Details that came from a source whose terms forbid passing them on.
How it is used
- A product is offered to other stores as trusted once several stores have entered it the same way. The review window then shows how many stores confirmed it.
- Prices are grouped by country and kept for a limited time. They are only shown to stores that have the price insights add-on, as a general figure, never as "store X sells at": see What is the suggested price in the Smart Scan window?.
- No store can see which store a detail came from.
Editions
Sharing is part of how the product database works and cannot be switched off.
What is the suggested price in the Smart Scan window?
With the price insights add-on, the review window shows a suggested selling price for a product, worked out from the shelf prices of other stores in your country. Click it to use it, or type your own. It is general information, not advice.
- The suggestion appears in the review window next to the price box, only for stores whose licence has the price insights add-on.
- Click the suggestion to copy it into the price box. You can change it before importing.
- It comes from recent shelf prices in your country only. With too few stores for a product, nothing is shown.
- The window says: General information only: not precise, prices vary. Ironloom accepts no responsibility for it.
Without the add-on, Smart Scan works the same, without the suggestion. The add-on is bought per store: see How do I get or buy a plugin?.
The price of your goods is your decision. Local costs, taxes and competition differ from store to store, and in some countries prices of certain goods are regulated.
Customers, loyalty and orders
How do I add a customer?
Open Customers and press New customer. The name is enough; add the phone number so the customer can be found at the till. A cashier can also add a customer during a sale.
- Open Customers and press New customer.
- Fill in what you have:
- Name, and Name (Arabic) if your store uses it;
- Phone, Email and Address: see Why does the till refuse a phone number, and how are addresses entered?;
- Tax number for a business customer;
- Birth date and Notes;
- Card / badge code: the number or barcode of a loyalty card you hand out;
- Loyalty member, Tier and Price level: see How do loyalty points work, and how do I set them up?;
- Credit limit: how much the customer may owe: see How do I let a customer buy on credit and record what they pay back?;
- Agrees to receive offers and news (marketing consent): tick it only if the customer said yes: see A customer asks for a copy of their data, or wants it erased. What do I do?.
- Save.
- At the till: press the customer button, type the phone number; if nobody matches, the till offers to create the customer with name, phone and email: see How do I attach a customer to the sale?.
- Print card prints a card with the customer's code as a barcode, to scan at the next visit.
- Creating, editing and deleting customers are three separate rights.
- Ask only for what you need. Customer details are personal data, and in many countries the law limits what a store may keep and for how long.
How do I find a customer?
Type part of the name, the phone number or the card code in the search box of Customers, or in the customer window at the till. The phone number is found however it is written: with or without spaces, country code or leading zero.
- In Customers: type in the search box above the list. The list shows the name, phone, level, points and balance of each customer.
- At the till: press the customer button or F6 and type: see How do I attach a customer to the sale?.
- With a card: scan the customer's card at the till. The customer is attached at once.
- Arabic name: a customer with an Arabic name is found by either name.
When nobody is found:
- check the number with the customer, digit by digit;
- try the name instead of the phone;
- the customer may have been registered under another number. Add the new number to the existing record instead of creating a second one.
Select a customer and press Statement to see what they bought and paid: see How do I print a customer's statement, and see who owes money?.
How do I let a customer buy on credit and record what they pay back?
Give the customer a Credit limit on their record. Cashiers can then put sales on the account, up to that limit. When the customer pays, select them in Customers and press Receive payment.
Allow credit
- Open Customers, select the customer and press Edit.
- Type the Credit limit: the most the customer may owe. 0 means no credit.
- Save.
At the till the cashier attaches the customer and pays with On account: see How do I sell on account, or use a customer's store credit?. A sale that would pass the limit is refused.
Record a payment
- In Customers, select the customer and press Receive payment.
- Type the amount and choose how it was paid (Cash or Card).
- Confirm. The till shows the new balance, and a cash payment goes into the drawer of the open shift.
See who owes what
- The tab On account lists the customers with a balance.
- The tab Who owes money sorts what is owed by age, with the last payment: see How do I print a customer's statement, and see who owes money?.
- A balance below zero means the store owes the customer: store credit from a return or a deposit.
Selling on account and receiving payments each need their own right. Every entry on an account is kept with its date, user and reference and cannot be edited afterwards.
How do I print a customer's statement, and see who owes money?
In Customers, select the customer and press Statement, choose the first and the last day, and print the A4 statement or save it as PDF. The tab Who owes money lists every customer with a balance, by how long it has been owed.
A statement for one customer
- Open Customers, select the customer and press Statement.
- Choose the period: Choose the first and the last day.
- The statement opens in a preview: opening balance, each sale on account, each payment and credit, and the closing balance.
- Print it, or save it as PDF to send it.
Who owes money
- Open the tab Who owes money.
- Each line shows the customer, the Balance, how much of it is 0-30, 31-60, 61-90 and over 90 days old, and the date of the last payment.
- Statement prints the statement of the selected customer; Export writes the list to Excel, CSV or PDF.
- The ages are counted from the date of each unpaid sale, oldest first; payments settle the oldest amounts first.
- The total of this list is the receivables figure your accountant needs at the end of a period.
- Store credit the store owes to customers is not in this list; it shows as a balance below zero on the customer.
How do loyalty points work, and how do I set them up?
A customer attached to a sale earns points on what they spend, and can spend them later as a discount. The owner sets how many points a currency unit earns and what one point is worth, in Settings, Checkout rules.
Set the rules
- Open Settings, then Checkout rules.
- Loyalty points per currency unit spent: for example 1 point for each unit of currency.
- Value of 1 point in minor units (cents): what a point is worth when spent. 1 means one cent.
- The three tier boxes set from how many points a customer becomes Silver, Gold and Platinum.
- Save.
Example: 1 point per unit spent and a point worth 1 cent gives customers 1 % back.
For each customer
- Tick Loyalty member on the customer's record. Members also get member prices where a promotion defines them.
- Tier shows the customer's level. Price level gives the customer a price list of their own, if you use price levels.
- Points in Customers opens the customer's points. +/- points adds or removes points by hand, with a reason, for a correction or a gift.
At the till
Points are earned when the sale is completed and can be spent with Redeem points: see How do I use a coupon or the customer's loyalty points?. A voided sale takes back the points it gave.
Points you have promised are a debt of the store towards its customers. Keep the value of a point small enough to honour.
How do I issue a gift card or a voucher?
In Customers, the tab Gift cards issues cards that hold an amount and can be spent over several visits. The tab Vouchers creates vouchers for an amount or a percentage, used once. Both are printed with a code that the cashier scans in the Payment window.
Gift card
- Open Customers, tab Gift cards, and press New.
- In Issue gift card, type the amount, and a code or leave Code (empty = generate) empty. Set Valid days if the card should expire.
- Confirm, then Print to print the card with its code as a QR code.
The list shows each card's code, balance, expiry and status. Void cancels a card that was lost or issued by mistake.
Voucher
- Open the tab Vouchers and press New.
- Type an amount, or percent for a voucher that takes a share of the sale. Set Valid days.
- Save and Print.
Good to know
- Issuing here creates the card; it does not take money. To sell a gift card, also ring up its amount at the till so the payment is recorded.
- A gift card is also created automatically when a return is refunded as a gift card: see How is the money given back for a return?.
- Using them at the till: see How do I take a gift card or a voucher as payment?.
- Managing gift cards and vouchers each need their own right.
- Unspent gift cards are money the store owes. The Dashboard shows the total. In some countries the law sets a minimum validity for gift cards.
How do I give a customer a quote?
Ring the products up at the till, press Quote / order, then Save as quote. Set for how many days the prices stay valid and print it. When the customer comes back, open the quote at the till and take the payment.
Make the quote
- On the Checkout, add the products as for a sale, with any discounts.
- Optional: attach the customer (F6), so the quote carries their name.
- Press Quote / order, then Save as quote.
- Type Prices valid for (days) and a Note if needed.
- Save. The quote gets a number and is printed, or shown on the screen. The basket is empty again.
When the customer comes back
- Press Quote / order and open the quote from the list. Or open Customers, tab Quotes and orders, select it and press Open at the till.
- The lines come back with the quoted prices. A basket you were working on is put on hold.
- If the quote has expired, the till asks whether to sell at the quoted prices anyway.
- Take the payment. The sale closes the quote.
The list
Customers, tab Quotes and orders: Open only / all switches between open ones and all, Print prints one again, Cancel cancels it with a reason.
A quote reserves nothing: stock does not move until the sale. For goods the customer orders and pays a deposit on, see How do I take a customer order with a deposit?.
How do I take a customer order with a deposit?
Ring the products up, attach the customer, press Quote / order, then Save as customer order. Enter the pick-up date and the deposit. When the customer collects, open the order at the till: the deposit is on their account as store credit and pays part of the sale.
Take the order
- On the Checkout, add the products and attach the customer (F6). An order always belongs to a customer.
- Press Quote / order, then Save as customer order.
- Fill in the Pick-up date, Deposit paid now (0 = none) and Deposit paid by (Cash, Card or Other), and a Note.
- Save. A slip prints with the items, the deposit and what is Left to pay. A cash deposit opens the drawer.
The deposit is recorded as a payment on the customer's account, so the customer has that amount as store credit.
When the customer collects
- Open the order: Quote / order on the till, or Customers, Quotes and orders, Open at the till.
- The till reminds you that the deposit is on the customer's account.
- Press PAY (F10), then Store credit to use the deposit, and take the rest with any method.
- The sale closes the order.
If the order is cancelled
Cancel in Quotes and orders cancels the order. The deposit stays on the customer's account as store credit; to give the money back, refund it from Customers, tab On account.
- The deposit cannot be more than the total.
- Stock does not move until the sale. If the goods must be kept aside, do that on the shelf yourself.
- Whether a deposit must be refunded when an order is cancelled depends on your terms and your country's law.
How do I take a phone order and send it out for delivery?
Ring the products up, press Quote / order, then the phone / delivery order. Enter the name, phone, address, delivery fee and driver; a delivery slip prints. When the driver brings the money back, open the order at the till and take the payment.
Take the order
- On the Checkout, add the products. Attach the customer if they are known: their phone and address are filled in.
- Press Quote / order and choose the delivery order.
- Fill in Name, Phone, Delivery address, Delivery fee (0 = free), Driver (can be set later) and a Note.
- Save. The order gets a number, and a delivery slip prints with the address, the phone, the driver, the items and the Cash to collect.
The delivery fee is added to the order as its own line and is remembered for the next order.
Follow the delivery
Open Customers, tab Quotes and orders. Select the order and press Delivery: next step:
- new order → Out for delivery: type the driver's name. The goods leave the stock;
- out for delivery → delivered, to be paid.
Take the payment
When the driver brings the money, select the order, press Open at the till and take the payment as for any sale. The sale closes the order.
- An order that is cancelled after the goods left puts them back in stock.
- A customer who pays by card at the door needs a terminal the driver carries; the till records the payment when the order is closed.
- The address is asked in the form your country uses: see Why does the till refuse a phone number, and how are addresses entered?.
How do I mark a customer as tax exempt?
Open the customer's record, tick Tax exempt (no tax is charged to this customer) and type the Exemption certificate number. From then on, attaching this customer to a sale removes the tax by itself and prints the exemption on the receipt.
- Open Customers, select the customer and press Edit.
- Tick Tax exempt (no tax is charged to this customer).
- Type the Exemption certificate number from the document the customer gave you.
- Save.
Reverse charge
For a business that accounts for the tax itself, tick the reverse-charge box and fill in the customer's Tax number. No tax is charged, and the invoice carries the customer's tax number.
What happens at the till
The cashier attaches the customer; the till says no tax is charged on this sale and changes the totals: see How do I sell to a customer who does not pay tax?. The sale keeps the note, so it can be found later.
- Exempt sales are shown apart from taxed sales in the tax figures: see Where are the figures for my tax return (VAT, GST, sales tax)?.
- For an invoice with the customer's details, print an A4 invoice: see How do I give a customer a full-page tax invoice?.
- Only users who may edit customers can set this. Every change to a customer is in the audit log.
Who is exempt, which document proves it and how long it is valid are rules of your country's tax law. Keep a copy of the certificate; the till stores only its number.
A customer asks for a copy of their data, or wants it erased. What do I do?
Select the customer in Customers and press Privacy. Give the customer a copy of their data writes everything the till holds about them to a file. Erase the customer's personal data (their request) removes their details for good and keeps the sales without the person.
A copy of the data
- Open Customers, select the customer and press Privacy.
- Choose Give the customer a copy of their data.
- The till writes a text file in its exports folder and shows it: profile, consent, sales, account entries, loyalty entries, quotes, orders and deliveries, serial numbers.
- Print it or send it to the customer.
Erasing
- Press Privacy and choose Erase the customer's personal data (their request).
- Read the warning and confirm. This cannot be undone.
What is removed: name, phone, email, address, tax number, birth date, card, notes and consent, and the name, phone and address on their orders. What stays: the sales, without the person's details, because the store's accounts need them.
- Erasing needs the right to delete customers, and is refused while the customer still has a balance. Settle the account first.
- The audit log records that an erasure was done, without personal data.
Consent
Agrees to receive offers and news (marketing consent) on the customer's record says whether you may send them offers. Untick it as soon as the customer asks.
Older backups still hold the customer's details until they are replaced. Privacy law (such as the GDPR in Europe) is the store's responsibility: the till gives you the tools, not legal advice.
Why does the till refuse a phone number, and how are addresses entered?
The till checks that a phone number is a real number of your country and stores it in the international form. Type it as it is dialled locally, or with + and the country code for a number from another country. Addresses are asked in the parts your country uses.
Phone numbers
- Type a local number the way it is dialled in your country. The till adds the country code and shows the number in your country's usual grouping.
- For a number from another country, start with + and the country code.
- A number that cannot exist is refused, with a message that names your country. Check it with the customer.
- This applies to customers, suppliers, the store itself and delivery orders.
- A customer is found by phone however the number is typed: see How do I find a customer?.
Addresses
The address boxes follow the store's country: for example ZIP code, Postcode or PIN code; State, Province, County, Emirate or Prefecture. The address is then written in that country's order on documents and delivery slips.
Numbers saved before
If customers were entered before this check existed, or imported from another program, one action rewrites all saved numbers in the international form: Settings, Date and time formats. It makes a backup first and lists the numbers it could not understand, to correct by hand.
The store's country is set in Settings, Store: see How do I change the store's name, address, tax number, logo or country?.
How do I delete a customer?
Select the customer in Customers and press Delete. It needs the right to delete customers and is refused while the customer has a balance. Their past sales stay in the reports.
- Open Customers and select the customer.
- Press Delete and confirm. The button is shown only to users whose role allows deleting customers.
- This customer still has a balance: the customer owes money, or the store owes them credit. Settle the account first: see How do I let a customer buy on credit and record what they pay back?.
- Sales already made to the customer are kept; they are part of the store's accounts.
- Entered twice: keep the record that has the sales and the points, correct its details, and delete the other one.
- The customer asked for their data to be removed: use Privacy instead. It removes the personal details from their orders too and records that it was done on request: see A customer asks for a copy of their data, or wants it erased. What do I do?.
- Deleting is written in the audit log with the user.
Promotions
How do I create a promotion?
Open Promotions, press New promotion, choose the kind of promotion, say which products it applies to and when it runs, and save. From then on the till applies it by itself whenever a basket meets its conditions.

- Open Promotions and press New promotion.
- Type the Name and the Description (receipt): the words the customer reads on the receipt.
- Choose the kind: see Which kinds of promotion can I create?.
- Fill in the value for that kind, for example the percentage.
- In Applies to: product:sku | department:name | category:name | brand:name | all (one per line), write one target per line. Examples: department:Bakery, brand:Acme, product:P000123, or all.
- Set when it runs and its priority: see How do I set the dates, days and hours of a promotion, and what happens when two promotions fit?.
- Tick Active and save.
- Try it before it goes live with Test on basket: see How do I test a promotion before customers see it?.
- The cashier does nothing: the discount appears on the line with the promotion's name, and on the receipt.
- To stop a promotion, untick Active. Delete removes it; past sales keep their discount.
- A product that should only change price for a few days needs no promotion: see How do I set a price that starts and ends on dates I choose?.
Which kinds of promotion can I create?
Seven kinds: a percentage off, a fixed amount off, buy X get Y, mix and match, a quantity break, a member price and a coupon. Each uses a few of the boxes on the promotion form.
| Kind | What it does | Boxes to fill in |
|---|---|---|
| Percent off | takes a percentage off each matching product | the percentage |
| Fixed amount off per unit | takes the same amount off each unit | the amount |
| Buy X get Y | buy a quantity, get more free: "buy 2, get 1" | Buy qty (X), Get qty (Y); the "get" products if they differ from the bought ones |
| Mix & match (N for price) | any N of the matching products for one price: "any 3 for 10" | Min qty / group size (mix & match, qty break) and Bundle price / coupon fixed amount |
| Quantity break | a discount from a quantity upwards: "10 % off from 6" | the minimum quantity and the percentage |
| Member price | a lower price for loyalty members only | the member price |
| Coupon | applies only when its code is entered or scanned | Coupon code and a percentage or an amount: see How do I create a coupon code or a price for members only? |
Options for any kind:
- Members only: the promotion needs a customer who is a loyalty member on the sale;
- Max uses per sale (0 = no limit): how many times it may apply in one basket;
- Stackable: whether it may combine with another promotion on the same line: see How do I set the dates, days and hours of a promotion, and what happens when two promotions fit?.
With "buy X get Y" the cheapest matching item is the free one. All matching items must be in the basket: the till does not add the free item by itself.
How do I set the dates, days and hours of a promotion, and what happens when two promotions fit?
On the promotion form, From and To set the first and last day, the days-of-week box limits it to certain days, and the two time boxes to certain hours. When several promotions fit the same product, the one with the lowest Priority number wins, unless they are stackable.
When it runs
- From / To: the first and the last day. Empty means no limit on that side.
- Days of week (1=Mon..7=Sun, e.g. 5,6): the days it runs, as numbers separated by commas. Empty means every day.
- Time from (HH:mm) / Time to: the hours it runs, in 24-hour form, for example 17:00 to 19:00. Empty means all day.
All the conditions must be true at the moment the product is scanned. The till uses the clock of the PC.
When several promotions fit
- Priority: a lower number is tried first. The first promotion that fits takes the line.
- Stackable: a stackable promotion may add its discount on top of another one. Leave it unticked unless you really want two discounts on one product.
- A discount typed by the cashier comes on top of a promotion, within the cashier's limit.
Example: "Bakery -20 % after 18:00" with priority 1 and "All fresh food -10 %" with priority 5: bread after 18:00 gets 20 %, not 30 %.
How do I create a coupon code or a price for members only?
A coupon is a promotion of the kind Coupon with a Coupon code: it applies only when the cashier enters or scans that code. A member price is a promotion of the kind Member price: it applies only when a loyalty member is attached to the sale.
Coupon
- Create a promotion and choose the kind Coupon: see How do I create a promotion?.
- Type the Coupon code, for example SPRING10. Print it on your flyer as text or as a barcode.
- Type a percentage, or an amount in Bundle price / coupon fixed amount.
- Say which products it applies to, and its dates.
- Save. At the till the cashier presses Coupon and types or scans the code: see How do I use a coupon or the customer's loyalty points?.
The same code can be used by every customer until its end date. For a code that works once and is worth money, issue a voucher instead: see How do I issue a gift card or a voucher?.
Member price
- Create a promotion and choose the kind Member price.
- Type the member price and the products it applies to.
- Save. Customers with Loyalty member ticked get that price as soon as they are attached to the sale: see How do loyalty points work, and how do I set them up?.
Any other kind of promotion can be limited to members by ticking Members only.
How do I test a promotion before customers see it?
In Promotions, press Test on basket, type a basket as product codes and quantities, and the till shows which promotions would apply to each line and the total discount. Nothing is sold.
- Open Promotions and press Test on basket.
- In Test basket, type the products as sku x qty, comma separated (e.g. P000001 x 3, P000005 x 1).
- Confirm. The window Promotion test lists each line with its price, the promotion that applied and the discount, then the total discount.
- Use the SKU shown in the Products list, not the barcode.
- The test uses the promotions as they are saved now, and today's date and time. To test a promotion that starts next week, set its start date to today, test, then put the date back.
- A product code the till does not know is reported as not found.
- If the result is not what you expect, see A promotion did not apply at the till. Why?.
A promotion did not apply at the till. Why?
Usually one of its conditions is not met: it is not active, today is outside its dates, days or hours, the product is not one of its targets, the quantity is too low, it needs a member, or another promotion with a better priority took the line.
Check in this order, in Promotions:
- Active is ticked.
- Dates, days and hours include this moment: see How do I set the dates, days and hours of a promotion, and what happens when two promotions fit?. A promotion with an end date of yesterday is over.
- Targets: the product's department, category, brand or SKU is written exactly as in Products. "department:Bakery" does not match a department called "Bakery & Pastry".
- Quantity: "buy 2 get 1" needs all three items in the basket; mix and match needs the full group.
- Members: with Members only or a member price, a customer who is a loyalty member must be attached to the sale.
- Coupon: the code was not entered, or was typed differently.
- Priority: another promotion with a lower priority number applied to the line, and this one is not stackable.
- The product itself: an item sold once as a pending item takes no promotion.
Then press Test on basket with the same products to see what the till does: see How do I test a promotion before customers see it?.
At the till, the cashier can give the customer the promised price with a line discount, within their limit: see How do I give a discount?.
Dashboard and reports
How do I read the Dashboard?
The Dashboard shows the store at a glance: sales, number of sales, margin, returns, low stock, a sales chart, payments by method and best sellers. Every figure opens the list behind it: click it, touch it, or press Enter on it. Esc comes back.
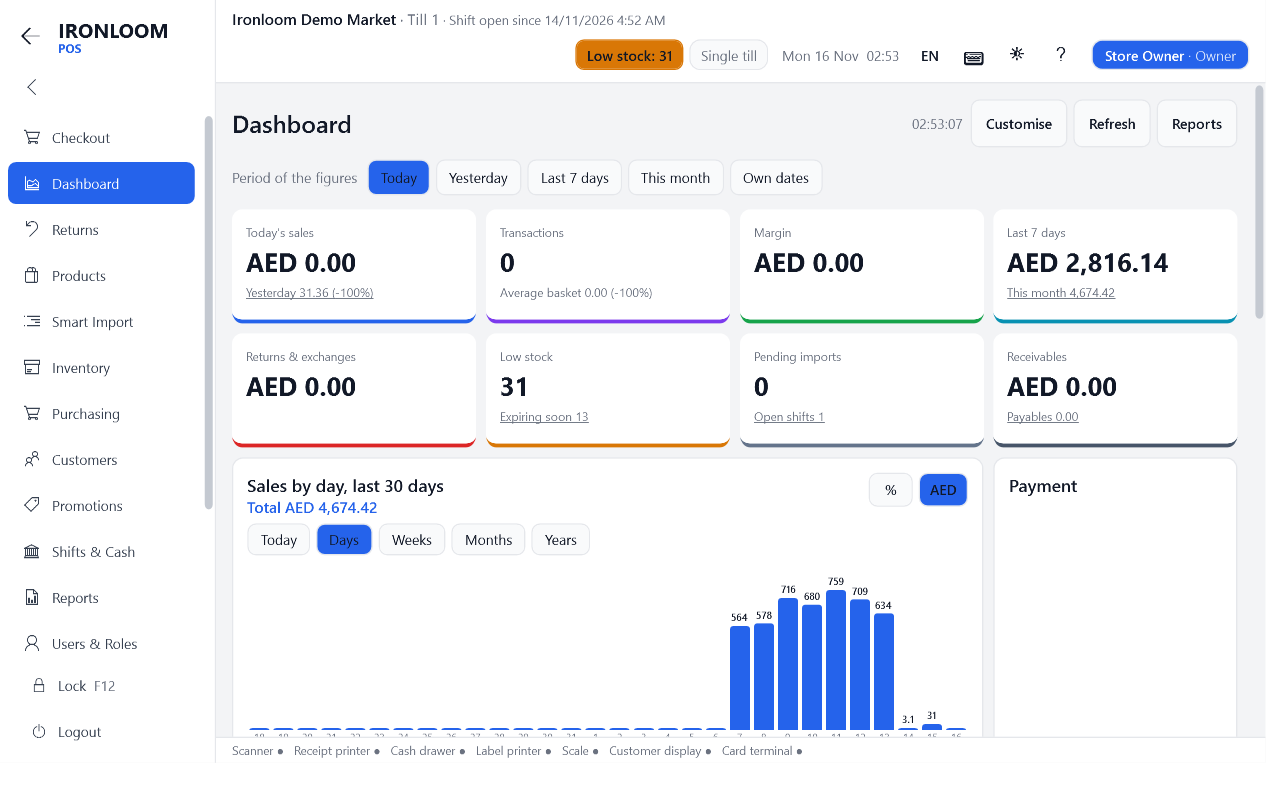
The figure cards
Today's sales, Transactions, Margin, Last 7 days, Returns, Low stock, Pending imports and Receivables. Most have a second line, such as the average basket or the change against the period before.
The blocks
| Block | What it shows |
|---|---|
| Sales chart | sales by hour today, or by day, week, month or year; the % and currency buttons choose what is written on the bars |
| Payment | the period's sales by payment method |
| Top products | the best sellers |
| Sales by cashier, Sales by department, Busy hours | who sold, what sold, and when |
| Cash and shifts | the open shifts with their expected cash, held sales waiting |
| Loss watch | discounts, voids, price changes, drawer openings without a sale, items sold under cost: see How do I keep an eye on discounts, voids and other ways money can be lost? |
| Stock watch | out of stock, to reorder, dead stock, stock value, next expiry dates |
| Purchasing and money | orders to receive, supplier invoices due, tax collected, gift cards and store credit still owed |
| Customers and orders | new customers, open orders and deliveries |
| Alerts | devices, backup, licence, till sync, product lookups waiting |
| Daily target | progress towards the day's sales target |
- Each block appears only if your role may see its data. A cashier's Dashboard is not the owner's.
- A bar of the chart opens the receipts of that hour, or the sales report of that day, week, month or year.
- The period of the figures can be changed: see How do I see yesterday or this month on the Dashboard, and set a daily sales target?. The blocks can be moved, resized and hidden: see How do I arrange the Dashboard the way I want it?.
How do I arrange the Dashboard the way I want it?
Press Customise on the Dashboard. Move a block by dragging it onto another or with its arrows, change its width with − and +, and hide or show it with the eye. The layout is saved for your user only.
- Open Dashboard and press Customise.
- On each block:
- drag it onto another block to swap places, or use its arrows;
- − and + make it narrower or wider, from one to four columns;
- the eye hides the block, or shows it again.
- Press Done arranging.
- Back to standard puts every block back where it was at the start.
- Each user has their own layout. Changing yours does not change anyone else's.
- A hidden block is only hidden. Its figures are still worked out and come back when you show it.
- While you arrange, dragging a finger moves blocks and does not scroll the page.
How do I see yesterday or this month on the Dashboard, and set a daily sales target?
Period of the figures at the top of the Dashboard switches all figures between today, yesterday, the last 7 days, this month and dates of your own, and shows the change against the period before. The Daily target block shows progress towards a sales figure you set.
The period
- On the Dashboard, find Period of the figures.
- Choose Today, Yesterday, Last 7 days, This month or Own dates.
- The cards and blocks change to that period. Under the main figures, Period before compares with the same length of time just before: yesterday against the day before, this month so far against the same days of last month.
Some blocks always show the present moment, whatever the period: open shifts, stock, alerts.
The daily target
- Click the Daily target block. When no target is set it says Not set: click to set it.
- Type Daily sales target (0 = no target) and save.
- The block shows a progress bar, what is Still to go, and Target reached when the day's sales pass it. A store with a second currency sees the figures in both.
The target is one figure for the store, not per cashier.
How do I see my sales for a period, by day, product, department or cashier?
Open Reports, tab Sales, choose the first and last day and what to group by. Each line shows the number of sales, the quantity, the total, the discounts, and the tax or margin.

- Open Reports. The first tab is Sales.
- Choose the dates. The buttons Today, 7 d and 30 d fill them in.
- Choose Group by:
| Group by | Use it to see |
|---|---|
| day, month, hour | when you sell |
| cashier, till | who sold, and where |
| department, category, product | what sells |
| payment method | how customers pay |
| customer | who buys |
- Read the list. The line at the bottom gives the totals.
- Export writes it to Excel, CSV or PDF; Print prints it: see How do I export or print a report?.
- Days and hours are those of the store's clock, not of the server.
- Returns are taken off the sales of the day they were made.
- Margin is shown to users who may see costs. It is worked out with the average cost of each product at the time of the sale.
- A clothing store can also group by article and by season.
- For one receipt, use the tab Receipts: see How do I find an old receipt and print it again?.
Which tabs you see depends on your rights: sales, stock, finance and audit reports each have their own.
How do I find an old receipt and print it again?
Open Reports, tab Receipts. Choose the dates, and narrow the list with the hour of the day and the payment method. Select a receipt to view it, reprint it or make an A4 invoice.
- Open Reports and the tab Receipts.
- Choose the first and last day.
- Narrow it down:
- the hour box: All hours, or one hour of the day;
- the payment box: All payment methods, or one method, for example card.
- Each line shows the receipt number, date and time, cashier, total, payment and status.
- Select a receipt and press:
- View receipt: shows it on the screen;
- Reprint: prints a copy;
- A4 invoice: a full-page invoice for this sale: see How do I give a customer a full-page tax invoice?.
- Export writes the list to a file.
- Typical use: a customer without a receipt remembers the day, roughly the hour, and that they paid by card. Three choices and the receipt is on the screen.
- Voided sales are in the list with their status, so nothing disappears.
- From the Dashboard, clicking a bar of today's chart opens this tab on that hour.
- To take goods back, open Returns and type the receipt number found here.
Where do I see the tax I collected?
Open Reports, tab Tax, and choose the period. It lists, for each tax rate, the sales without tax, the tax collected and the total. For the figures of a tax return, with the tax on your purchases taken off, use the tab Tax return.
- Open Reports and the tab Tax.
- Choose the first and last day.
- One line per tax rate: the net sales, the tax, and the total. Returns are already taken off.
- Export or Print it for your accountant: see How do I export or print a report?.
- A tax made of parts, such as state + city or GST + PST, shows each part on its own line: see My tax is made of several parts (state + county + city, GST + PST, CGST + SGST). How do I set it up?.
- Sales to tax-exempt customers are counted as sales without tax.
- This tab is about sales only. Tax return puts the tax on sales next to the tax on supplier invoices and expenses: see Where are the figures for my tax return (VAT, GST, sales tax)?.
- The Z report of each shift also prints the tax by rate for that shift.
These are the figures of the till. What goes into your tax return, and when, is decided with your accountant under your country's rules.
How do I keep an eye on discounts, voids and other ways money can be lost?
Two places: the Loss watch block on the Dashboard gives the figures of the period at a glance, and Reports, tab Discounts, voids & returns, lists each discount, void and return with the cashier and the reason.
On the Dashboard: Loss watch
| Line | What it counts |
|---|---|
| Discounts given | discounts typed by cashiers |
| Voided lines, Voided sales, Emptied baskets | products removed, finished sales voided, baskets cancelled before payment |
| Price overrides | prices changed at the till |
| Drawer opened without a sale | no-sale drawer openings |
| Items sold under cost | sales below the product's cost |
Click a line to open the entries behind it.
In Reports: Discounts, voids & returns
- Open Reports and the tab Discounts, voids & returns.
- Choose the period.
- Each line shows the date, the cashier, the product or receipt, the amount and the reason typed at the till.
What to look for
- One cashier with far more voids or discounts than the others.
- Discounts without a reason, or always the same reason.
- Drawer openings without a sale shortly before a shift is closed.
- Voids of whole sales paid in cash.
Tighten the rules where needed: discount and refund limits per role, and the rights to void, change prices or open the drawer: see How do I limit the discounts and refunds a cashier may give?. Every such action is also in the audit log, which cannot be edited: see What is the audit log, and how do I check that nobody changed it?.
How do I export or print a report?
On any tab of Reports, press Export and choose Excel, CSV or PDF, or press Print. The file holds exactly what is on the screen: the same period, grouping and columns.
- Open Reports and the tab you need.
- Set the period and the other choices until the list shows what you want.
- Press Export, choose where to save the file and its type:
- Excel (.xlsx): to work on the figures;
- CSV: for other programs;
- PDF: to send or file as it is.
- Or press Print to print the list.
- Dates and numbers in the file follow the store's formats: see How do I change the date format, the 12 or 24-hour clock, the first day of the week or the calendar on receipts?.
- The same Export button is on other lists too: who owes money, stock, purchases, the hours report.
- For your accounting program, do not rebuild the figures from these reports: the accounting export writes journals it can import directly: see How do I export the journal and match it to my chart of accounts?.
- Exporting needs the right to see the report; which reports you see depends on your role.
- An exported file is outside the till: store and send it with care, above all customer lists.
How do I get the day's figures by email?
Fill in the store's mail settings and the daily email address in Settings, Email. Then Daily summary email in Reports sends the summary of the day: sales, number of sales, average basket and top products.
- Open Settings, Email, and fill in the mail server of your email provider and the address that should receive the summary: see How do I set up email, so the till can send receipts and the daily summary?.
- Open Reports and press Daily summary email. The till confirms where it was sent.
- Without an address, the till says Set the daily email address in Settings > Email.
- The email is sent from your own mail account, through your provider. Ironloom does not send or receive it.
- It needs an internet connection at that moment.
- The summary holds totals only: no customer details.
What is the audit log, and how do I check that nobody changed it?
The audit log is the till's own record of every sensitive action: who did it, when, and what changed. Open Reports, tab Audit log. Verify audit chain checks that no entry was altered or removed.
- Open Reports and the tab Audit log. It is shown to users with the right to see audit reports.
- Choose the period. Each line shows the date and time, the user, the action, what it concerned and the values before and after.
- Press Verify audit chain. The till answers Audit log chain is intact., or names the first entry where the chain is broken.
What is recorded
Logins and failed logins, PIN resets, voids, discounts above a limit, price changes at the till and in Products, refunds, drawer openings without a sale, cash in and out, shift openings and closings, card declines, stock corrections, product and customer deletions, changes of rights and settings, backups and restores, hardware tests, exports, and privacy requests.
Why it can be trusted
Each entry carries a fingerprint worked out from its own content and from the entry before it. Changing or deleting one entry breaks the chain from that point on, and the check shows it. Nobody can edit the log from inside the program, the owner included.
- A broken chain means the data was changed outside the program, or a damaged database was repaired. Keep the backups from before and contact support.
- The log is part of the store's data and is saved in every backup.
Users and roles
How do I add a user?
Open Users & Roles, press New, type a user name and the person's full name, choose a role, and set a PIN or a password. Give every person their own user, so each sale and each correction carries the right name.
- Open Users & Roles. The first tab is Users.
- Press New.
- Fill in:
- Username: short, without spaces, for example "sara";
- Full name: shown in the greeting, on receipts and in reports;
- Role: what the person may do: see How do I decide what each person may do (roles and rights)?;
- User ID (1 to 4 digits, empty = next free number): the short number for signing in on the number pad: see What is the user ID, and how do I change it?;
- Badge code: the code of a staff badge, if you use badges;
- Language: the screen language for this person, if different from the store's;
- Max discount % and Max refund (0 = role default): only to give this person other limits than their role: see How do I limit the discounts and refunds a cashier may give?.
- Save, then give the person a way to sign in: Set PIN or Set password: see How do I set a new PIN or password for someone, or unlock their account?. The till asks for one of them: Set a password or a PIN.
- Adding users needs the right to manage users.
- The list shows each user's role, whether they are active and their last login.
- Do not share one login among several people: discounts, voids and the cash count are checked per user.
- Your licence counts computers, not users. Add as many users as you need.
What is the user ID, and how do I change it?
The user ID is a short number, 1 to 4 digits, that each user gets automatically: 1, 2, 3 and so on. A cashier signs in by typing it and the PIN on the number pad, with no keyboard. Change it in the user's details.
- Where to see it: Users & Roles, column User ID.
- Signing in with it: type the number in the first box of the sign-in screen, then the PIN: see How do I sign in?.
- Changing it: select the user, press Edit and type another number in User ID (1 to 4 digits, empty = next free number). Leave it empty to get the next free number.
Messages
- User ID already used: another user has that number. Choose another.
- User ID: 1 to 4 digits: the number is too long, or holds letters.
- Unknown user ID at sign-in: no active user has that number.
The user ID is not a secret: it only says who is signing in. The PIN is the secret. Two users must never share a PIN: if a PIN is not unique, the till asks for the user name as well.
How do I set a new PIN or password for someone, or unlock their account?
Open Users & Roles, select the user and press Set PIN or Set password. Type the new one and tell the person privately. If the account was locked after wrong tries, select the user and press Unlock.
- Open Users & Roles and select the user in the tab Users.
- Press Set PIN: PIN: 4 to 8 digits. Or press Set password: at least 6 characters.
- Confirm. The new PIN or password works at once, and the old one no longer does.
- PIN or password? A PIN is quick on the number pad and right for the till. A password is longer and suits owners and managers. A user can have both.
- Locked account: after several wrong tries a user is locked for a while. Unlock lifts the lock at once; setting a new PIN also clears it.
- Your own PIN: select yourself and set it the same way.
- The owner forgot their own PIN: nobody inside the store can reset it unless another owner or manager with the right exists. Otherwise use Forgot your PIN? on the sign-in screen: see I forgot my PIN or password. How do I get back in?.
- Setting PINs needs the right to manage users. Every change is written in the audit log, without the PIN itself.
PINs and passwords are stored scrambled. Nobody can read an existing PIN, not the owner and not Ironloom: it can only be replaced.
How do I decide what each person may do (roles and rights)?
Each user has a role, and a role is a list of rights you tick or untick. Open Users & Roles, tab Roles, select a role and press Edit. A screen or button a role may not use is hidden for its users, or asks for a manager's approval.
The roles that come with the program
| Role | Meant for |
|---|---|
| Owner | everything, including settings, users and the licence |
| Manager | the daily running of the store: products, prices, stock, reports, approvals |
| Supervisor | the tills: approvals, returns, shifts |
| Cashier | selling, taking payment, their own shift |
| Stock Clerk | products, stock, receiving goods |
| Accountant | reports, the accounting export, expenses and the period close |
Change what a role may do
- Open Users & Roles and the tab Roles.
- Select the role and press Edit.
- Tick or untick the rights. There are about 90, grouped by area: selling, returns, cash, products, stock, purchasing, customers, reports, settings, users.
- Set the role's limits (Max discount %, Max refund) and its Home page (after login and with Esc).
- Save. The change applies at the next sign-in of its users.
Make your own role
Press New in the tab Roles, name it and tick its rights. Then choose it on the users concerned.
- Examples of separate rights: opening the drawer without a sale, returns without a receipt, selling below cost, changing a price, seeing costs, voiding a finished sale, closing someone else's shift, creating, editing and deleting customers.
- Managing roles needs its own right. Keep at least one user who has it.
- Delete removes a role that no user has any more.
- Changes of rights are written in the audit log.
How do I limit the discounts and refunds a cashier may give?
Each role has a highest discount percentage and a highest refund amount. Set them in Users & Roles, tab Roles. Above the limit, the till asks for a manager's approval. A single user can have limits of their own.
Per role
- Open Users & Roles, tab Roles, select the role and press Edit.
- Max discount %: the highest percentage the role may give by itself, for example 10.
- Max refund: the highest amount the role may refund in one return.
- Save.
For one user
Open the user and fill in Max discount % and Max refund (0 = role default). 0 means the user follows their role.
At the till
- A discount above the limit asks for a manager: the till says "discount above your limit", a manager types their PIN, and the sale goes on: see The till says "Manager approval needed". What do I do?.
- A refund above the limit shows Refund above your limit and asks the same way.
- A limit of 0 on a role means no limit of its own; whether the role may discount at all is a separate right.
Limits work together with rights. The right decides whether a user may give discounts or refunds at all; the limit decides how much without asking. See what is given in practice in Reports: see How do I keep an eye on discounts, voids and other ways money can be lost?.
The till says "Manager approval needed". What do I do?
Your role may not do this action by itself. Call a manager or supervisor: they type their own PIN or password in the window, the action goes through once, and you stay signed in.
- You press a button your role does not cover, or go above your limit. The window Manager approval needed opens.
- A manager types their user ID and PIN, or user name and password, in that window.
- The action is done once. Your own rights do not change, and the manager is not signed in on your till.
- The manager must have the right you lack. A cashier's PIN does not approve another cashier.
- The approval is recorded in the audit log with both names: who asked and who approved.
- Managers: look at what you approve. Your name is on it.
- Never ask for a manager's PIN to type it yourself, and managers must never give it away.
Actions that often ask: a discount above the limit, voiding a line or a sale, changing a price, a refund in cash or above the limit, a return without a receipt, opening the drawer without a sale, selling on account.
If you need an action many times a day, ask the owner to add the right to your role: see How do I decide what each person may do (roles and rights)?.
How do I decide who may open the cash drawer without a sale?
Open Hardware and the Drawer card of the till. Under Open the drawer without a sale, choose between the rights of each role and every cashier on this till. The rule is per till, and every opening is recorded whichever you choose.
- Open Hardware on the till concerned and open the Drawer card.
- Open the drawer without a sale:
- By the rights of each role (Users and Roles): only users whose role has the no-sale right; others need a manager's approval. This is the usual choice;
- Every cashier on this till (cash exchange till): anyone signed in on this till may open it, for a till that mostly changes money.
- Drawer test and hardware test page: Every cashier or Managers only.
- Save.
- The rule belongs to the till, not to the user: the same cashier may be free on one till and need approval on another.
- Every opening without a sale is written in the audit log with the user and the time, and counted in Loss watch on the Dashboard.
- The drawer also opens by itself for cash sales, cash refunds, cash in and out, and when a shift is closed. Those are not "without a sale".
- The same card holds the technical settings of the drawer: see How do I set up the cash drawer, and what is the drawer test?.
An employee left. How do I remove their access?
Open the user in Users & Roles, untick Active and save. The person can no longer sign in, and everything they did stays in the reports under their name. Users are not deleted, because sales and the audit log refer to them.
- Open Users & Roles, select the user and press Edit.
- Untick Active and save.
Do it the day the person leaves. Also:
- if they closed shifts or handled cash, look at their last Z report and at the loss watch for their last days;
- if they knew another person's PIN, change that PIN: see How do I set a new PIN or password for someone, or unlock their account?;
- if they knew the lock PIN of lock mode, change it in Settings;
- take back their staff badge. Its code stops working with the user.
An inactive user can be made active again at any time: tick Active. Their user ID stays reserved for them.
If the only owner leaves, create a new owner user first, sign in with it, and then make the old one inactive. The till must always have one active user who may manage users.
Settings
How do I change the store's name, address, tax number, logo or country?
Open Settings, Store. What you type here is printed at the top of receipts and invoices, and the country decides the store's formats and rules. Press Save when done.

- Open Settings and the tile Store.
- Fill in or correct:
- Store name and Legal name: the name customers know, and the registered name for invoices;
- Address, Phone, Email;
- Tax number: your tax or VAT registration number, printed on receipts where the law asks for it;
- Store logo: press Browse and choose the picture;
- Receipt header and Receipt footer: lines of your own, such as opening hours or a thank-you;
- Country: sets date, phone and address formats, tax wording and country rules;
- Measurement system: see How do I switch between kilograms and pounds (the measurement system)?;
- Store language: the languages your store works in: see How do I change the language of the screens, and choose the languages my store uses?.
- Save.
Tills
The tile Tills lists the tills of the store. For each: its Name, a Receipt prefix so receipts of different tills cannot be confused, the Next receipt number, and which one is the Master PC. Lowering the receipt counter can create duplicate numbers; the till warns you.
- Only users with the right to change store settings see these tiles.
- A logo for a thermal receipt printer needs converting once: see How do I get a sharp logo on a thermal receipt printer?.
- In many countries the receipt must show the store's legal name, address and tax number. Check with your accountant.
How do I tell the till what kind of business I run?
Open Settings, Type of business, and choose between a shop or supermarket, a café or restaurant, and a clothing or shoe store. The till then shows only the buttons and screens that fit, and the demo data matches.
- Open Settings and the tile Type of business.
- Choose:
- Shop / supermarket: scanning, weighed goods, quick keys;
- Café / restaurant (tables, kitchen tickets): tables, kitchen tickets and the restaurant extras: see How do I set the till up for a café or restaurant?;
- Clothing / shoes (sizes and colours, seasons, exchanges): one price per article, ordering by size, seasons and one-step exchanges: see How do I set the till up for a clothing or shoe store?.
- For a café, restaurant or clothing store that also sells by weight, tick Café / restaurant or clothing: we sell by weight (show Read scale and Tare at the till).
- Save.
What changes
- The buttons of the till: no exchange button in a café, no kitchen buttons in a shop, the scale buttons only where goods are weighed. In a café the returns screen is called refunds: see I cannot find a button on the till. Where is it?.
- The row of buttons under the basket starts with the usual ones for that type; you can change it per till: see How do I choose which buttons are in the row under the basket?.
- A store that already has products in sizes or colours keeps the clothing extras whatever its type.
- If the store still holds the demo products of another type, the till offers to replace them. Only demo data is touched: see How do I remove the demo data and start with my own store (Demo ON / OFF)?.
The first-start setup asks the same question, so most stores never need this tile.
How do I change the language of the screens, and choose the languages my store uses?
Open Settings, Language / Theme, choose the language and save: the till restarts in that language. Which languages are offered, and which name boxes products have, is set by Store language in Settings, Store.
The language of the screens
- Open Settings and the tile Language / Theme.
- Choose Language: English, Arabic or French.
- Save. The till asks The language changes after a restart. Restart now? Answer yes.
In Arabic the whole screen runs from right to left, receipts included. A user can have a language of their own, set on their user record.
The languages of the store
- Open Settings, Store.
- Under Store language, tick the languages your store works in. At least one.
- Save and restart when asked.
The store's languages decide:
- which languages are offered for the screens;
- which name boxes products, departments and categories have: see How do I give a product a name in Arabic or French?;
- in which language names are shown: on an Arabic screen the Arabic name, and so on.
Also in this window
- Theme: Light or Dark;
- Look: the standard look or a theme you got from Plugins: see How do I change the look of the program with a theme?;
- Sound when a button is pressed: see How do I switch the click sound of the buttons on or off?.
The installer and the licence agreement are offered in the same three languages.
How do I set the keyboard language and the on-screen keyboard?
Open Settings, Keyboard. Keyboard language can follow the language of the screen, stay on one keyboard, or be left to Windows. On-screen keyboard sets when the touch keyboard opens, or switches it off.

- Open Settings and the tile Keyboard.
- Keyboard language:
- Automatic (the language of the screen): an Arabic screen switches to the Arabic keyboard, and so on. That keyboard must be installed in Windows;
- one keyboard from the list, to stay on it;
- Leave it to Windows: the till does not touch the keyboard.
- On-screen keyboard:
- Opens when a text box is touched (touch screens);
- Opens whenever a text box is selected (for a touch screen that works as a mouse);
- Only with the keyboard button;
- Switched off: no on-screen keyboard.
- On-screen keyboard language: the letters it starts with. Automatic follows the screen.
- Save.

- The list shows the keyboards installed in Windows. To add one: Windows Settings, Time and language, Language.
- The on-screen keyboard has English, Arabic and French built in, whatever is installed in Windows.
- Where a number pad is on the screen (quantity, amount, PIN), the on-screen keyboard never opens.
- Touch screen on this PC tells you whether Windows reports a touch screen. Without one, the keyboard button is not shown in the top bar.
- The settings are per till.
How do I set up a second currency and its exchange rate?
Open Settings, Currencies. Add the currency from the list of all currencies, tick Show this currency next to prices (second currency), and choose between the daily market rate and a rate of your own. Prices, totals, payment and change then work in both currencies.
- Open Settings and the tile Currencies.
- Press Add a currency and search the list: every currency is in it.
- Open the currency and set:
- Show this currency next to prices (second currency): makes it the store's second currency;
- Use my own rate for this currency (for example a shop rate) with My own rate, or leave it unticked to use Market rate today;
- Decimals (0 to 3): the till proposes the usual number for that currency;
- Cash rounding unit (minor units, 1 = none, 5 = 0.05, 25 = 0.25): for countries where cash totals are rounded.
- Save.
Rates
- With internet, the till downloads market rates each day. Update market rates now does it at once.
- Without internet, the last rates stay in use.
- Your own rate stays until you change it. Type it as the number of second-currency units for one unit of the main currency, or the other way round, as the box shows.
- A sale keeps the rate of the moment it was made; later rate changes do not alter past receipts.
What the second currency does
Prices and totals at the till in both currencies (Why does the till show prices in two currencies?), cash and change in either (The customer pays in the second currency. How do I take it and give change?), a price box in each on the product (How do I enter a product's price in the second currency?) and a separate drawer count (How do I count the notes and coins, and what if the drawer holds two currencies?). In Checkout rules you choose whether change may be given in the second currency.
To make another currency the main one, see How do I change the main currency of the store?.
How do I change the main currency of the store?
In Settings, Currencies, use Change the main currency, choose the new currency and the rate. The till makes a backup, then converts every price, cost and open balance exactly. Past sales stay as they were.
- Add the new currency as a second currency first, if it is not in your list: see How do I set up a second currency and its exchange rate?.
- Open Settings, Currencies, and press Change the main currency.
- Choose the currency and type the rate. The window reminds you how to write it, for example 89500.
- Read the notice: All prices, costs and open balances are converted from … to … at the rate below, with open quotes, customer orders, held sales, purchase orders and unpaid supplier invoices. Past sales stay as they were. A backup is made first.
- Press Convert. The till reports how many prices and balances were converted.
What is converted
Product prices, costs and deposits, pack prices and price levels, scheduled prices, supplier price lists, customer balances and credit limits, gift cards and vouchers, the amounts in promotions, and refund limits. From version 1.0.33 also what is still open: quotes, customer orders, deliveries and open tables, held sales, purchase orders not fully received, and unpaid supplier invoices.
What is not
Sales, returns, shifts and reports of the past keep the amounts they were made with, and so do documents that are finished: sold or cancelled quotes, received purchase orders, paid supplier invoices.
- Do it outside opening hours, with the shift closed.
- The old main currency can stay as the second currency, so prices are still shown in both.
- Converting back with the reverse rate gives the same prices again, because the conversion is exact both ways.
- The backup made before the change is in the backups folder: see How do I back up my data, and how do I restore a backup?.
How do I set up my tax rates?
Open Settings, Taxes. Create one line per rate your store charges, say whether your prices include it, and mark one as the default. Each product then points to one of these rates.
- Open Settings and the tile Taxes.
- Press New, or open a rate to change it.
- Fill in:
- Name: as it should read on receipts, for example "VAT 20 %";
- Tax rate %: the percentage;
- Prices include tax: ticked when your shelf prices already contain the tax; unticked when tax is added at the till: see Should my prices include tax, or is tax added at the till?;
- Parts of this tax, if it has several (e.g. State 6.25; County 1; City 1.5): for taxes made of parts: see My tax is made of several parts (state + county + city, GST + PST, CGST + SGST). How do I set it up?;
- Active.
- Save. Mark the rate most products use as the default: new products get it.
Good to know
- A product has one tax rate, chosen on its form. A department can propose a rate to its new products: see What are departments, categories and brands, and how do I manage them?.
- A store that charges no tax keeps one rate of 0 %.
- A rate changes by law: do not edit the old rate on the day; past sales keep what they were charged either way, but it is clearer to create the new rate and move the products to it. With many products, change them through an export and import of the product list.
- Tax holidays: Settings, Tax holidays lists days on which named departments are sold without tax.
- Customers who pay no tax: see How do I mark a customer as tax exempt?.
Which rate applies to which goods is set by your country's tax law. Ask your accountant before the first sale.
How do I change what is printed on the receipt?
Open Settings, Receipt. Choose the paper width, the header and footer lines, whether the logo and the QR code are printed, and whether a receipt prints after every sale, on request or only when asked. A test receipt shows the result.
- Open Settings and the tile Receipt.
- Set:
- Paper width (mm): 58 or 80 mm, as your printer takes;
- Print logo: the store's logo at the top: see How do I get a sharp logo on a thermal receipt printer?;
- Print QR code (digital receipt / returns): a code at the bottom that the till scans to open the sale for a return;
- Header text and Footer text: your own lines, for example return conditions or opening hours;
- Print receipt: after every sale, ask each time, or Never (on request): see How do I print, email or skip the receipt?.
- Save. The till offers to print a test receipt: Print a test receipt?
What the till prints by itself
The store's name, address and tax number from Settings, Store; the receipt number, date, time, till and cashier; each line with quantity and price; discounts; the tax by rate; the payments and the change; the customer's points; serial numbers and warranty; and, during a trial, the words TRIAL COPY.
- On an Arabic screen the receipt is printed in Arabic, right to left. Arabic is sent to thermal printers as an image, so it prints correctly on printers without Arabic fonts.
- Dates, times and a second calendar on the receipt follow Date and time formats: see How do I change the date format, the 12 or 24-hour clock, the first day of the week or the calendar on receipts?.
- Country rules can add a title or a tax QR code: see the chapter on taxes and country rules.
How do I get a sharp logo on a thermal receipt printer?
Open Settings, Receipt logo. Choose the logo picture, pick the printing style, move the darkness slider until the preview looks right, print a test and save. Thermal printers print only black dots, so a colour logo must be converted once.

- Open Settings and the tile Receipt logo.
- Under Logo picture, press Browse... and choose the picture, or press Use the store logo.
- Choose Printing style:
- Logo: sharp black and white (recommended): for logos with clear shapes and text;
- Photo: fine dots for shades: for pictures with shades.
- Move Darkness: Move right if thin parts disappear, left if the logo prints as a black block.
- Look at the preview. It shows the printed result at real size for your paper width.
- Press Print test and look at the paper.
- Save.
A logo that prints well
- Black on a white background: no colours, gradients or shadows.
- Bold shapes and thick lines. Thin lines and small text disappear.
- A PNG about 384 pixels wide and 120 to 200 pixels high.
- Text inside the logo at least 24 pixels tall.
Remove receipt logo goes back to printing the store logo as it is. The logo is printed only when Print logo is ticked in Settings, Receipt.
What can I set under Checkout rules?
Settings, Checkout rules holds the rules of the till in one window: the auto-lock time, the age question, loyalty points and tiers, the low-stock warnings, the time clock, change in the second currency, training mode, and the notes and coins counted when a shift is closed.
| Setting | What it does | More |
|---|---|---|
| Auto-lock after minutes (0 = off) | locks the till after that time without use | How do I lock the till when I walk away? |
| Age check prompts | asks about the customer's age for products with a minimum age | The till asks about the customer's age. What do I do? |
| Loyalty points per currency unit spent, Value of 1 point in minor units (cents) | how points are earned and what they are worth | How do loyalty points work, and how do I set them up? |
| Silver tier from points, Gold tier from points, Platinum tier from points | from how many points a customer reaches each level | How do loyalty points work, and how do I set them up? |
| Warn at the till when an item runs low or out of stock | the message after a product is added | The till shows "Low stock" or "Out of stock after this sale". Can I still sell? |
| Show the low-stock count at the top of the screen | the orange button in the top bar | The till shows "Low stock" or "Out of stock after this sale". Can I still sell? |
| Employee time clock at login and logout | off, ask, or automatic | How does the employee time clock work? |
| the change option for the second currency | lets the cashier give change in the second currency, all or split | The customer pays in the second currency. How do I take it and give change? |
| Notes and coins counted at Close shift | the list of notes and coins of the main currency, if yours differs from the standard list | How do I count the notes and coins, and what if the drawer holds two currencies? |
| Training mode (sales are not recorded as real) | for teaching new staff; see below |
Notes and coins
Type the values largest first, separated by commas, thousands without a mark, for example 100000, 50000, 0.25. Clear the box to go back to the standard list of the currency.
Training mode
With training mode on, sales made at the till are not counted as real sales. Use it to teach a new cashier on the real screens, then switch it off before opening. For a full practice store with products and customers, the demo is better suited: see How do I remove the demo data and start with my own store (Demo ON / OFF)?.
Changes apply as soon as you save, on this till.
How do I choose which buttons are in the row under the basket?
Open Settings, Checkout buttons. Write a place number (1, 2, 3 ...) next to each button that should be in the row under the basket. A button left empty or at 0 goes under More. The choice is saved for this till.
- Open Settings and the tile Checkout buttons.
- Every button of the till is listed with a number box.
- Type 1 for the first button of the row, 2 for the second, and so on.
- Leave the box empty, or type 0, for the buttons you rarely use: they are under More.
- Save. Open Checkout to see the row.
- Restore the buttons of the type of business brings back the row your type of business starts with.
- Only buttons that fit the store are shown at the till: kitchen buttons need a café or restaurant, scale buttons need goods sold by weight: see I cannot find a button on the till. Where is it?.
- On a small window, buttons that do not fit in the row move under More by themselves, so nothing is cut off.
- The shortcut keys work for every button, whether it is in the row or not: see What are the keyboard shortcuts?.
- Each till has its own row. Set it on every till.
- The change is written in the audit log.
A good row holds the five to eight actions your cashiers use at almost every sale. Everything else is one tap away under More.
How do I set the rules for card payments?
Open Settings, Card payments. Choose whether the cashier must type the approval code and the last 4 digits of the card, whether card type buttons are shown, and whether the card total is checked against the terminal when a shift is closed.
- Open Settings and the tile Card payments.
- Set each rule to Off, Optional or Required:
- Approval code from the terminal slip: the code the terminal prints when a card is approved. With it on the receipt, a payment can be traced on the bank's statement;
- Last 4 card digits: helps find a payment when a customer disputes it;
- Card check at Close shift (terminal settlement total): the cashier types the terminal's end-of-day total, and the till compares: see At closing the till asks for the card total. What do I type?.
- Tick Show card type buttons (Visa, Mastercard...) if you want to know which kind of card was used.
- Save.
- "Required" means the cashier cannot finish the card payment, or close the shift, without it. "Optional" shows the box and lets it stay empty.
- The till works with a stand-alone terminal: the cashier types the amount on the terminal and confirms the result on the till: see How do I take a card payment?.
- The full card number, expiry date and security code are never asked for or stored.
- More asked means a slower card payment. Many stores start with the card check at close as optional, and add the approval code only if card disputes happen.
Your card terminal, its contract and its fees are between you and your bank or payment provider.
How do I keep the till full screen so staff cannot leave the program (lock mode)?
Open Settings, Lock mode and tray, tick lock mode and set a lock PIN. The till then covers the whole screen and the taskbar and stays on top of other programs; leaving it asks for the lock PIN, or the password of an owner or manager.

- Open Settings and the tile Lock mode and tray.
- Tick Lock mode: full screen, always on top of all programs and notifications.
- Type a Lock PIN (4 to 12 digits). Give it only to the people who may leave the till program.
- Optional:
- Minimise to the tray (next to the clock);
- Close button hides the till in the tray instead of closing it.
- Save.
What lock mode does
- The till is full screen, above the taskbar and above notifications.
- The Windows key, Alt+Tab and Alt+F4 are blocked.
- Minimising or closing asks for the lock PIN, or the user name and password or PIN of an owner or manager.
- An icon next to the Windows clock offers Open, Lock, Open drawer and Exit.
To leave or switch it off
Use the minimise button at the top right, or the Ironloom POS icon next to the clock, and type the lock PIN. To switch lock mode off for good, come back to this tile and untick it.
Limits
Windows lets no program block Ctrl+Alt+Del. For a till that must be fully sealed, use the kiosk mode of Windows itself (Assigned Access) as well.
Lock mode is not the same as locking the screen with F12, which only asks for a new sign-in: see How do I lock the till when I walk away?.
How do I back up my data, and how do I restore a backup?
The till backs itself up every day and at each Z report. In Settings, Backups, choose a folder on a USB stick or another computer, so a broken PC does not take the backups with it. Restore brings a backup back.
Set it up once
- Open Settings and the tile Backups.
- Backup folder (local, USB or network path): choose a place that is not the till's own disk: a USB stick left in the PC, or a shared folder on another computer.
- Keep last N backups: how many to keep; older ones are removed.
- Keep Daily automatic backup and Backup on Z report ticked.
- Save, then press Back up now and check that a file appeared in the folder.
The tile shows the date of the Last backup, and the Dashboard warns under Alerts when there is none or it is old.
Restore
- Open Settings, Backups, and press Restore.
- Choose the backup by its date.
- Confirm. The current data is kept as a safety copy, and the program restarts to finish.
Everything entered after that backup is gone from the till: sales, products, customers. Restore only when you mean to.
What a backup holds
The whole store: products, stock, sales, customers, users, settings, the audit log, and product pictures. The till also makes a backup by itself before risky steps: an import, a change of main currency, a unit conversion, switching the demo off.
On a new PC
Install Ironloom POS, copy the backup file to it, and restore it. Then move the licence: see How do I move Ironloom POS and its licence to another computer?.
A backup on the same disk as the till protects against mistakes, not against a broken, stolen or burnt PC. Keep one copy elsewhere, and try a restore once on a spare PC so you know it works.
How do I set up email, so the till can send receipts and the daily summary?
Open Settings, Email (SMTP), and enter the outgoing mail server of your own email provider: server, user name, password and the address to send from. Press Send test to check. The till then sends through your account.
- Open Settings and the tile Email (SMTP).
- Fill in, from your email provider's help page for "SMTP" or "outgoing mail":
- SMTP host: the server name, and its port if the provider gives one;
- Username and Password: of the mailbox. Leave the password empty to keep the saved one;
- From address: the address customers see;
- Daily summary email: the address that receives the daily summary: see How do I get the day's figures by email?.
- Save and press Send test. The till answers SMTP works., or shows the server's error.
If the test fails
- Many providers (Gmail, Outlook and others) refuse the normal password for programs. Create an "app password" in your account's security settings and use that.
- Check the server name and the port against the provider's page, letter by letter.
- The PC needs internet at that moment, and a firewall must let the mail port through.
What uses it
Emailed receipts (How do I print, email or skip the receipt?) and the daily summary. The password is stored protected on this PC.
Email is sent by your own provider under your own account. Ironloom does not relay it, cannot see it and cannot fix a provider's refusal: your provider's support can.
How do I change the date format, the 12 or 24-hour clock, the first day of the week or the calendar on receipts?
Open Settings, Date and time formats. By default everything follows the store's country. You can choose the date order, the clock, the first day of the week and a second calendar on receipts yourself.
- Open Settings and the tile Date and time formats.
- For each line, leave Automatic (from the country) or choose:
- Date format: for example day/month/year, month/day/year or year-month-day;
- Clock: 12-hour or 24-hour;
- First day of the week: Monday, Sunday or Saturday, used by the calendar boxes;
- Second calendar on receipts: None, Hijri (Umm al-Qura), Persian (Solar Hijri) or Thai Buddhist. The date is then printed in both calendars.
- The window shows the current date and time in the format chosen, under Now.
- Save.
Where the formats are used
Receipts, slips and invoices, every list and report on the screen, and exported files.
Also in this window
- Phone numbers of customers: keep them in the International form of the store's country (recommended), or Keep as typed.
- The address parts your country uses are listed, so you can see what customers will be asked.
- Save, and rewrite all customer phone numbers in the international form: converts numbers saved earlier. A backup is made first, and numbers that are not valid are listed and left as they are: see Why does the till refuse a phone number, and how are addresses entered?.
Amounts follow the currency: its symbol and its number of decimals: see How do I set up a second currency and its exchange rate?.
How do I switch between kilograms and pounds (the measurement system)?
Open Settings, Store, and set Measurement system: automatic from the country, metric, or US units. When it changes, products sold by weight or volume are converted, their price per unit and their stock, after a backup.
- Open Settings, Store.
- Choose Measurement system:
- Automatic (from the country);
- Metric (kg, g, L, ml);
- US (lb, oz, gal, fl oz).
- Save. The till explains what will be converted and asks you to confirm, then reports how many products were converted.
What the conversion does
- The unit of each weighed or measured product changes: kg to lb, g to oz, L to gal, ml to fl oz, or back.
- The price per unit is recalculated so that the same quantity costs the same: a price per kg becomes the matching price per lb.
- The stock quantity is converted to the new unit.
- Products sold by the piece are not touched.
Related
- The Unit list on a product offers the units of the store's system: see How do I set up a product that is sold by weight?.
- A scale that sends weights without saying the unit is read as kg or lb according to the scale's own setting in Hardware: see How do I connect a scale to the till?.
- Tare weights of containers stay in grams.
Changing the system and changing it back gives the original prices again. The backup made before the conversion is in the backups folder.
How do I make the till read the weight or price labels of my labelling scale, and set the containers for tare?
Open Settings, Scale labels (EAN-13 weight/price). Tell the till how your scale builds its barcodes: which starting digits, how many digits for the product number and for the value, and whether the value is a weight or a price. The same window lists the containers offered by the Tare button.
A labelling scale prints a 13-digit barcode that holds the product's number and the weight or the price. The usual layout is 2 + 5 + 5 + check digit: 2 + 5 + 5 + check digit = 13: 20 00123 01250 X = PLU 123, 1.250 kg
- Open Settings and the tile Scale labels (EAN-13 weight/price).
- Fill in, from the manual of your scale or from one of its labels:
- Prefixes (EAN-13 starts) e.g. 20,21,22,23,24,25,26,27,28,29: the two starting digits your scale uses;
- Prefixes that carry a PRICE instead of a weight: those of them whose value is a price;
- Prefix length, Item (PLU) length and Value length: how the digits are split;
- Value type: Weight (grams) or Price (minor units).
- Save, then scan a label at the till. The product should appear with the weight on the label.
The product number on the label must be the PLU (scale code) of the product in the till: see How do I set up a product that is sold by weight?.
Containers for tare
In Containers for tare, one per line: name = grams (e.g. Small tub = 12), type one container per line. The cashier chooses from this list with the Tare button: see How do I take off the weight of a container (tare)?.
- If a label is scanned as an unknown barcode, the prefix or the lengths do not match your scale.
- These barcodes mean something only inside your store and are never looked up online.
How do I teach the till other keys, when the F-keys of my laptop do something else?
Open Settings, Laptop keys. For each action of the till, press the key you want to use for it. The Ctrl shortcuts always work as well: Ctrl+Enter pays, Ctrl+H holds, Ctrl+F searches.
On many laptops the top row of keys changes the volume or the brightness unless Fn is held. The till notices this the first time such a key arrives, and shows a tip with three ways out:
- hold Fn while pressing the F-key, or lock Fn (on many laptops Fn+Esc);
- use the Ctrl shortcuts, which need no F-keys: see What are the keyboard shortcuts?;
- teach the till your own keys, as below.
Teach your own keys
- Open Settings and the tile Laptop keys.
- For each action the window says Press the key you want to use for: and names the action. Press the key.
- Skip leaves an action as it is. Finish ends the round.
- The window lists the Learned keys:.
- Letters, digits and Enter cannot be chosen: they are needed for typing.
- Forget all learned keys goes back to the F-keys and the Ctrl shortcuts only.
- The learned keys are saved for this till.
- The F-keys and the Ctrl shortcuts keep working next to the learned keys.
How do I remove the demo data and start with my own store (Demo ON / OFF)?
Open Settings and press the Demo tile. Switching it OFF erases the demo and every other piece of business data, starts receipt numbers at 1 and makes the till use its real devices. Switching it ON, possible only in an empty store, loads demo products and sales for your type of business.
Demo OFF: start for real
- Open Settings and press the tile Demo, which shows ON.
- Read the message and confirm. A backup is made first.
Erased for good: products, departments, stock, sales, returns, shifts and Z reports, customers, suppliers, promotions, purchases, gift cards and vouchers. Receipt numbers start again at 1.
Kept: store details, users, settings, currencies, taxes, receipt layout, hardware and licence.
Afterwards the till uses its real devices, and offers to open Hardware to set up the printer, scanner and drawer.
Demo ON: try the program
- In an empty store, press the tile Demo, which shows OFF.
- Confirm. The demo of your type of business is loaded: a supermarket catalogue, a café menu, or clothing in sizes and colours, with customers, suppliers, promotions and a week of sales. The till uses simulated devices.
Demo ON is refused when the store already has products or sales.
Good to know
- Switch the demo OFF before the first real sale. Everything rung up while the demo is on is erased with it.
- When Type of business is changed, the till offers to replace the demo products of the old type. Products, customers and sales you entered yourself are not touched.
- Demo OFF is refused when strict record keeping is on and the store has real sales, or when invoices were already reported to a tax authority. Records of real business are corrected, never erased: see What is strict record keeping?.
How do I switch the click sound of the buttons on or off?
Open Settings, Language / Theme, and tick or untick Sound when a button is pressed. The sound is on by default, and every button also shows a ring when pressed, with or without sound.
- Open Settings and the tile Language / Theme.
- Tick or untick Sound when a button is pressed.
- Save.
- The click helps on a touch screen, where a finger feels nothing: you hear that the press was taken.
- The sound plays through the PC's speakers at the Windows volume. If you hear nothing, check that Windows is not muted.
- The setting is for this till.
- The ring around a pressed button and the press-in effect stay on either way.
Devices
Which devices work with Ironloom POS?
Standard point-of-sale devices: barcode scanners, ESC/POS receipt printers, cash drawers opened through the printer, label printers, serial scales, customer displays and a stand-alone card terminal. You need none of them to start: the till works with a keyboard and a mouse alone.

| Device | How it connects |
|---|---|
| Barcode scanner | USB (several at once), keyboard-style scanners, serial or Bluetooth, or a webcam |
| Receipt printer | ESC/POS thermal printers, 58 or 80 mm, through their Windows driver, the network (port 9100) or a serial port |
| Cash drawer | through the receipt printer's drawer socket (the usual way), a serial port, or OPOS |
| Label printer | ZPL or TSPL printers, or any printer with a Windows driver |
| Scale | serial scales (CAS, Toledo and generic protocols) or OPOS; labels from labelling scales are read as barcodes |
| Customer display | 2 × 20 pole displays, a second monitor, or OPOS |
| Card terminal | a stand-alone terminal from your bank: the cashier types the amount on it |
Before you buy
- A printer described as "ESC/POS compatible" and a drawer that plugs into it are the safe choice.
- The till has lists of common makes that fill in the usual settings; other makes that follow the same standards can be set up by hand.
- Any Windows PC from Windows 7 SP1 to Windows 11 runs the program. A touch screen is optional.
Setting up
Open Hardware. Each device has its card with its settings and a Test button. Detect devices finds what is connected: see How do I let the till find and set up my devices?. Test hardware checks everything in one place: see How do I test all the devices of the till in one place?.
Settings are saved per till, so each till can have different devices.
Always run the test on your own device before the first day of sales. A make or model that is not in the lists may need its settings adjusted.
How do I let the till find and set up my devices?
Open Hardware and press Detect devices. The till looks for receipt and label printers, a second screen, point-of-sale devices on USB and, if you agree, a scale. It lists what it recognised with a tick box each; tick what to set up and confirm.
- Connect the devices, switch them on, and install the Windows driver of each printer first.
- Open Hardware and press Detect devices.
- The till searches and shows a wait message with a Cancel button. Stopping changes nothing.
- It asks whether to listen on the COM ports for a scale, for a few seconds. Put something on the scale if you answer yes.
- Under Suggestions, each device found has a tick box: a receipt printer with the cash drawer through it, a label printer, a customer display or second screen, a scale.
- Tick what you want and press Set up the ticked devices.
- Test each device from its card: see How do I test all the devices of the till in one place?.
- Show the full detection report lists everything Windows reports: COM ports, printers, keyboard devices (USB scanners show here), webcams and screens.
- Nothing new to set up. Printers need their Windows driver installed first; scales and pole displays need their COM port. means exactly that: install the driver, or check the cable.
- A new till sets up a recognised receipt or label printer by itself at its first start.
- A USB scanner that types like a keyboard needs no setup at all.
How do I set up a barcode scanner?
Plug in a USB scanner and scan: it works at once, on every screen, without setup. To make the till recognise the scanner as a scanner, so its scans never land in the wrong box, open Hardware, the Scanner card, and use Learn USB scanner (scan now).
The simple case: a USB scanner
Most scanners type the barcode like a very fast keyboard and end with Enter. The till recognises such fast typing as a scan on every screen and sends it to the right place: the sale, the Products search, the stock list.
Teach the till your scanner
- Open Hardware and the Scanner card.
- Press + Add scanner and choose the kind: USB, serial or Bluetooth, or webcam.
- For USB, press Learn USB scanner (scan now) and scan any barcode. The till remembers which device it came from.
- Press Test: scan something and scan again to check.
- Save.
A learned scanner is read directly, so what it sends never appears as typing in a text box, even when the cursor is somewhere else.
Other settings
- Auto-detect scanners (learn from fast bursts): recognises unlearned scanners by their speed. Max ms between keys sets how fast "fast" is.
- Tab suffix: for scanners that end with Tab in place of Enter.
- Webcam index: which camera to use as a scanner. A webcam can read product barcodes too: hold the product still in front of the camera for a few seconds. It is slower than a barcode scanner, so use it as a backup or on a quiet till. Tilt a pack wrapped in plastic a little, so the light does not shine on the barcode. Test: scan something shows the camera picture and the code when it is read.
- Brand / model: fills in usual settings for common makes.
- Several scanners can be used on one till.
Problems: see The scanner does nothing, types into the wrong box, or scans the wrong product. What do I check? and, for Arabic keyboards, A barcode is not found when the keyboard is set to Arabic (or another language). Why?.
How do I set up the receipt printer?
Install the printer's Windows driver, then open Hardware, the Printer card. Choose how it is connected, the paper width, and press Test. For a printer on the network, type its address and the port 9100.
- Install the printer in Windows with its driver, or connect it to the network.
- Open Hardware and the Printer card.
- Choose the Type:
- Windows printer (Spooler): pick the printer from the list of Windows printers;
- IP / host (Tcp) with the TCP port (usually 9100): for a network printer;
- a serial port with its speed settings.
- Set Paper width (mm): 58 or 80 mm.
- Brand / model fills in the usual settings of common makes.
- Save and press Test. Check the paper: the text in the three languages is readable, the barcode and the QR code scan, and the paper is cut.
Arabic and other scripts
Leave Print Arabic as image (works on every printer) ticked: the till then draws Arabic text itself and sends it as a picture, so it prints correctly on printers without Arabic fonts. Code page (437 default, 864/1256 Arabic) matters only if you untick it.
More
- Native QR: lets the printer draw the QR code itself; untick it if the code does not print.
- The cash drawer normally plugs into this printer and opens through it: see How do I set up the cash drawer, and what is the drawer test?.
- What is printed on the receipt is set in Settings, Receipt: see How do I change what is printed on the receipt?.
- Nothing prints? See The receipt does not print. What do I check?.
How do I set up the cash drawer, and what is the drawer test?
Plug the drawer's cable into the drawer socket of the receipt printer. The till opens it through the printer with a standard signal. If it stays closed, run Find the drawer setting: the till tries the common signals one by one and saves the one that opens your drawer.
Connect it
- Plug the drawer's cable (a phone-style plug) into the socket marked for the drawer on the back of the receipt printer. Not into a phone or network socket.
- Set up the receipt printer first: see How do I set up the receipt printer?.
- Open Hardware and the Drawer card. The usual Type is the drawer through the printer.
- Press the test. If the drawer opens, you are done.
The drawer test
- Open Test hardware in Hardware and press Find the drawer setting.
- The till sends one signal and asks Did the drawer open?
- Answer Yes, or No to try the next signal, or Stop. There are eight candidates, a couple of seconds apart.
- On Yes, that setting is saved for this till.
A cashier can start the same test from the till: pressing Open drawer twice within 10 seconds offers it.
Settings by hand
Open command, Pin (0 = pin 2, 1 = pin 5), On time (x2 ms, default 25) and Off time (x2 ms, default 250) are the signal itself; your drawer's leaflet may give them. The on time must be at most a quarter of the off time, or the drawer's coil can overheat. A serial drawer and an OPOS drawer have their own kind. Drawer open when the sensor signal is high is for drawers that report whether they are open.
Who may open the drawer without a sale is set on the same card: see How do I decide who may open the cash drawer without a sale?.
How do I connect a scale to the till?
Connect the scale to a serial (COM) port of the PC, open Hardware, the Scale card, choose its kind and port, and press Test with something on the platter. A labelling scale that prints barcodes needs no connection: its labels are scanned.
A scale read by the till
- Connect the scale's cable to a COM port, or to a USB-to-serial adapter.
- Open Hardware and the Scale card.
- Choose the Type: the protocol your scale speaks (CAS, Toledo, generic) or OPOS, and the port with its speed settings from the scale's manual.
- Brand / model fills in usual settings for common makes. Detect devices can also find the scale by listening on the ports: see How do I let the till find and set up my devices?.
- Put something on the scale and press Test. The till shows the weight.
kg or lb
Scale reports in is used when the scale sends a weight without naming the unit: Automatic (store measurement system), kg or lb. Weights sent with kg, g, lb or oz are always read as sent.
Messages
No stable weight: the scale answered, but the weight was still moving or was zero. Wait until the scale is steady. No answer at all means the wrong port, speed or cable.
A labelling scale
A scale that prints its own price labels is not connected. Tell the till how its barcodes are built, once: see How do I make the till read the weight or price labels of my labelling scale, and set the containers for tare?.
Selling by weight is regulated in most countries: the scale must be an approved type and may need periodic verification. That is between the store and the local weights and measures office; the till only reads what the scale sends.
How do I set up a label printer for shelf labels?
Install the label printer's Windows driver, open Hardware, the label card, choose the printer's language (ZPL, TSPL or its Windows driver) and type the size of your labels in millimetres. Press Test to print one.
- Load the labels and install the printer in Windows.
- Open Hardware and the label printer card.
- Choose the Type: ZPL (Zebra and compatible), TSPL (TSC and compatible), or the Windows driver for other printers.
- Type Label width mm, Label height mm and Gap mm: measure one label and the space between two labels.
- Tick Print barcode and Print date as you wish.
- Brand / model fills in usual settings for common makes.
- Save and press Test.
- If the print starts too high or too low, or creeps from label to label, the height or the gap is wrong. Many printers also have their own calibration button: see the printer's leaflet.
- A label shows the product name, the price, the SKU and the barcode; a weighed product shows its price per unit.
- Labels are printed from Products: see How do I print shelf labels?.
- The receipt printer cannot print adhesive shelf labels; the two printers are set up separately.
How do I set up a customer display?
Open Hardware, the Customer display card, and choose the kind: a pole display with two lines of 20 characters on a COM port, or a Second monitor connected to the PC. Press Test: it should show Ironloom POS and the time.
A pole display (2 × 20)
- Connect it to a COM port, or a USB port that Windows shows as a COM port.
- In the Customer display card choose the Type and the port.
- Choose the VFD command set your display understands: Epson, CD5220 or plain text. The leaflet of the display names it.
- Save and press Test.
If the test shows odd characters, try another command set, or check the port speed.
A second monitor
- Connect a second screen to the PC and set Windows to extend the desktop onto it.
- In the Customer display card choose Second monitor and the screen.
- Save and press Test.
What the customer sees
- each product as it is added, with its price, and the running total;
- at payment, the total and then the change, or a thank-you;
- the price found with a price check.
The display follows the sale by itself: the cashier does nothing.
Does my card terminal connect to the till?
Not in the Standard edition. The till works with a stand-alone terminal: the one your bank or payment provider gave you, not wired to the PC. The cashier reads the amount on the till, types it on the terminal, and confirms on the till whether the card was approved.
How it works day to day
- The till shows the amount in large digits.
- The cashier types it on the terminal and the customer pays.
- The cashier presses approved or declined on the till: see How do I take a card payment?.
- At the end of the shift, the terminal's total is compared with the till's card total, which catches typing mistakes: see At closing the till asks for the card total. What do I type?.
In the Hardware screen
The Card card has a Type. Leave it on the stand-alone (manual) kind. The simulator kind approves every card after a second and is only for the demo: never use it in a real store.
Why it is not connected
Sending the amount to a terminal needs the bank's or the provider's own connection, which differs for every bank and country and needs an agreement with them. Integrated card terminals through payment providers are not part of this version.
What you need
Any card terminal with its own connection (network, Wi-Fi or mobile data) and its own paper or screen receipt. The contract, the fees and the settlement to your bank account are between you and the bank or provider. Ironloom POS never sees card numbers.
How do I test all the devices of the till in one place?
Open Test hardware, in Hardware or in Shifts & Cash. The window shows the state of every device and has a button for each test: open the drawer, print a test receipt, print a test label, read the scale, write on the customer display, or Test all.
- Open Hardware, or Shifts & Cash, and press Test hardware.
- The top of the window lists each device with its state. Not set up means the till has no such device configured.
- Press the test you need:
| Button | What should happen |
|---|---|
| Open drawer | the drawer opens. If it stays closed, use Find the drawer setting: see How do I set up the cash drawer, and what is the drawer test? |
| Print a test receipt | a receipt with lines in English, Arabic and French, a barcode, a QR code and a cut. All three languages should be readable and both codes should scan |
| Print a test label | one shelf label |
| Read scale | the weight on the scale, or No stable weight |
| Write on the customer display | the display shows Ironloom POS and the time |
| Test all | runs every test in turn |
- Do this on a new till before the first sale, after changing a device, and when something stops working.
- The test receipt also prints the settings in use, which helps support if you send a photo of it.
- Every test is written in the audit log.
- The owner decides per till whether cashiers may open this page: see How do I decide who may open the cash drawer without a sale?.
What are simulators, and why does nothing really print?
A simulator stands in for a device that is not there: it shows a receipt on the screen instead of printing it, pretends to open a drawer and approves every card. Simulators are on while the demo is on. For a real store, switch them off in Hardware.
Is this till using simulators?
Open Hardware. The first tile, Use simulators for all devices, says ON: every device is simulated or OFF: real devices below. Click it to switch.
What each simulator does
| Device | Simulated |
|---|---|
| Receipt and label printer | the print is kept on the screen: Show what the simulated printer printed |
| Cash drawer | "opens" without a real drawer |
| Scanner | none: type barcodes, or use a real scanner, which always works |
| Scale | gives a made-up weight |
| Card terminal | approves every card after a second |
When they are used
- The demo store uses simulators, so the whole program can be tried on a PC with nothing connected: see How do I remove the demo data and start with my own store (Demo ON / OFF)?.
- A new store that is not a demo starts with real devices: a USB scanner, a stand-alone card terminal and the drawer through the printer.
- Switching the demo OFF switches the simulators off too.
Never take real payments with simulators on. A simulated card terminal says "approved" without any card being charged.
Inventory
How do I see how much of a product is in stock?
Open Inventory. The first tab, Stock on hand, lists every product with its quantity, reorder level and average cost. Scan a product on any tab of this screen to see its stock at once.

- Open Inventory. The tab Stock on hand is shown.
- Type part of the name, SKU or barcode in the search box, or scan the product.
- Each line shows the SKU, the name, the department, the quantity, the Reorder point and the Avg cost.
- Scan: a scan on any tab shows that product's stock in the message line. If the barcode is not known, the till tells you to scan it in Products to add it.
- At the till: a price check shows the stock too: see How do I check a price without adding the product to the sale?.
- Valuation shows the value of the whole stock at average cost. For the value on a past date, see What was my stock worth on a past date, such as the end of the year?.
- Export writes the list to Excel, CSV or PDF.
- A product with stock tracking switched off has no quantity; the till says its stock is not tracked.
- Weighed products are counted in their unit, with decimals. Each size and colour of an article has its own quantity.
The quantity goes down with each sale and up with each delivery received, return put back in stock, and correction. If a figure looks wrong, look at the product's movements before correcting it: see How do I see who changed the stock of a product, and when?.
How do I correct the quantity of a product in stock?
In Inventory, select the product and press Adjust. Type the quantity that is really there and choose the reason. The till records the difference as a movement with your name.
- Open Inventory and select the product in Stock on hand.
- Press Adjust.
- Check the Product and the Warehouse.
- Type the New quantity: what you counted, not the difference.
- Choose the Reason:
- Correction (counting error): the figure was wrong;
- Opening stock: the first stock of a new product;
- Damaged / waste, Expired, Theft / missing, Own use / samples: goods that are gone: see How do I record stock that was damaged, expired, stolen or used by the store?.
- Confirm.
- The reason matters for the accounts: a correction and a loss are not booked the same way.
- A quantity below zero means more was sold than was ever entered. Find out why: a delivery not received in the till, or the wrong product sold.
- Do not use an adjustment to bring in a delivery: receive it, so the cost and the supplier are recorded: see How do I receive a delivery into stock?.
- For many products at once, do a stock take: see How do I do a stock take (count my stock)?.
- Adjusting needs the right to do so, and each one is in the movements list and the audit log.
How do I record stock that was damaged, expired, stolen or used by the store?
In Inventory, select the product, press Adjust, type the quantity that is left and choose the reason of the loss. Each reason goes to its own account in the journal, and Reports, tab Stock losses, totals the losses by reason.
Record a loss
- Open Inventory, select the product and press Adjust.
- Type the New quantity: what is left on the shelf.
- Choose the Reason:
| Reason | Use it for |
|---|---|
| Damaged / waste | breakage, spoilage, unsaleable goods |
| Expired | goods past their date |
| Theft / missing | goods that disappeared |
| Own use / samples | goods the store used or gave away |
- Confirm.
An expired batch can also be written off from the tab Expiry: see How do I keep track of expiry dates?.
See the losses
- Open Reports and the tab Stock losses.
- Choose the period. The report shows, per reason, the quantity and the value at cost, with Stock count differences from stock takes on their own line.
Why the reason matters
- Each reason has its own account in the accounting export, so the accountant sees waste, theft and own use separately: see What is in the daily journal?.
- Losses lower the profit in the profit and loss report: see How do I see whether the store made a profit (profit and loss)?.
- In some countries goods taken for own use, or given away, are taxed. Tell your accountant what these lines are.
A return marked damaged at the till is a loss too; it is recorded with the return: see Does a returned product go back into stock, or is it damaged?.
How do I move stock from one warehouse to another?
In Inventory, tab Transfer, press New, choose the two warehouses and list the products and quantities, one per line. The stock moves when you press Complete sale.
- You need at least two warehouses: see What are warehouses, and do I need more than one?. Otherwise the till says Create a second warehouse first.
- Open Inventory and the tab Transfer, and press New.
- Choose the warehouse the goods leave and the one they go to.
- In the lines box, type one product per line as Lines: sku or barcode | qty (one per line), for example P000123 | 12. A barcode can be scanned into the box.
- Add Notes if needed and save. The transfer is in the list with its status.
- When the goods have really moved, select the transfer and press Complete sale. The till asks Complete transfer?
- Stock changes only when the transfer is completed: down in one warehouse, up in the other, at the same cost.
- A product the till does not know is refused with its code.
- The total stock of the store does not change, so a transfer has no effect on the accounts.
- Both sides appear in the movements list.
- The till sells from the store's default warehouse. Stock kept in another warehouse is not sold until it is transferred there.
How do I do a stock take (count my stock)?
In Inventory, tab Stock take, press Start stock take, then scan every item on the shelves. The till adds up what you scan, compares it with its own figures and shows the differences. Nothing changes until you press Complete (apply).
Before you start
Count when the store is closed, or at least when the products being counted are not being sold. Receive every delivery that is already on the shelves first.
Count
- Open Inventory and the tab Stock take, and press Start stock take.
- Give it a Name, choose the Warehouse, and a Department to count only one. Empty means all departments.
- Scan each item, one scan per piece. The till shows how many of that product are counted so far. For a large quantity of one product, scan it, then type the quantity.
- A barcode the till does not know is reported: put the item aside and add it in Products.
- You can leave the screen and come back: the count stays open. Only one stock take can be open at a time.
Check and apply
- The list shows, for each product, the till's quantity, your count and the difference.
- Recount the products with large differences.
- Press Complete (apply).
- The till asks: Set uncounted products to zero? (No = leave uncounted products unchanged) Answer yes only if you counted everything in the chosen warehouse and department; otherwise answer no.
- Applying sets the stock to your count and records each difference as a movement.
- The value of the differences appears in Reports, Stock losses, under stock count differences: see How do I record stock that was damaged, expired, stolen or used by the store?.
- Counting a few products each week (a cycle count) keeps the figures right without closing the store: start a stock take for one department.
How do I keep track of expiry dates?
Tick Has expiry (FEFO) on the product. Each delivery is then received as a batch with its expiry date, the till sells the batch that expires first, and Inventory, tab Expiry, lists what expires soon so you can sell it off or write it off.
Set it up
- Open the product and tick Has expiry (FEFO): see How do I set a minimum age, a deposit, an expiry date or a discount rule on a product?.
- When a delivery is received, enter the expiry date of the goods, and the batch number if there is one: see How do I receive a delivery into stock?.
What the till does
- Each batch has its own quantity and date.
- A sale takes from the batch with the nearest date first.
- The Dashboard shows the next expiry dates under Stock watch.
The Expiry tab
- Open Inventory and the tab Expiry.
- Batches are listed by date, the nearest first, with the product, the batch, the quantity left and the date.
- For goods past their date, select the batch and press Write off. The quantity leaves the stock with the reason expired, and is counted in the losses: see How do I record stock that was damaged, expired, stolen or used by the store?.
Tips
- The till sells the oldest batch in its books; on the shelf, staff must also put the oldest goods at the front.
- Mark down goods that are close to their date with a scheduled price or a promotion, rather than writing them off later.
- Whether goods past a "best before" date may still be sold depends on your country's food law.
How do I see what is running low, and what has not sold for a long time?
Open Inventory. The tab Low stock lists products at or under their reorder point; the tab Dead stock lists products with stock that have not sold for a long time. From the low-stock list, Reorder suggestions starts a purchase order.
Low stock
- Open Inventory and the tab Low stock, or press the orange button at the top of any screen.
- Each line shows the product, the quantity on hand and its Reorder point.
- Press Reorder suggestions to create a purchase order from the list: see How do I create a purchase order?.
A product appears here only if it has a reorder point. Set it on the product form: Reorder point is the level at which to order again, Reorder qty the quantity to order.
Dead stock
- Open the tab Dead stock.
- Each line shows a product that still has stock, with the date it was last sold.
- Decide what to do: a lower price, a promotion, a return to the supplier, or a write-off.
Where else you see it
- At the till, a warning appears when a product is added that is low or runs out: see The till shows "Low stock" or "Out of stock after this sale". Can I still sell?.
- The Dashboard shows out-of-stock, reorder and dead-stock counts under Stock watch.
How do I see who changed the stock of a product, and when?
Open Inventory, tab Movements. Every change of stock is a line: the date, the product, the quantity in or out, the cost, the reason and the user. Search the product to see only its lines.
- Open Inventory and the tab Movements.
- Type the product's name or SKU in the search box, or scan it.
- Read the lines, newest first.
What makes a movement
| Movement | Stock |
|---|---|
| a sale | down |
| a return put back in stock | up |
| a delivery received | up |
| a return to the supplier | down |
| a correction or a loss | up or down, with its reason |
| a transfer between warehouses | down in one, up in the other |
| a stock take applied | the difference, up or down |
| a finished sale voided | up |
Use it to find a wrong figure
- Stock too high: was a delivery received twice, or a sale made under another product?
- Stock too low: was a delivery put on the shelf without being received in the till?
- A sudden jump: look for a correction or a stock take on that date, and who made it.
Movements are never edited or deleted. A wrong one is put right by a new movement, so the history stays complete. The audit log holds the same actions with more detail: see What is the audit log, and how do I check that nobody changed it?.
What was my stock worth on a past date, such as the end of the year?
Open Reports, tab Stock value on a date, and choose the date. The report lists each product with the quantity it had at the end of that day, its average cost and its value, and gives the total.
- Open Reports and the tab Stock value on a date.
- Choose the date, for example the last day of your financial year. The last day of the period chosen is used.
- Read the list: product, quantity, Avg cost and Value. The total is at the bottom.
- Export it for your accountant.
How it is worked out
- The quantity on that date is today's quantity with every later movement undone.
- The value uses the weighted average cost: each delivery received changes the average, at its cost including freight and other costs spread over it: see How do I add freight, customs and other costs to the cost of the goods (landed cost)?.
- Products without stock tracking are not in the list.
Good to know
- Today's value is also in Inventory, button Valuation.
- For a year-end figure the accountant can rely on, do a stock take close to the date, so the quantities are counted and not only calculated.
- Other valuation methods (first in first out, lower of cost or market) are the accountant's work, starting from this list.
What are warehouses, and do I need more than one?
A warehouse is a place where stock is kept. Every store starts with one, which the till sells from. Add another in Inventory, tab Warehouse, only if you want the till to keep separate quantities for a stockroom or a second site.
Do you need one?
- One is enough when the goods on the shelf and in the back room are counted together.
- Add a second when you want to know how much is in the back store, or keep goods at another address, and move them to the shop when needed.
Add a warehouse
- Open Inventory and the tab Warehouse.
- Press New, type the Name and save.
How they work
- Deliveries are received into a warehouse you choose: see How do I receive a delivery into stock?.
- The till sells from the store's default warehouse.
- Stock moves between warehouses with a transfer: see How do I move stock from one warehouse to another?.
- Corrections and stock takes are made per warehouse.
- Stock on hand shows the quantity of all warehouses together.
More warehouses mean more transfers to record. If transfers are forgotten, the till shows no stock in the shop while the shelf is full. Start with one.
Purchasing
How do I add a supplier?
Open Purchasing, tab Suppliers, and press New. The name is enough to start; the payment terms tell the till when the supplier's invoices fall due.

- Open Purchasing and the tab Suppliers.
- Press New and fill in:
- Name, and Name (Arabic) if your store uses it;
- Phone, Email, Address and Tax number;
- Payment terms (days): how many days after the invoice you must pay, for example 30;
- Notes.
- Save.
Price list
Select a supplier and press Price list to enter what this supplier charges for each product: one line per product with your SKU, the cost and the supplier's own code. The cost is then proposed when you order from this supplier.
Good to know
- A supplier is not required to receive goods, but with one the till can show what you bought from whom, what you owe and when it is due.
- A supplier you no longer use is made inactive by unticking Active; past orders and invoices keep the name.
- The phone number is checked like a customer's: see Why does the till refuse a phone number, and how are addresses entered?.
How do I create a purchase order?
Open Purchasing, tab Purchase orders, and press New: choose the supplier and list the products, quantities and costs. Or press Suggest from reorder points and the till builds the order from what is running low.
By hand
- Open Purchasing. The first tab is Purchase orders.
- Press New.
- Choose the Supplier and the Warehouse the goods will go to.
- In the lines box, type one product per line as Lines: sku or barcode | qty | unit cost, for example P000123 | 24 | 1.80. Leave the cost out to use the last known one.
- Add Notes for the supplier and save.
From the reorder points
- Press Suggest from reorder points and choose the supplier.
- The till lists the products at or under their reorder point, each with its reorder quantity. If nothing is low it says Nothing below reorder point.
- Adjust the lines and save.
Then
- Print prints the order, or saves it as PDF to send.
- Edit changes an order that has not been received.
- Receive goods takes the delivery in against the order: see How do I receive a delivery into stock?.
- Cancel order cancels an order that will not come.
An order by itself changes neither stock nor money: it is a list of what you asked for. Stock goes up when the goods are received.
How do I receive a delivery into stock?
Open Purchasing, tab Receive goods, choose the supplier and list what arrived with its quantity and cost. Stock goes up and the product's cost is updated. With the supplier's invoice number, the till also records what you owe.
- Open Purchasing. To receive against an order, select it in Purchase orders and press Receive goods: its lines are filled in. Otherwise open the tab Receive goods.
- Choose the Supplier and the Warehouse.
- Check or type the lines, one product per line: Lines: sku or barcode | qty | unit cost | batch | expiry (yyyy-mm-dd). Batch and expiry are only for products with expiry dates.
- Correct quantities to what really arrived, and costs to what the delivery note says.
- Optional: Supplier invoice number (creates a payable): with it, the amount is added to what you owe this supplier: see How do I record a supplier's invoice and its tax?.
- Optional: Freight, customs and other costs (added to the cost of these goods): see How do I add freight, customs and other costs to the cost of the goods (landed cost)?.
- Press Receive goods. The till confirms how many lines were received.
What happens
- The stock of each product goes up in the chosen warehouse.
- The product's average cost is recalculated with the new cost, which is what margin and stock value are based on.
- Each line is a movement in Inventory.
- The order, if there was one, is marked received.
A product the till does not know is refused with its code: create it first, or receive by scanning, which creates unknown products on the way: see How do I receive a delivery by scanning the goods?. Units with serial numbers are entered on the product: see How do I sell products with serial numbers and keep track of the warranty?.
How do I receive a delivery by scanning the goods?
In Purchasing, press Receive by scanning and scan each item as you unpack. A known product adds one to its line; an unknown barcode opens Smart Scan, where you create the product with its quantity and cost. Press Receive goods when the delivery is complete.
- Open Purchasing and press Receive by scanning.
- Choose the Supplier and the Warehouse at the top.
- Scan the items. You can also type a barcode or SKU and press Enter.
- A product you have: its line gets one more.
- A barcode you do not have: the till looks it up and opens the review window with boxes for the quantity received and the cost. Import it, and it joins the list: see How do I check and import a product that Smart Scan found?.
- Correct a line's Qty or Unit cost in the list; Remove takes a line out.
- Type the Supplier invoice number (creates a payable) and any Freight, customs and other costs (added to the cost of these goods).
- Press Receive goods. Stock goes up, as with any receiving.
Or make an order of it
Save as order saves what you scanned as a purchase order instead of receiving it. Use it to prepare an order by walking along the shelves and scanning what is nearly empty.
- For a case of 24, scan one and change the quantity on its line.
- The window shows the total as you go, to compare with the delivery note.
- Cancel leaves without receiving anything.
How do I add freight, customs and other costs to the cost of the goods (landed cost)?
When receiving a delivery, type the total of these costs in Freight, customs and other costs (added to the cost of these goods). The till spreads the amount over the lines of the delivery in proportion to their value, so each product's cost is what it really cost to get it on the shelf.
- Receive the delivery as usual: see How do I receive a delivery into stock?.
- Before pressing Receive goods, type the total of freight, customs, insurance and handling for this delivery in Freight, customs and other costs (added to the cost of these goods).
- Press Receive goods.
What the till does
- It shares the amount between the lines by value: a line worth half of the delivery carries half of the costs.
- Each product's unit cost, and so its average cost, includes its share.
- Margin, stock value and cost of goods sold then show the real cost.
Example
A delivery of 1,000 in goods with 100 of freight: a product bought at 10.00 goes into stock at 11.00.
Good to know
- Type only costs that belong to these goods. General costs of the store, such as rent, are expenses: see How do I record an expense, such as something paid from the drawer?.
- Costs that arrive later, such as a customs bill a week after, cannot be added to a delivery already received. Record them as an expense, or tell your accountant.
- The amount is carried in the journal with the purchase, not as a separate expense: see What is in the daily journal?.
- Whether such costs must be part of the stock value is an accounting rule in most countries. Ask your accountant how to treat them.
How do I record a supplier's invoice and its tax?
An invoice is created by itself when you receive a delivery and type the supplier's invoice number. For an invoice that is not a delivery, open Purchasing, tab Supplier invoices, and press New. Enter the tax inside the invoice so it is counted in your tax return figures.
With a delivery
When receiving, fill in Supplier invoice number (creates a payable): see How do I receive a delivery into stock?. The invoice appears in the tab Supplier invoices with the total of the delivery.
Without a delivery
- Open Purchasing and the tab Supplier invoices, and press New.
- Choose the Supplier and type the Invoice number, the Date and the Total.
- Type Tax inside the invoice (claimable): the tax amount printed on the invoice that your store may claim back.
- Add Notes and save.
The tax
- For an invoice created by a delivery, select it and press Set tax to enter Tax inside the invoice (claimable).
- This tax is the input tax of the tax return: it is taken off the tax you collected on sales: see Where are the figures for my tax return (VAT, GST, sales tax)?.
- Enter only tax that you are allowed to claim. If you are not registered for tax, leave it at zero.
What happens next
- The invoice adds to what you owe the supplier, due after the supplier's payment terms.
- The tab Payables shows what is owed and for how long: see How do I record a payment to a supplier, and see what I still owe?.
- Export writes the list for your accountant.
Keep the paper or PDF invoice: the till records the figures, and the tax office wants the document.
How do I record a payment to a supplier, and see what I still owe?
Open Purchasing, tab Payables. It lists what you owe each supplier and for how long. Select the supplier or the invoice, press Pay supplier, type the amount and choose between a bank transfer and cash from the drawer.
See what you owe
- Open Purchasing and the tab Payables.
- Each line shows the supplier, the open amount and how old it is, with the payment terms.
- The Dashboard shows Supplier invoices due this week under Purchasing and money.
Record a payment
- Select the supplier's line, or an invoice in the tab Supplier invoices, and press Pay supplier.
- Type the Amount. It can be part of what is owed.
- Choose how it was paid:
- Bank transfer: you paid from the bank; nothing moves in the till's drawer;
- Cash (from drawer): the cash leaves the drawer of the open shift and is counted in its expected cash.
- Confirm. The open amount goes down.
Good to know
- The till records that you paid; it does not send money. Make the transfer at your bank.
- Paying a supplier's invoice is not an expense entry: the goods were already counted when received. Do not enter it a second time under expenses.
- The payables total is the figure your accountant asks for at the end of a period. Export writes the list.
- Payments made go into the daily journal.
How do I return goods to a supplier?
Open Purchasing and press Return to supplier. Choose the supplier and enter the product, the quantity, the cost and the reason. The goods leave your stock, and what you owe the supplier goes down by their value.
- Open Purchasing and press Return to supplier.
- Choose the Supplier.
- Type the product's SKU, the quantity going back and the unit cost the supplier will credit.
- Type the Reason: damaged on arrival, wrong item, recall and so on.
- Confirm.
What happens
- The quantity leaves the stock, as a movement with the reason.
- The value is taken off what you owe that supplier.
- A product code the till does not know is refused.
Good to know
- Return goods to the supplier here, not as a stock loss: a loss is a cost to your store, a supplier return is not.
- If the supplier replaces the goods, receive the replacement as a new delivery.
- If the supplier refuses the return, bring the goods back with a receiving at the same cost, or write them off: see How do I record stock that was damaged, expired, stolen or used by the store?.
- Ask the supplier for a credit note and keep it with your invoices; your accountant needs it for the tax on purchases.
Accounting
What does Ironloom POS give the accountant?
Ironloom POS is a till, not an accounting program, but it keeps what the accountant needs: a balanced journal for every day, exports for QuickBooks, Xero and Zoho Books, a profit and loss report, the figures of the tax return, a period lock, A4 invoices and credit notes, and an audit file.
What it does not do
A general ledger, a balance sheet, fixed assets, payroll, bank reconciliation and the filing of tax returns stay in the accountant's software. The till hands over clean daily figures for it.
Access for the accountant
Give the accountant their own user with the Accountant role: reports, exports, expenses and the period close, without the till: see How do I decide what each person may do (roles and rights)?.
The figures are those of the store's own records. The accountant decides how they enter the books and the returns of your country.
What is in the daily journal?
For each day the till builds one balanced journal: debits and credits of everything that happened, by kind of entry. See it in Reports, tab Accounting export (daily journal CSV); export it from Settings, Accounting export (daily journal CSV).
- Open Reports and the tab Accounting export (daily journal CSV).
- Choose the period. Each line shows the date, the kind, the Debit and the Credit.
What a day contains
| Event | Debit | Credit |
|---|---|---|
| Sales | each payment method: cash, card, account, gift card, voucher, wallet, cheque, store credit, points | revenue, tax collected |
| Discounts, rounding, tips | discounts; rounding | rounding; tips |
| Returns | returns | the refund method |
| Cost of goods sold | cost of goods sold | inventory |
| Goods received | inventory, landed costs | payables |
| Supplier invoices and payments | input tax; payables | payables; cash or bank |
| Expenses | the expense category, input tax | drawer, safe, bank, card or owner |
| Money moved | where it went (safe, bank) | where it left (drawer, card settlements); bank fees as a cost |
| Stock losses | the loss account of the reason | inventory |
| Cash over or short | cash over / short | cash, or the other way round |
| Customer payments on account | cash or card | customer accounts |
How it is built
- Every day balances: total debits equal total credits. No balancing line is added to hide a difference.
- Amounts are in the store's main currency, at the rate of the moment for payments in another currency.
- Each kind is matched to one of your accounts for the export: see How do I export the journal and match it to my chart of accounts?.
- If a day ever fails to balance, the export says so and asks you to tell Ironloom support, with the dates.
A day of a closed period cannot change any more: see How do I close a month or a year so that its figures cannot change?.
How do I export the journal and match it to my chart of accounts?
Open Settings, Accounting export (daily journal CSV). Choose the folder, the file format and the dates, and write next to each kind of entry the name of your own account. The till then writes one journal per day that your accounting software can import.
- Open Settings and the tile Accounting export (daily journal CSV).
- Choose the Export folder.
- Choose the File format: Plain CSV (any software), QuickBooks Online, QuickBooks Desktop, Xero or Zoho Books.
- Choose the first and the last day. At most one year at a time.
- Fill in Accounts: kind = account name | code (the code is used by Xero): one line per kind, for example tender.cash = Cash on hand | 1000.
- Press Export. The till says where the files were written.
The kinds
| Kind | Meaning |
|---|---|
| tender.cash, tender.card, tender.account, tender.gift_card, tender.voucher, tender.wallet, tender.cheque, tender.store_credit, tender.points, tender.other | money in, by payment method |
| revenue, discounts, rounding, tips | sales |
| tax, tax_input | tax collected, tax on purchases |
| returns, returns_cash | returns and their refunds |
| cogs, inventory, purchases, landed_costs, opening_stock | stock and its cost |
| payables | owed to suppliers |
| safe, bank, card_payable, owner, cash_in_out, cash_over_short | where money sits or moved |
| stock_loss.damaged, .expired, .theft, .own_use, .count, .adjustment | stock losses by reason |
| expense.other and your expense categories | expenses |
Advice
- The account names must be written exactly as they are in your accounting software, or the import will refuse them or create new accounts.
- The list is saved, so you fill it in once.
- Import one day first and check it with your accountant before importing a whole period.
- Import each period once. Importing the same days twice doubles the figures.
How do I import the journal into QuickBooks?
Export from Settings, Accounting export (daily journal CSV), with the file format for your QuickBooks: a journal-entry CSV for QuickBooks Online, an IIF file for QuickBooks Desktop. Then import the file in QuickBooks with its own import tool. Try one day first.
Prepare
- In Settings, Accounting export (daily journal CSV), write next to each kind the account name exactly as it is in your QuickBooks chart of accounts: see How do I export the journal and match it to my chart of accounts?.
- Choose the file format for QuickBooks Online or for QuickBooks Desktop.
- Choose one day and press Export.
QuickBooks Online
- In QuickBooks Online, open the import of journal entries (in the settings menu, under importing data).
- Choose the CSV file written by the till.
- Match the columns when QuickBooks asks: journal number, date, account, debits, credits, description.
- Finish the import and open the journal entry to check it.
QuickBooks Desktop
- Make a backup of the company file.
- In QuickBooks Desktop, use the import of IIF files, in the File menu under Utilities, Import.
- Choose the .iif file written by the till.
Check, then go on
- Compare the day in QuickBooks with the day's Z reports: sales, tax, cash, card.
- If an account was not found, correct its name in the till's account list and export again.
- When one day is right, export and import the rest of the period, each day once.
Menu names in QuickBooks change between versions and countries; use Intuit's own help for the import screens. The link between the till and QuickBooks is a file, not a live connection, and has not been certified by Intuit.
How do I import the journal into Xero?
Export from Settings, Accounting export (daily journal CSV), with the Xero file format, after giving each kind of entry its Xero account code. Then import the CSV in Xero as manual journals. Try one day first.
Prepare
- In Settings, Accounting export (daily journal CSV), fill in the account list. Xero matches accounts by code, so write the code after the | sign: tender.cash = Cash on hand | 1000: see How do I export the journal and match it to my chart of accounts?.
- Choose the Xero file format.
- Choose one day and press Export.
In Xero
- Open the manual journals (in the accounting menu) and choose to import.
- Choose the CSV file written by the till.
- Xero shows the journals as drafts. Open one and check the lines and the total.
- Post the journals.
Check, then go on
- Compare the day in Xero with the day's Z reports: sales, tax, cash, card.
- An account code that Xero does not know stops the import: add the account in Xero, or correct the code in the till, and export again.
- Tax: the journal carries the tax collected as its own line. Whether the lines should also carry a Xero tax rate depends on how your accountant files returns from Xero; ask before posting a whole period.
- When one day is right, export and import the rest, each day once.
Menu names in Xero change over time; use Xero's own help for the import screen. The link is a file, not a live connection, and has not been certified by Xero.
How do I import the journal into Zoho Books, or into another accounting program?
For Zoho Books, export from Settings, Accounting export (daily journal CSV), with the Zoho Books file format and import the CSV as manual journals. For any other program, use Plain CSV (any software): one line per entry with date, account, debit and credit.
Zoho Books
- In Settings, Accounting export (daily journal CSV), write next to each kind the account name exactly as in your Zoho Books chart of accounts: see How do I export the journal and match it to my chart of accounts?.
- Choose the Zoho Books file format, one day, and press Export.
- In Zoho Books, open the manual journals (in the accountant menu) and choose to import journals.
- Choose the CSV file and match the columns when asked: journal date, reference number, account, debit, credit, notes.
- Import, then open the journal and check it against the day's Z reports.
Any other program
- Choose Plain CSV (any software) as the file format and export.
- The file has one line per journal line: the date, the kind, your account name and code, the debit, the credit and a description.
- Import it with the journal import of your program, or hand it to your accountant, who can rework the columns in a spreadsheet.
In both cases
- Try one day, check it, then do the period, each day once.
- An account the program does not know must be created there, or its name corrected in the till.
- The link is a file, not a live connection. Menu names in these programs change; use their own help for the import screens.
How do I see whether the store made a profit (profit and loss)?
Open Reports, tab Profit and loss, and choose the period. It shows the sales without tax, the cost of what was sold, the gross profit, the expenses by category and the net profit.
- Open Reports and the tab Profit and loss. It is shown to users with the right to see finance reports.
- Choose the first and last day, for example a month.
- Read the report from top to bottom:
| Line | Meaning |
|---|---|
| Gross sales | everything sold, without tax |
| Less discounts, less returns | what was given away or taken back |
| Net sales | what the store really earned from sales |
| Cost of goods sold | what the sold goods cost, at average cost including landed costs |
| Gross profit | net sales minus cost of goods sold |
| Expenses | each category entered under Shifts & Cash, Expenses, and stock losses |
| Cash over / short | differences found when closing shifts |
| Net profit | gross profit minus expenses |
- Export or Print it.
What makes it right
- Costs: every delivery must be received with its real cost: see How do I receive a delivery into stock?. A product with no cost shows as pure profit.
- Expenses: rent, wages, electricity and the rest must be entered, whether paid from the drawer or the bank: see How do I record an expense, such as something paid from the drawer?.
- Stock losses: recorded with their reason: see How do I record stock that was damaged, expired, stolen or used by the store?.
What it is not
A management view of the store, not statutory accounts: no depreciation, loans, owner's drawings or income tax. Your accountant's profit will differ by those items.
Where are the figures for my tax return (VAT, GST, sales tax)?
Open Reports, tab Tax return, and choose the tax period. It shows the tax on your sales, the tax you can claim back on supplier invoices and expenses, and the difference: the tax to pay, or to claim back.
- Open Reports and the tab Tax return.
- Choose the first and the last day of the tax period.
- Read the three parts:
| Part | Where it comes from |
|---|---|
| Tax on sales (output tax), by rate, with the tax on returns taken off | every sale and return of the period |
| Tax you can claim back (input tax) | the tax entered on supplier invoices and on expenses |
| Tax to pay, or tax to claim back | the first minus the second |
- Export or Print it for your accountant.
The report says it itself: Check the figures with your accountant before filing.
What makes it right
- Each product has the correct tax rate: see How do I set up my tax rates?.
- Supplier invoices carry their tax: see How do I record a supplier's invoice and its tax?. An invoice without its tax entered gives nothing to claim.
- Expenses carry the tax inside them: see How do I record an expense, such as something paid from the drawer?.
- Tax-exempt and reverse-charge sales are sales without tax: see How do I mark a customer as tax exempt?.
What the till does not do
- It does not file the return. You or your accountant enter the figures with the tax authority.
- It does not know your country's special rules: partial deduction, cash accounting, thresholds, exempt activities, different rates for the same goods eaten in or taken away.
- Once the return is filed, lock the period so the figures cannot change: see How do I close a month or a year so that its figures cannot change?.
How do I close a month or a year so that its figures cannot change?
Open Settings, Month / year close, choose Close the books until a date and pick the last day of the period. After that, nothing dated on or before that day can be added, changed or voided. Mistakes found later are corrected in the open period.
Close
- Finish the period first: all shifts closed, deliveries received, supplier invoices and expenses entered.
- Open Settings and the tile Month / year close. It shows No period closed yet, or until which date the books are closed.
- Choose Close the books until a date.
- Pick the day under Closed up to and including: a day before today, because the current day is still open.
- Press Close the books and confirm. A backup is made first.
What it blocks
For any date on or before the closing day: entering or voiding an expense, entering a supplier invoice, voiding a finished sale, and money movements dated in the period.
What you do instead
- A sale that was wrong: make a return today: see How do I take a product back when the customer has the receipt?.
- A missing expense: enter it with today's date, and tell your accountant which period it belongs to.
Selling, returns and reports of the open period are not affected, and reports of closed periods can still be read, printed and exported.
Reopen
Reopen a closed period (owner) moves the closing date back, or removes it, with a Reason that is written in the audit log. Only an owner can do it. Reopen only when your accountant asks for it: figures already filed would change.
How do I give a customer a full-page tax invoice?
Find the sale in Shifts & Cash, recent sales, or in Reports, Receipts, select it and press A4 invoice. The till gives the sale an invoice number, shows the invoice in a preview, and you print it or save it as PDF.
- For the invoice to carry the buyer's details, attach the customer to the sale at the till before payment.
- After the sale, open Shifts & Cash and the recent sales, or Reports and the tab Receipts.
- Select the sale and press A4 invoice.
- If the sale has no customer, the till asks whether to make the invoice without a buyer.
- The invoice opens in a preview. Print it on any printer, or save it as PDF.
What is on it
The store's legal name, address and tax number; the invoice number and date; the buyer, with their tax number if they have one; each line with quantity, unit price, discount, tax and net amount; the total without tax, the tax by rate and the total; and how it was paid.
Numbers
- Invoice numbers come from their own series, in order and without gaps. A number is given the first time the invoice is made and never changes.
- Opening the invoice of the same sale again shows the same number: it is a reprint, not a new invoice.
- Only a completed sale can get an invoice.
Corrections
An invoice is never edited. If goods come back, a return creates a numbered credit note that refers to the invoice: see How do I give a credit note for a return?.
What a tax invoice must show is set by your country's law, and some countries require invoices to be reported or cleared electronically. Check the layout with your accountant.
The tax office asks for my sales data as a file. How do I produce it (tax audit file, SAF-T)?
Open Settings, Tax audit file and record keeping, choose the period and the folder, and write the file. It is one XML file in the OECD standard SAF-T 2.00 that holds the store, the accounts, customers, suppliers, tax rates, products, the daily journal and every sale and return of the period.
- Open Settings and the tile Tax audit file and record keeping.
- Choose the first and the last day. At most one year at a time.
- Choose the Export folder.
- Confirm Write the audit file now? and wait. The till says where the file was written.
- Hand the file to your accountant or to the inspector, as they ask.
What you should know before relying on it
The window says it plainly: The standard audit file (OECD SAF-T 2.00) holds the store, the accounts, customers, suppliers, tax rates, products, the daily journal and every sale and return of the period. Countries with their own SAF-T version or a certification rule (for example Portugal, France, Germany) need that version and the official certification of the program; ask Ironloom support before relying on it there.
In short:
- the file follows the general OECD standard;
- several countries have their own version of the file, or require that the till program itself be certified. Ironloom POS does not hold those country certifications;
- if your tax office names a specific format, send its name to support@ironloomtechnologies.com before the audit, not during it.
Related
- The file holds personal data of customers. Send it only through the channel the tax office gives you.
- The audit log and its integrity check are a separate tool: see What is the audit log, and how do I check that nobody changed it?.
- Strict record keeping, in the same window, stops records from being erased: see What is strict record keeping?.
What is strict record keeping?
A switch in Settings, Tax audit file and record keeping. With Strict record keeping on, once the store has real sales nothing can erase its records: Demo OFF is refused, and mistakes are reversed with a void, a return or a credit note, never deleted.
Switch it on
- Open Settings and the tile Tax audit file and record keeping.
- Tick Strict record keeping: once real sales exist, nothing can erase records (Demo OFF is refused); mistakes are reversed, never deleted.
- Save.
Switch it on when your store starts trading for real, after the demo data is gone: see How do I remove the demo data and start with my own store (Demo ON / OFF)?.
What already holds without it
Even with the switch off, the till never deletes or edits a finished sale:
- a sale is corrected by a void or a return, both kept with their reason;
- receipt, Z report, invoice and credit note numbers run in sequence;
- every sensitive action is in the audit log, which is chained so that a change shows: see What is the audit log, and how do I check that nobody changed it?;
- a closed period cannot change: see How do I close a month or a year so that its figures cannot change?.
What the switch adds is the refusal of the one action that wipes business data, the Demo OFF reset.
What it is not
It is not a fiscal certification. Countries with certified cash-register rules (for example France, Germany, Austria, Portugal, Italy and others) require approved software, devices or signatures that Ironloom POS does not provide by this switch. Ask your accountant what your country demands.
Keeping records
Most countries require business records to be kept for several years. Keep your backups for that long, on something that will still be readable: see How do I back up my data, and how do I restore a backup?.
Cafés and restaurants
How do I set the till up for a café or restaurant?
Open Settings, Type of business, choose Café / restaurant (tables, kitchen tickets), list your tables and say where kitchen tickets print. The till then shows tables, kitchen and bill buttons. Modifiers, courses and tips are set in Restaurant: modifiers, courses, tips.
- Open Settings and the tile Type of business.
- Choose Café / restaurant (tables, kitchen tickets).
- Fill in Café / restaurant only: tables (e.g. 1-12; Terrace 1; Terrace 2; Takeaway): ranges and names, separated by semicolons. 1-12 creates twelve tables; a name such as Terrace 1 creates one.
- Choose Café / restaurant only: kitchen tickets print on: The receipt printer, or another Windows printer that stands in the kitchen.
- If you also sell by weight, tick the weight box.
- Save.
Then set up the extras
Open Settings, Restaurant: modifiers, courses, tips:
- modifiers with prices, such as "Extra cheese": see How do I add options to a dish, such as "extra cheese" or "no onions"?;
- the courses in the order they are served: see How do I tell the kitchen which dishes come first (courses)?;
- the tip buttons in percent: see How do I add a tip to the bill?;
- the kitchen screen on another device: see How do orders get to the kitchen (kitchen tickets and the kitchen screen)?.
What changes at the till
A tables button, and the buttons Send to kitchen, Save table, Line note, Modifiers, Course, Move, Split the bill, Tip, Kitchen screen and Reservations. Returns are called refunds. Dishes are products like any other: give them departments such as Starters, Mains, Desserts and Drinks, and put the favourites on quick keys.
How do I open a table, add to it and come back to it later?
Press tables and choose the table. Ring up what the guests order, press Send to kitchen, then Save table: the order is parked on the table and the till is free. Choose the table again to add items or to take the payment.
Take an order
- Press tables at the top of the Checkout. Each table is shown as free, or with its total and the time it was opened.
- Choose the table. Its name appears on the till.
- Add the dishes and drinks.
- Press Send to kitchen: a ticket prints with what is new: see How do orders get to the kitchen (kitchen tickets and the kitchen screen)?.
- Press Save table. The order stays on the table, and the till is empty for the next one.
Come back to it
Press tables and choose the table: the order comes up. Add more, send again, save again. When you choose a table while another order is on the till, that order goes back to its own table by itself.
Take the payment
Choose the table, press PAY (F10) and take the payment. The table becomes free.
Good to know
- Items rung up before a table was chosen: when you then choose a table, the till asks whether to put them on it.
- A takeaway order uses a table named Takeaway, or no table at all.
- An open table is not a sale yet. Open tables are shown on the Dashboard, so none is forgotten at closing time.
- Guests who want to pay separately, or change table: see How do I move guests to another table, or split the bill?.
How do orders get to the kitchen (kitchen tickets and the kitchen screen)?
Send to kitchen prints a ticket with only what was added since the last ticket, with quantities, notes and the table name in large type. A kitchen screen can show the same tickets, on the till or on a tablet in the kitchen, where the cook marks them done.
Kitchen tickets
- With the order on the till, press Send to kitchen.
- The ticket prints on the kitchen printer chosen in the setup: see How do I set the till up for a café or restaurant?.
- Add to the table later and send again: only the new items print. If nothing is new, the till says Nothing new for the kitchen.
The ticket shows the table, or Takeaway, the time, each item with its quantity, its modifiers and its note, grouped by course when you use courses.
The kitchen screen
- Press Kitchen screen on the till to see the waiting tickets, each with its table and how long it has been waiting.
- Done takes a ticket off the screen.
- When nothing waits, it says No tickets are waiting.
On another device
The kitchen screen can be opened in the browser of a tablet, a PC or a TV on the same network:
- Open Settings, Restaurant: modifiers, courses, tips.
- Switch on Kitchen screen on another device (tablet, PC or TV with a browser, on the same network) and save. Windows may ask once to allow the program on the network.
- Type the Address to open on that device into the browser of the device in the kitchen.
The device must be on the store's own network. Keep that network private: anyone on it could open the address.
How do I add options to a dish, such as "extra cheese" or "no onions"?
Select the dish in the basket and press Modifiers to add priced options from your list, or Line note to type a free note for the kitchen. Both print on the kitchen ticket; a modifier's price is added to the bill.
At the till
- Modifiers: select the line, press Modifiers and tick the options. Each one is added to the dish with its price.
- Note: select the line, press Line note and type under Note for the kitchen, for example "no onions" or "allergy: nuts".
If the till says No modifiers are set up for this product. Add them in Settings > Restaurant., the list is empty for that dish.
Set up the list
- Open Settings, Restaurant: modifiers, courses, tips.
- In Modifiers with prices, one per line (Extra cheese = 1.50; a line [Pizza] = only that department; [*] = all), type one modifier per line: its name, an equals sign and its price. A price of 0 is an option without charge.
- A line with a department name in square brackets starts a group that applies only to that department. [*] starts a group for every product.
- Save.
Example:
- [Pizza]
- Extra cheese = 1.50
- Thin crust = 0
- [*]
- To take away = 0
Good to know
- A note costs nothing; a modifier can. Use modifiers for what you charge for or want to count.
- Allergies should always be told to the kitchen in person as well. The ticket helps; it does not replace talking.
How do I tell the kitchen which dishes come first (courses)?
Select a dish and press Course to say which course it belongs to: starters, mains, desserts, drinks. The kitchen ticket groups the dishes by course, and when you send you can choose to send one course only.
Mark the course
- Select the line in the basket.
- Press Course and choose, for example Starters, Mains, Desserts or Drinks. No course removes it.
Send by course
- Press Send to kitchen.
- When the order has courses, the till asks what to send: Everything that is new, or one course.
- Send the starters now; when the table is ready, choose the table again and send the mains.
Set up your courses
Open Settings, Restaurant: modifiers, courses, tips, and type them in Courses, in the order they are served, separated by semicolons. The order you type is the order on the ticket.
- A dish with no course prints first, with the new items.
- Courses are for the kitchen only: they do not change the bill.
- A small café that serves everything at once can ignore courses.
How do I move guests to another table, or split the bill?
With the table open, press Move to move one item or the whole table to another table. Press Split the bill to let some guests pay their items now, or to divide the total into equal parts.
Move
- Open the table: see How do I open a table, add to it and come back to it later?. Without one the till says Open a table first.
- Press Move and choose The selected item or The whole table.
- Choose the table it goes to. Moving a whole table onto a table that is occupied joins the two orders.
Split by items
For guests who each pay what they had, or one guest who leaves early:
- Open the table and press Split the bill, then By items: some items are paid now.
- Tick the items paid now. For a line with several pieces, such as 4 beers, write how many are paid now.
- Press Pay these. That part comes onto the till; the rest stays on the table.
- Take the payment. Repeat for the next guest.
Split in equal parts
For a table that shares the bill:
- Press Split the bill, then In equal parts.
- Type How many people pay? The till shows the amount for each.
- Press PAY (F10) and take each person's payment one after the other with Split in the Payment window: see How do I split a payment between two methods?.
Splitting needs a table with at least two lines. One receipt is printed per payment made by items, and one receipt for a bill shared in equal parts.
How do I add a tip to the bill?
Before payment, press Tip and choose a percentage button, Another amount or No tip. The tip is added to what the guest pays and kept apart from the sales, so it can be handed to the staff.
- With the order on the till, press Tip.
- The window shows the total and the tip buttons. Choose a percentage, or Another amount and type it. No tip removes a tip.
- Press PAY (F10) and take the payment, tip included.
Set the buttons
Open Settings, Restaurant: modifiers, courses, tips, and type the percentages in Tip buttons in percent (e.g. 5; 10; 15).
Where tips go
- The tip is shown on its own line of the receipt.
- It is not revenue of the store and carries no sales tax in the till's figures. In the journal it has its own kind, tips: see What is in the daily journal?.
- A tip paid by card arrives with the card money; pay it out to the staff from the drawer with a cash out and a reason, so the drawer count stays right.
- Cash handed directly to the waiter never passes through the till.
How tips are taxed, shared and reported differs by country, and a compulsory service charge is not a tip. Ask your accountant how to treat them.
How do I see the room at a glance and take reservations?
Press Reservations on the till. The window shows every table as free, occupied or reserved, with the reservations of the day. Arrange the tables lets you drag each table to its place in the room; New reservation books a table.
The room
- Each table shows its state: free, occupied or Reserved.
- Arrange the tables: drag each table to where it stands in the room, then press Back to rows to go back to the simple list. The layout is saved.
Take a reservation
- Press Reservations, then New reservation.
- Fill in the Name, the Phone, the number of People, the Date, the Time (hour:minutes, 24 h), the Table and a Note.
- Save. The table shows as reserved around that time.
When the time comes
Open the reservation and choose what happened:
- The guests have arrived: the table opens for them;
- The guests did not come: the table is free again;
- Cancel the reservation;
- Keep the reservation: leave it as it is.
Good to know
- Give the time as hour:minutes, for example 19:30.
- A reservation holds a name and a phone number: personal data. Do not keep more than you need.
- The till does not take reservations from a website; staff enter them.
A guest complains about a dish. How do I take it off the bill or refund it?
Before payment, open the table, select the dish and press Void line. After payment, open Refunds, find the receipt, choose the dish and refund it. In a café or restaurant the returns screen is called Refunds, and food is not put back in stock.
The bill is not paid yet
- Open the table: see How do I open a table, add to it and come back to it later?.
- Select the dish and press Void line. If your role may not, a manager approves.
- To charge less instead of nothing, use a line discount with a reason: see How do I give a discount?.
A dish already sent to the kitchen stays on the kitchen's ticket: tell the kitchen.
The bill is paid
- Open Refunds in the menu, or press F11.
- Scan the QR code of the receipt, or type its number.
- Select the dish, set the quantity, and press Damaged so that it is not put back into stock.
- Press Refund, choose how the money is given back and type the reason: see How is the money given back for a return?.
Good to know
- Every void and refund is recorded with the user and the reason, and shown in the loss watch.
- A whole bill rung up by mistake and still the same day can be voided: see A finished sale was a mistake. Do I void it or return it?.
- A tip on a refunded bill is not refunded by the till; give it back by hand if it should be.
Clothing and shoe stores
How do I set the till up for a clothing or shoe store?
Open Settings, Type of business, and choose Clothing / shoes (sizes and colours, seasons, exchanges). Then create each article once and give it its sizes and colours with Variants. The till adds one price per article, ordering by size, seasons and a one-step exchange.
- Open Settings, Type of business, choose Clothing / shoes (sizes and colours, seasons, exchanges) and save.
- In Products, create an article, for example "Linen shirt", with its price, department and tax.
- Select it and press Variants: Size = S, M, L, XL and Colour = White, Blue. The till creates one product per size and colour, each with its own stock: see How do I create a product in several sizes or colours?.
- Give each size and colour its barcode, or print your own hang tags: see How do I print shelf labels?.
- Receive your stock per size and colour.
What a clothing store gets
| Extra | Where | Article |
|---|---|---|
| One price and one season for all sizes of an article | Products, Article price | How do I change the price of an article in all its sizes and colours at once? |
| A purchase order per size | Products, Order sizes | How do I order an article from a supplier, size by size? |
| Swap a size or colour in one step | the till, Exchange size or colour | A customer wants another size or colour. How do I exchange it? |
| Seasons, and sales by article and by season | Season / collection, Reports | How do I use seasons or collections, and see sales per article? |
Good to know
- Labels for products with sizes print as hang tags: the article's name, with the size and colour on their own line.
- The scale buttons show only if you tick that you also sell by weight.
- A store of another type that has products in sizes or colours gets these extras too.
How do I change the price of an article in all its sizes and colours at once?
In Products, select any size or colour of the article and press Article price. Type the price, and the till sets it on every size and colour of that article. The cost and the season can be set the same way.
- Open Products and select one of the article's sizes or colours.
- Press Article price. The window names the article and the number of variants.
- Type Price for every size and colour.
- Optional: Cost for every size and colour (0 = leave as it is), and the Season / collection.
- Save.
- If the product has no sizes or colours, the till says This product has no sizes or colours yet. Make them first with Variants.: see How do I create a product in several sizes or colours?.
- One size at another price, such as larger sizes, is changed afterwards on that product alone: see How do I change a product's price or details?.
- Print new hang tags for the article after a price change: see How do I print shelf labels?.
- For an end-of-season sale on many articles, a promotion on a department, or a bulk price change, is quicker: see How do I create a promotion? and How do I change many prices at once?.
How do I order an article from a supplier, size by size?
In Products, select the article and press Order sizes. The window lists every size and colour with its stock; type how many of each to order, choose the supplier and press Make the purchase order. The order is saved as a draft in Purchasing.
- Open Products and select any size or colour of the article.
- Press Order sizes.
- Choose the Supplier. If there is none, the till tells you to add one first.
- Each size and colour is listed with its stock on hand. Type the quantity to order next to each; leave the others empty.
- Press Make the purchase order. The till says how many sizes and pieces were put on the order.
- Open Purchasing to check, print or send the order: see How do I create a purchase order?.
- The order is a draft: nothing is ordered until you send it to the supplier, and stock does not change until the goods are received: see How do I receive a delivery into stock?.
- When the goods arrive, receive against the order; each size has its own line.
- Looking at the stock per size before ordering shows which sizes really sell: see How do I use seasons or collections, and see sales per article?.
A customer wants another size or colour. How do I exchange it?
Press Exchange size or colour on the till, scan the receipt, choose the item that comes back and the size or colour that goes out. The till takes one back into stock, takes the other out, and settles any price difference in one step.
- Finish or hold any sale on the till first.
- Press Exchange size or colour. It is in the button row or under More.
- Scan the QR code of the receipt, or type the receipt number.
- Choose Which item comes back? Only items with sizes or colours are listed.
- Choose Exchange for which size or colour? The list shows the other sizes and colours of the same article with their stock.
- The window shows what Comes back and what Goes out:
- Same price: nothing to pay.;
- The customer pays the difference: choose Cash or Card;
- or the difference is given back in cash.
- Press Exchange. A slip prints.
Good to know
- Stock is corrected for both sizes, so the counts stay right.
- If the receipt has no item with sizes or colours left to exchange, the till says so. For any other product, use a normal return and a new sale: see How do I exchange a product for another one?.
- An item can be exchanged once per piece bought.
- Whether you accept an exchange, and until when, is your store's policy.
How do I use seasons or collections, and see sales per article?
Give each article a Season / collection, on the product form or with Article price for all its sizes at once. Then Reports, tab Sales, can group sales by article, adding up all its sizes and colours, and by season.
Set the season
- For one article with all its sizes: select it in Products, press Article price and fill in Season / collection: see How do I change the price of an article in all its sizes and colours at once?.
- For one product: open it and fill in Season / collection.
Write the season the same way every time, for example "SS27" or "Winter 2027": the reports group by the exact text.
Read the reports
- Open Reports and the tab Sales.
- Choose the period.
- Choose Group by: by article, to see each article as one line with all its sizes and colours together; or by season, to compare collections.
- To see which sizes of an article sell, group by product: each size and colour is its own line.
At the end of a season
- Inventory, Dead stock, lists what has stock and has stopped selling: see How do I see what is running low, and what has not sold for a long time?.
- Mark the season down with a promotion on the department, or a new price per article.
- The season is printed on the hang tag next to the size and colour, which helps sorting the stockroom.
Taxes and country rules
Should my prices include tax, or is tax added at the till?
It depends on your country. Where shelf prices by law or custom include the tax (VAT and GST countries), tick Prices include tax on the tax rate. Where tax is added at the till (sales tax in the United States and Canada), leave it unticked. The setting is on each tax rate, in Settings, Taxes.
What each choice does
| Tax included | Tax added | |
|---|---|---|
| The price you type on a product | what the customer pays | the price before tax |
| At the till | the total equals the sum of the prices | tax is added under the subtotal |
| On the receipt | the tax inside the total, per rate | subtotal, tax, total |
| A 20 % rate on a price of 12.00 | customer pays 12.00, of which 2.00 is tax | customer pays 14.40, of which 2.40 is tax |
Set it
- Open Settings, Taxes, and open the rate.
- Tick or untick Prices include tax.
- Save.
Good to know
- Reports always show sales without tax and the tax apart, whichever you choose: see Where do I see the tax I collected?.
- A tax-exempt customer pays the price without the tax in both cases: with included tax, the tax part is taken off: see How do I mark a customer as tax exempt?.
- Do not switch a rate from one to the other once products are priced: every price would mean something else. Create a new rate and reprice.
- Discounts apply to the price as typed; the tax follows.
Whether prices shown to consumers must include tax is a legal rule in many countries. Follow yours.
My tax is made of several parts (state + county + city, GST + PST, CGST + SGST). How do I set it up?
Create one tax rate and list its parts in the parts box, each with its own percentage. The rate becomes their sum, the receipt prints one line per part, and the tax report totals each part.
- Open Settings, Taxes, and create or open the rate.
- In Parts of this tax, if it has several (e.g. State 6.25; County 1; City 1.5), write the parts separated by semicolons, each as a name and a percentage: State 6.25; County 1; City 1.5.
- Save. The rate of the tax is now the sum of its parts: 8.75 % in this example.
Examples
| Where | Parts |
|---|---|
| United States | State 6.25; County 1; City 1.5 |
| Canada (some provinces) | GST 5; PST 7 |
| India | CGST 9; SGST 9 |
What the till does
- The tax of each line is worked out once on the total rate, then shared between the parts so that the cents always add up.
- The receipt prints one tax line per part.
- Reports, tab Tax, shows each part on its own line, which is what the separate authorities ask for: see Where do I see the tax I collected?.
Good to know
- If different places you sell from have different local parts, create one rate per place.
- For India, a product can also carry its HSN / SAC code, and sales can be grouped by it in the sales report.
- A tax where one part is charged on top of another (tax on tax) is not covered: the parts are each a share of the same price.
How do I make receipts follow my country's rules (country compliance)?
Open Settings, Country compliance. The till takes the rules from the store's country: how the tax is called on receipts, a legal invoice title where one is required, and for some countries a tax QR code or an electronic invoice. Where no special rules are built in, the general tax features still work.
- Set the store's country and tax number in Settings, Store: see How do I change the store's name, address, tax number, logo or country?.
- Open Settings and the tile Country compliance.
- Rules of which country: leave Automatic (from the country), or choose a country, or No country rules.
- Tick what applies:
- Print the legal invoice title on receipts;
- Print the tax authority's QR code on receipts (Saudi Arabia);
- Write an e-invoice XML file for every sale (folder einvoices).
- Save.
What is built in
| Country | What the till does |
|---|---|
| Every country | the tax named as the country names it (VAT, GST, sales tax and so on), tax parts, tax-exempt customers, the store's tax number on receipts |
| Saudi Arabia | simplified tax invoice title and QR code; connection to ZATCA: see Saudi Arabia: how do receipts get the "Simplified Tax Invoice" title and the QR code?, Saudi Arabia: how do I connect the till to ZATCA (phase 2, Fatoora)? |
| United Arab Emirates | tax invoice title; sending invoices to an accredited provider: see United Arab Emirates: how do receipts become tax invoices, and how do I send e-invoices to my provider? |
For other countries the window says: No special rules are built for this country yet. Tax parts, tax-exempt customers and the tax number on receipts work everywhere.
The window itself warns: The store's tax number must be filled in Settings > Store. Ask your tax adviser to check a printed receipt before relying on it. Do that before your first day of sales. What Ironloom does not do for your country is listed in What must my store arrange itself, that Ironloom POS does not do for me?.
Saudi Arabia: how do receipts get the "Simplified Tax Invoice" title and the QR code?
Set the store's country to Saudi Arabia and enter its 15-digit VAT number in Settings, Store. Receipts then carry the title "Simplified Tax Invoice" in Arabic and English and the tax QR code, switched on in Settings, Country compliance.
- Open Settings, Store: set the Country to Saudi Arabia, the store's legal name, and the Tax number: 15 digits, starting and ending with 3.
- Open Settings, Country compliance.
- Tick Print the legal invoice title on receipts and Print the tax authority's QR code on receipts (Saudi Arabia).
- Save, and print a test sale.
What the receipt then shows
- The title "Simplified Tax Invoice / فاتورة ضريبية مبسطة".
- The seller's name and VAT number, the date and time, each line, the VAT amount and the total with VAT.
- A QR code that holds the seller's name, the VAT number, the time, the total and the VAT, in the form ZATCA published for the first phase of e-invoicing.
What this is, and is not
- This is the printed receipt of the first phase (generation). It needs no connection to ZATCA.
- Reporting each invoice to ZATCA, the second phase (integration), is a separate step with the store's own Fatoora account: see Saudi Arabia: how do I connect the till to ZATCA (phase 2, Fatoora)?.
- A sale to a business buyer with a VAT number needs a standard tax invoice, not a simplified one: see Saudi Arabia: how do I connect the till to ZATCA (phase 2, Fatoora)?.
Ask your tax adviser to check a printed receipt, and to tell you which phase and which date apply to your store. ZATCA sets them by turnover.
Saudi Arabia: how do I connect the till to ZATCA (phase 2, Fatoora)?
Open Settings, Saudi Arabia: ZATCA e-invoicing, fill in the store's registration details, choose ZATCA's simulation platform, and connect with a one-time code from the store's own account on the Fatoora portal. Once connected, the till signs every sale and return and reports it in the background. This connection has not yet been accepted by ZATCA on a real account: test it on the simulation platform first.
Before you start
- The store needs its own account on ZATCA's Fatoora portal. Ironloom has no access to it and holds no certificate for you.
- In Settings, Store: the legal name and the 15-digit VAT number.
Connect
- Open Settings and the tile Saudi Arabia: ZATCA e-invoicing. It is shown only when the store's country is Saudi Arabia.
- Fill in: Commercial registration number (CRN), Branch name, Building number (4 digits), Street, District, City, Postal code (5 digits), Business category, and for items at 0 % VAT the tax category and reason.
- Choose the ZATCA platform: Simulation (ZATCA's test platform for real stores) first. Production (real invoices) only after the simulation succeeded.
- In the Fatoora portal, create a one-time code for a new device.
- Choose Save and connect this till to ZATCA (needs a one-time code) and type the One-time code (OTP) from the Fatoora portal.
- The till makes its certificate request, sends sample invoices and shows ZATCA's answer. On success: This till is connected to ZATCA. Every sale and return is now signed and reported.
If ZATCA does not accept the samples, the till says it is not connected and shows the answer. Send that text to support@ironloomtechnologies.com.
Day to day
- Each sale and return gets a counter, a hash linked to the one before, a signature and the QR code, and is reported in the background.
- Without internet, invoices wait and are sent later. Send the waiting invoices now sends them at once; Show the last answers of the platform shows what ZATCA replied.
- A buyer with a VAT number gets a business tax invoice, which ZATCA must clear before it is handed over. The till asks for the buyer's address once and tells you whether ZATCA cleared or refused it.
- Make a debit note for a receipt (an amount added afterwards) reports an amount added to a receipt later.
The window says it plainly: The one-time code comes from your own account on ZATCA's Fatoora portal. Connect on the simulation platform first; go to production only after ZATCA accepted the samples there. Written from ZATCA's published rules: not yet accepted by ZATCA on a real connection.
United Arab Emirates: how do receipts become tax invoices, and how do I send e-invoices to my provider?
Set the store's country to the United Arab Emirates and enter its tax registration number in Settings, Store: receipts are titled "Tax Invoice". For electronic invoicing, open Settings, UAE: e-invoicing provider, and enter the address and key your accredited service provider gave you. This sending has not yet been tried with a real provider.
The printed receipt
- In Settings, Store: Country = United Arab Emirates, the legal name and the Tax number (TRN).
- In Settings, Country compliance, tick Print the legal invoice title on receipts.
- Receipts then carry the title "Tax Invoice", the TRN, the VAT amount and the total with VAT.
Electronic invoices
In the UAE, electronic invoices go through an accredited service provider that the store chooses and pays.
- Open Settings and the tile UAE: e-invoicing provider. It is shown only when the store's country is the UAE.
- Fill in:
- Name of your accredited service provider;
- Address the provider gave you for sending invoices (https://...);
- Access key from the provider (leave empty to keep the saved one), and how the provider wants the key sent;
- Your participant ID at the provider (Peppol ID).
- Tick Send the invoice file of every sale to the provider and save.
Each sale is then sent to that address as an invoice file in the PINT AE format. Without internet, files wait and are sent later; Send the waiting invoices now and Show the last answers of the platform help you follow them.
The window itself says: In the UAE, electronic invoices go through an accredited service provider that the store chooses and pays. The till sends each sale as a PINT AE invoice file to the address above. Providers differ: ask yours whether it accepts this file as it is. Not yet tried with a real provider. Ask your provider and your tax adviser before relying on it, and check which date the e-invoicing rules start for your business.
What must my store arrange itself, that Ironloom POS does not do for me?
Ironloom sells the software. Registration with the tax authority, e-invoicing accounts and certificates, fiscal devices, card and payment accounts, approved scales and legal advice are the store's own. The program has the fields to enter your credentials; it does not get them for you, and it holds no country certification as a cash register.
The store arranges
| Subject | What it means |
|---|---|
| Tax registration | your tax or VAT number, and knowing which rates apply to your goods |
| E-invoicing | your own account with the tax platform or an accredited provider (for example Fatoora in Saudi Arabia, a service provider in the UAE), and its fees |
| Fiscal devices and certified tills | where the law requires a fiscal printer, a signature device or certified software, Ironloom POS is not that device or certificate |
| Card and wallet payments | the terminal, the contract and the fees with your bank or provider |
| Scales | an approved scale and its periodic verification |
| Privacy | what customer data you keep, for how long, and your answers to customers' requests |
| Accounts and returns | filing tax returns and statutory accounts, with your accountant |
| Labour rules | pay, overtime and tips |
What the program gives you for them
Tax rates and parts, tax-exempt customers, the tax number and titles on receipts, numbered invoices and credit notes, a balanced journal, a tax return summary, an audit file in the general OECD format, strict record keeping, an audit log that shows tampering, and privacy tools.
Before you open
- Ask your accountant or tax adviser what your country requires of a till.
- Have them check a printed receipt and an A4 invoice.
- If your country requires certified cash-register software or a fiscal device, ask support@ironloomtechnologies.com before you rely on Ironloom POS there.
Countries with such rules include, among others, France, Germany, Austria, Italy, Portugal, Poland, Hungary and several others in Europe, Africa and Latin America. The list changes; your tax adviser knows the current rule.
Installing, licence and updates
What do I need to run Ironloom POS?
A PC with Windows 7 Service Pack 1, 8.1, 10 or 11, 32-bit or 64-bit, with 2 GB of memory and 500 MB of free disk space. Internet is needed at the first start; after that the till sells without it. No special hardware is required to begin.
| Need | Detail |
|---|---|
| Windows | 7 SP1, 8.1, 10 or 11; 32-bit and 64-bit both work |
| Memory and disk | 2 GB of memory, 500 MB of free disk space, more as your sales history grows |
| Microsoft .NET Framework 4.8 | Windows 10 and 11 normally have it; on older Windows the installer adds it |
| A Windows account that may install programs | for the installation only; cashiers then use ordinary accounts |
| Internet | at the first start, to begin the trial or activate a licence; later now and then: see Does Ironloom POS work without internet? |
| Screen | any; the screens are checked down to 1024 × 768. A touch screen is optional |
Not needed to start
A scanner, a receipt printer, a drawer: the till works with a keyboard and a mouse, and devices can be added later: see Which devices work with Ironloom POS?.
What it does not run on
Ironloom POS is a Windows program. It does not run on a Mac, an iPad, an Android tablet or in a web browser. A Windows tablet or an all-in-one touch PC works.
Good to know
- One PC is enough for one till. Each further PC is one more till and needs its own licence seat: see How do I use more than one till in the same store?.
- The data is kept on the PC itself, not in the cloud. Plan a backup to a USB stick or another computer from the first day: see How do I back up my data, and how do I restore a backup?.
How do I install Ironloom POS?
Download the installer from the Ironloom POS site, open it, choose the language, accept the licence agreement and click Install. It takes a few minutes. The program goes into Program Files; your data is kept apart in its own folder.
- Download the installer from the download page of the Ironloom POS site.
- Open the file. If Windows shows "Windows protected your PC", click More info, then Run anyway. Check first that the file came from the Ironloom site.
- Choose the language of the installer: English, Arabic or French.
- Read and accept the licence agreement. It is shown in the language you chose.
- If Microsoft .NET Framework 4.8 is missing, the installer adds it. Windows may ask to restart; setup continues afterwards.
- Choose the options:
- a desktop icon;
- start Ironloom POS when Windows starts: useful on a PC that is only a till;
- allow other tills to connect to this PC: tick it only on the PC that will be the master for other tills: see How do I use more than one till in the same store?.
- Click Install, then Finish.
After installing
Start Ironloom POS from the Start menu or the desktop icon. The first start opens the setup of your store: see What happens at the first start, and how do I set up my store?.
Good to know
- The data folder is separate from the program, so updating or reinstalling does not touch your sales: see Where is my data kept, and who can see it?.
- On Windows 7 the installer also switches on the secure connection settings (TLS 1.2) the program needs to reach the internet.
- Install with a Windows account that may install programs. Daily use does not need such an account.
What happens at the first start, and how do I set up my store?
The first start opens a short setup: language, store details, type of business, currency and tax, the owner's name and PIN, and whether to load a demo. It takes a few minutes, and everything can be changed later in Settings.
- Language: English, Arabic or French. The rest of the setup is in that language.
- Store: the store name, address, phone and email (required), and optionally the legal name, the tax number and the logo. They are printed on receipts.
- Type of business: shop or supermarket, café or restaurant, clothing or shoes. The till, the menus and the demo products follow it.
- Currency and tax: the main currency, an optional second currency with today's exchange rate (fetched from the internet, or typed), your tax rate and whether your prices include it.
- Owner: your full name and a PIN of 4 to 8 digits, typed twice. The owner is the highest role and signs in as "owner" with this PIN. Keep it safe.
- Demo: choose whether to start with a demo store to practise, or with an empty store.
- Press Finish. The sign-in screen opens.
Good to know
- Your full name, email and phone are sent to Ironloom with the free trial, so support can help you and tell you about your licence. They are not shared with anyone.
- With internet, the trial starts at this moment: see How does the free trial work?.
- With the demo on, the till uses simulated devices and holds sample products and sales. Switch it off before your first real sale; that empties the store: see How do I remove the demo data and start with my own store (Demo ON / OFF)?.
Next steps for a real store
- Connect and test your devices: see How do I let the till find and set up my devices?.
- Add your products: see How do I add a product? and How do I add many products quickly by scanning them?.
- Add your staff: see How do I add a user?.
- Set up backups to a USB stick or another computer: see How do I back up my data, and how do I restore a backup?.
- Open a shift and make a first sale: see How do I make a sale, from the first product to the receipt?.
How does the free trial work?
The trial is free for 14 days and starts when the till first reaches Ironloom over the internet. It covers one master PC and one till in the same store. During it, "Trial copy" is shown on the screen and printed on every receipt. When it ends, selling stops until a licence is entered; all your data is kept.
- Start: at the first start with internet. Without internet the till says Connect this computer to the internet once to start the free 14-day trial (or to activate your licence).
- During the trial: everything works. A small box in the top bar shows the days left, and receipts carry the words TRIAL COPY.
- Two computers: one master PC and one till. A third computer is told The trial allows one master PC and one till per store. Buy a licence to use more computers.
- At the end: the till says The 14-day trial has ended. Buy a licence to continue selling; all your data is kept. Reports and exports still work, so nothing is lost and nothing is locked away.
- After buying: enter the licence key and continue with the same store, products and sales: see How do I buy a licence and enter the licence key?.
Good to know
- The trial is per store and per computer and cannot be started again by reinstalling.
- The clock of the PC matters: if the date is moved back, the till asks you to correct it before going on.
- Receipts printed during the trial are marked as trial copies. Start real trading on a licence.
- If you practised with the demo, switch the demo off before real sales: see How do I remove the demo data and start with my own store (Demo ON / OFF)?.
How do I buy a licence and enter the licence key?
Open Settings, Licence. Buy a licence opens the Ironloom site in your browser to pay; when the payment is done, this computer gets its licence by itself. If you already have a key, choose Enter a licence key and type the key that starts with ILPOS-. The till needs the internet once for this.
Buy from the till
- Open Settings and the tile Licence.
- Choose Buy a licence.
- Choose the licence and how many computers will use it: the main PC and every till.
- The Ironloom site opens in your browser to pay. When the payment is done, this computer receives its licence by itself.
Enter a key you already have
- Open Settings, Licence, and choose Enter a licence key.
- Type the Licence key and confirm. Licence keys from Ironloom start with ILPOS- and need the internet once to activate. After that the till works offline.
Check and renew
- The licence window shows the status, the date until which the licence is valid, the installation id and the last contact with Ironloom.
- Add tills to the licence opens the Ironloom site to buy extra tills for this store's licence. The licence covers the main PC and one till; every computer above that is an extra till.
- Check with Ironloom now fetches the licence again, for example after buying more tills.
- A licence is for a period. Before it ends the till reminds you; Renew the licence opens the site to pay for one more year, and the new date arrives by itself.
- When a licence has expired the till says so and stops selling until it is renewed; the data stays.
Good to know
- Each computer that runs Ironloom POS uses one seat of the licence. Users are not counted.
- Current prices are on the Ironloom POS site. Plugins and themes are paid once and live on the same licence: see What are plugins?.
- Keep the email with your key. If you lose it, write to support@ironloomtechnologies.com from the address you bought with.
How do I move Ironloom POS and its licence to another computer?
Back up on the old PC, remove the licence from it with Move the licence to another computer in Settings, Licence, install on the new PC, restore the backup and enter the key there. The licence then belongs to the new computer.
- On the old PC: close the shift, then make a backup to a USB stick: Settings, Backups, Back up now: see How do I back up my data, and how do I restore a backup?.
- Still on the old PC: open Settings, Licence, and choose Move the licence to another computer. The till asks Remove the licence from this computer? This till goes back to trial and the licence can be activated on another computer. Confirm. It needs the internet.
- On the new PC: install Ironloom POS: see How do I install Ironloom POS?. Go through the first-start setup with any values; the backup will replace them.
- Restore the backup: Settings, Backups, Restore. The program restarts with your store.
- Enter the licence key: Settings, Licence, Enter a licence key: see How do I buy a licence and enter the licence key?.
- Set up the devices on the new PC: hardware settings belong to each computer: see How do I let the till find and set up my devices?.
If the old PC is broken or stolen
You cannot remove the licence from a PC that no longer starts. Write to support@ironloomtechnologies.com with your key or the email you bought with; support frees the seat so you can activate on the new PC. Your data comes from your last backup: this is why the backup must not be on the till's own disk.
Good to know
- A licence is tied to the computer it was activated on. Changing major parts of a PC can look like another computer to the licence check; if the till then asks for a key again, contact support.
- After moving, the old PC goes back to trial state and cannot sell.
Does Ironloom POS work without internet?
Yes. Selling, payments, returns, stock and reports run on the PC itself and need no internet. The till needs the internet once to start the trial or activate a licence, and then must reach Ironloom at least once every 30 days.
Works without internet
Everything in daily use: the Checkout, payments, receipts, returns, shifts and Z reports, products, stock, customers, promotions, reports, backups, and several tills in one store on the local network.
Needs the internet
| What | When |
|---|---|
| Starting the trial, activating or moving a licence | once, at that moment |
| The licence check | in the background when a connection exists; at least once every 30 days |
| Smart Scan lookups of unknown barcodes | when you scan one; otherwise it waits: see What does Smart Scan do when there is no internet? |
| Daily market exchange rates | once a day; the last rates stay in use |
| Emailed receipts and the daily email | when sent |
| Updates and problem reports | when you check or send |
| Buying a licence or a plugin | at that moment |
| E-invoicing to a tax platform | invoices wait and are sent later |
The 30 days
If the till has not reached Ironloom for 30 days it says This till has not reached Ironloom for 30 days. Connect it to the internet to renew the licence check. and stops selling until it has been online once. A short connection is enough, for example through a phone's hotspot.
Good to know
- Your data is on your PC, not on Ironloom's servers. Ironloom cannot see your sales and cannot restore them for you: keep your own backups: see How do I back up my data, and how do I restore a backup?.
- A till in a place without any internet can be used, as long as it is brought online once every 30 days.
How do I use more than one till in the same store?
Choose one PC as the master. On it, set Multi-till sync to master with a shared secret. On each other till, set Multi-till sync to till and enter the master's address and the same secret. Each till then sells on its own and exchanges data with the master over the store's network.
The master
- Install Ironloom POS on the PC that will be the master, usually the back-office PC, with the option that allows other tills to connect ticked: see How do I install Ironloom POS?.
- Open Settings, Multi-till sync, and choose Master PC.
- Set the Master port (8787 unless you have a reason to change it) and a Shared secret: a long word only your tills know.
- Save.
Each till
- Install Ironloom POS on the till PC and go through the first-start setup.
- Open Settings, Multi-till sync, and choose Till.
- Type the master's address in Master URL, for example http://192.168.1.10:8787/ironloom, and the same Shared secret.
- Press Test connection. It should answer Master reachable.
- Press Download catalogue from master to download the catalogue, customers, users and promotions from the master. Local copies on the till are overwritten.
- Save. The till now sells by itself, sends its sales to the master and picks up changes at the interval set in Sync every N seconds. Sync now does it at once.
Rules
- All PCs must be on the same network, and the master must keep the same address: give it a fixed address in your router.
- The licence covers the main PC and one till. Each computer above that needs an extra till on the licence: add them in Settings, Licence, Add tills to the licence, see How do I buy a licence and enter the licence key?.
- A till keeps selling when the master is off or unreachable, and catches up later.
- Make changes to products and prices on the master.
- Back up the master every day; it holds the store.
If Test connection fails: check that both PCs are on the same network, that the address and port are right, that the secret is identical, and that the Windows firewall on the master allows the program.
How do I update Ironloom POS to a new version?
Open About. It shows your version and whether a newer one exists. Press Check for updates, then Install update: the till downloads the new version, checks it, closes, updates and starts again. Your data is kept.
- Close the shift and make a backup first: see How do I back up my data, and how do I restore a backup?.
- Open About in the menu. It shows the version in use and when updates were last checked.
- Press Check for updates.
- If a newer version exists, press Install update.
- The till downloads the installer, checks that the file is the genuine one, and asks Windows for permission to install. Allow it.
- The program closes, updates itself and starts again. If the licence agreement changed, it is shown for you to accept.
Good to know
- The till looks for updates by itself once a day and tells you when one is available. Nothing is installed without you pressing the button.
- Updating does not touch your data folder. Sales, products and settings stay: see Where is my data kept, and who can see it?.
- With several tills, update the master and all tills the same day, outside opening hours. Tills on different versions may not be able to exchange data.
- You can also update by hand: download the new installer from the Ironloom POS site and run it over the old version.
- Each version's changes are listed on the site, in plain words.
After an update, make one test sale and print a receipt before the store opens.
How do I remove Ironloom POS from a computer?
Use Windows: Settings, Apps, find Ironloom POS and uninstall. The program is removed; the data folder with your sales records is left in place on purpose. Move the licence off the PC first if you will use it elsewhere.
- If the licence will be used on another PC, remove it from this one first: Settings, Licence, Move the licence to another computer: see How do I move Ironloom POS and its licence to another computer?.
- Make a last backup and take it off the PC: see How do I back up my data, and how do I restore a backup?.
- Close Ironloom POS.
- In Windows, open Settings, Apps (or Control Panel, Programs), choose Ironloom POS and uninstall.
What stays
The data folder C:\ProgramData\IronloomPOS, with the database, the backups, the product pictures and the logs. It is kept so that an uninstall by mistake, or a reinstall, loses nothing.
To remove the data too
Only when you are sure you no longer need it, and after checking how long your country requires business records to be kept: delete the folder C:\ProgramData\IronloomPOS by hand.
Before giving away or selling the PC, delete that folder: it holds your sales and your customers' details. Deleting a folder does not make it unrecoverable; for a PC that leaves your hands, wipe the disk with a tool made for that.
How do I bring my products and customers over from another point-of-sale program?
Export your data from the old program, then open Settings, Import from another system, choose the file and press Read and analyse. The till shows how each column will be imported before anything changes. A backup is made first.

- In the old program, export products, customers and suppliers. CSV or Excel is the safest choice.
- Open Settings and the tile Import from another system.
- Choose the Exported file and press Read and analyse.
- The till reads the file and says what it recognised. For each table, choose what it is (Products, Customers, Suppliers, Categories, or not imported), and check which column feeds each field. Sample values are shown.
- Adjust if needed:
- Prices: if prices come out 100 times too large, choose the division by 100;
- Numbers use a decimal comma (12,50);
- Update products and customers that already exist (same barcode, item code or phone);
- Import stock quantities as opening stock (new products);
- Import customer balances and loyalty points (new customers).
- Press Preview, read the warnings (products without a price, repeated barcodes, rows without a name), then Import now.
What it reads
Supported: CSV, Excel (.xlsx, .xls), JSON, XML, SQLite databases, SQL dump files, dBase (.dbf), Access (.mdb, .accdb) and ZIP files with any of these. Recognised directly: Loyverse, Square, Shopify, Lightspeed Retail, Odoo, uniCenta oPOS.
If the columns are not recognised
Enter a one-time Ironloom key and press Analyse with Ironloom AI. Only the table names, column names and 5 sample rows per table are sent to Ironloom; your full data stays on this computer. A key covers one migration and is bought on the Ironloom POS site.
Good to know
- The file is read on this computer. Nothing is sent anywhere unless you choose the Ironloom AI analysis in the next step.
- A full backup is made before importing. To undo the import, restore that backup in Settings > Backups.
- Sales history of the old program is not imported: keep the old program's reports for your records.
- After importing, check a few products at the till and a few customer balances before trading.
Where is my data kept, and who can see it?
On your own PC, in the folder C:\ProgramData\IronloomPOS: one database file, with folders for backups, product pictures and logs. Your sales, customers and stock are not on Ironloom's servers, and Ironloom cannot see or restore them.
The folder
| Inside C:\ProgramData\IronloomPOS | What |
|---|---|
| the database file | the whole store: products, stock, sales, customers, users, settings, the audit log |
| backups | the automatic and manual backups, unless you chose another folder |
| images | product pictures and logos |
| logs | technical logs of the program, used when a problem is reported |
| exports, einvoices | files the program wrote at your request |
What leaves your PC
- The licence check: the computer's installation id, the id of the store (a random number made at setup), the edition and version.
- With the trial: the owner's name, email and phone you typed at setup.
- Smart Scan: the barcode being looked up; and product facts and shelf prices for the shared product database: see What does my store share with the Ironloom product database?.
- A problem report, when you send one: your description, technical logs and, if you tick it, a screenshot. The report shows what will be sent before you send it.
- Emails, e-invoices and accounting files go where you send them, not to Ironloom.
Who can see it in the store
Anyone who can sign in sees what their role allows. Anyone with access to the Windows account and the folder could copy the database file: protect the PC with a Windows password and keep it physically safe.
Your part
Back up to another device every day: see How do I back up my data, and how do I restore a backup?. If the PC is lost and there is no backup elsewhere, the data is gone: Ironloom has no copy.
Plugins and themes
What are plugins?
Plugins are extra features and themes for Ironloom POS. Each is paid once, lives on your store's licence and stays as long as that licence is valid. Open Plugins in the menu and press Load plugins or Load themes to see what Ironloom offers.
- Open Plugins in the menu.
- The screen has two parts: Features, plugins that add a screen or a tool to the program, and Themes, which change its colours and look.
- Press Load plugins or Load themes. The till asks the Ironloom server for the list.
- Each item is a card with its name, what it does and its state:
- Switched on: you have it and it is in use;
- included in your edition;
- bought;
- or its price, with a Buy button, or Get it when it is free.
- Learn more opens the item's page on the Ironloom site, in the language of your screen.
Good to know
- A plugin is bought once, not every year. It belongs to the licence, so every till of the store has it, and it ends if the licence ends.
- Only Ironloom makes plugins. They come with the program and are switched on by the licence; nothing is downloaded from third parties.
- Without internet the screen shows the last list it received.
- Getting or buying a plugin needs the right to manage the licence: see How do I get or buy a plugin?.
How do I get or buy a plugin?
In Plugins, press Get it on a free item, or Buy on a paid one. Buy opens the Ironloom site in your browser to pay; afterwards press Check my purchases and the plugin is switched on for the whole store.
A free item
- Open Plugins and load the list.
- Press Get it. The till asks the Ironloom server and confirms that the item is now on your licence.
A paid item
- Press Buy on the card. The till asks you to confirm and names the price.
- The Ironloom site opens in your browser, with the cart already filled for your store's licence. Pay there.
- Back in the till, press Check my purchases. The till fetches the licence again and the card shows the item as bought and switched on.
Good to know
- Only a user who may manage the licence can get or buy plugins. Others see the cards but not the buttons' effect.
- Payment is made on the Ironloom site with the methods offered there. The till itself never asks for card details.
- The purchase is for the licence, so every till of the store has the plugin after its next licence check. On another till, press Check my purchases to get it at once.
- If the browser cannot be opened from the till, open the Ironloom POS site yourself and sign in with the account you bought the licence with.
- If a purchase does not appear after a few minutes, write to support@ironloomtechnologies.com with your licence key and the order number.
How do I change the look of the program with a theme?
Light and dark come with the program. Other looks are themes: open Plugins, press Load themes, get the theme, then press Use this theme. Back to the standard look returns to the original.
Light and dark
Press the sun button in the top bar, or choose Theme in Settings, Language / Theme: see How do I switch between light and dark, change the keyboard language or open the on-screen keyboard?.
A theme
- Open Plugins and press Load themes.
- Each theme is a card. Learn more shows it on the Ironloom site.
- Get or buy the theme: see How do I get or buy a plugin?.
- Press Use this theme. The till confirms that the theme is in use.
A theme changes the colours, the fonts of headings and the look of the whole program, the sign-in page included. Each theme has its own light and dark mode; the sun button switches between them.
Go back
Press Back to the standard look in Plugins, or choose Standard look under Look in Settings, Language / Theme.
Good to know
- A theme changes the look only. Buttons, texts and the way the till works stay the same, so this help applies with any theme.
- The theme is chosen per till; the purchase is for the whole store.
- Check the screens your staff use most after switching, in your language, before a busy day.
Keyboard shortcuts
What are the keyboard shortcuts?
At the Checkout: F2 search, F3 price check, F4 hold, F5 recall, F6 customer, F7 quantity, F8 discount, F9 open drawer, F10 pay, F11 returns. Everywhere: F1 help, F12 lock, Esc back. Each has a Ctrl shortcut for keyboards whose F-keys do something else.
At the Checkout
| Key | Ctrl shortcut | What it does |
|---|---|---|
| F2 | Ctrl+F | puts the cursor in the search box |
| F3 | Ctrl+P | price check |
| F4 | Ctrl+H | hold the sale |
| F5 | Ctrl+R | recall a held sale |
| F6 | Ctrl+U | attach a customer |
| F7 | Ctrl+M | quantity for the next scan |
| F8 | Ctrl+D | discount on the whole sale |
| F9 | Ctrl+O | open the drawer |
| F10 | Ctrl+Enter | pay |
| F11 | Ctrl+T | returns |
| Del | remove the selected line | |
| + and − | one more, one less on the selected line | |
| Enter | add what is typed; in a list, open the selected line |
Everywhere
| Key | What it does |
|---|---|
| F1 | opens the help for the screen you are on |
| F12, Ctrl+L | lock the till |
| Esc | back: closes a panel, clears the search, or returns to the previous screen |
| F5 | on list screens, reload the list |
| Enter | on list screens, open the selected line |
In the Payment window
| Key | What it does |
|---|---|
| Enter | take the amount in cash; when nothing remains, complete the sale |
| F2 | card |
| F10 | complete the sale, when nothing remains |
| Esc | back to the Checkout without paying |
The shortcuts work whether a button is shown in the row or sits under More. Del, + and − act on the basket only when the search box is empty.
The F-keys do not work on my laptop: they change the volume or the brightness. What do I do?
On many laptops the top row sends volume and brightness unless Fn is held. Hold Fn while pressing the F-key, lock Fn, use the Ctrl shortcuts (Ctrl+Enter pays), or teach the till other keys in Settings, Laptop keys.
The till notices when a volume or media key arrives in place of an F-key, and shows this tip once. Your choices:
1. Hold or lock Fn
- Hold the Fn key and press the F-key: Fn+F10 pays.
- Many laptops can lock Fn so the top row sends F1 to F12 directly: often Fn+Esc, or a setting in the laptop's own keyboard settings.
2. Use the Ctrl shortcuts
They work on every keyboard and need no F-keys:
| Action | Shortcut |
|---|---|
| Pay | Ctrl+Enter |
| Search | Ctrl+F |
| Price check | Ctrl+P |
| Hold / Recall | Ctrl+H / Ctrl+R |
| Customer | Ctrl+U |
| Quantity | Ctrl+M |
| Discount | Ctrl+D |
| Open drawer | Ctrl+O |
| Returns | Ctrl+T |
| Lock | Ctrl+L |
3. Teach the till your own keys
Open Settings, Laptop keys, and press the key you want for each action: see How do I teach the till other keys, when the F-keys of my laptop do something else?.
A separate keyboard plugged into the laptop usually has normal F-keys, and is more comfortable for a till in any case. Every action is also a button on the screen.
If something goes wrong
The till says it cannot sell. What do I do?
Read the message: it names the reason. Most often there is no open shift, the trial or the licence has ended, or the till has not reached Ironloom for 30 days. Your data is never lost by any of these; reports and exports keep working.
| The till says | What to do |
|---|---|
| No shift is open on this till. Open a shift to start selling. | Open a shift: see How do I open a shift?. If your role may not, ask a supervisor. |
| The 14-day trial has ended. Buy a licence to continue selling; all your data is kept. | Buy a licence and enter the key: see How do I buy a licence and enter the licence key?. |
| Your licence has expired. Renew it to continue selling. | Renew the licence in Settings, Licence: see How do I buy a licence and enter the licence key?. |
| This till has not reached Ironloom for 30 days. Connect it to the internet to renew the licence check. | Connect the PC to the internet once; a phone hotspot is enough. Then Settings, Licence, Check with Ironloom now. |
| Connect this computer to the internet once to start the free 14-day trial (or to activate your licence). | Connect the PC to the internet and start the program again. |
| The trial allows one master PC and one till per store. Buy a licence to use more computers. | The trial covers two computers. Buy a licence for the number of tills you use. |
| The computer's date and time were moved back. Correct the clock to continue. | Correct the date and time in Windows: see The till says "The computer's date and time were moved back". What do I do?. |
| Your licence was disabled by Ironloom. Contact Ironloom. or This till was blocked by Ironloom. Contact Ironloom support. | Write to support@ironloomtechnologies.com with your licence key. |
| You do not have permission for this action. | Your role may not sell. Ask the owner: see How do I decide what each person may do (roles and rights)?. |
If the message is about the internet but the internet works
- Check that the date and time of the PC are right.
- Check that a firewall or antivirus is not blocking Ironloom POS.
- Open Settings, Licence: it shows the last contact with Ironloom. Press Check with Ironloom now.
Still stuck
Write down the exact message and contact support: see How do I contact Ironloom support?. Customers can be served in the meantime only by hand; enter those sales afterwards.
Ironloom POS does not start. What do I do?
Read the small window that appears: it names the reason. If it says the program is already running, look for its window in the taskbar. If it says the program could not start, restart the PC and try again; if it still fails, send the log folder to support. Your sales and products stay on the PC.
The window says the program is already running
The message is: Ironloom POS is already running.
- Look in the Windows taskbar for the Ironloom POS icon and click it. Press Alt+Tab to go through the open windows.
- If no window can be found, restart the PC and start Ironloom POS again.
The window says the program could not start
The window shows the reason and the folder of the log.
- Write down the reason, or take a picture of the window.
- Restart the PC and start Ironloom POS again.
- Check that the disk is not full: the program needs free space to open its database.
- If the window comes back, send the reason and the newest file of the log folder to support: see How do I contact Ironloom support?. The folder is named in the window; see also Where is my data kept, and who can see it?.
Nothing happens at all
- Wait half a minute: on a slow PC the first start after Windows starts takes longer.
- Start it from the Start menu, not from an old shortcut that may point to a removed version.
- Check that the PC meets the requirements, with Microsoft .NET Framework 4.8: see What do I need to run Ironloom POS?.
- Check that an antivirus program has not blocked or removed the program. If it has, allow Ironloom POS in the antivirus, then install it again over the old one: see How do I install Ironloom POS?. Installing again keeps your data.
The program starts but closes, or asks for the date
- After an unexpected close, the next start offers to send a problem report: see How do I report a problem to Ironloom?.
- A message about the date and time: see The till says "The computer's date and time were moved back". What do I do?.
Do not delete the data folder to "repair" the program: it holds your sales, products and customers. Ask support first.
The scanner does nothing, types into the wrong box, or scans the wrong product. What do I check?
First scan a barcode into Windows Notepad: if digits appear there, the scanner is fine and the setting is in the till; if nothing appears, the problem is the scanner, its cable or its own settings.
Nothing happens at all
- Unplug the scanner and plug it into another USB port.
- Open Windows Notepad and scan a barcode. No digits: the scanner itself is at fault. Check the cable, or scan the "factory default" and "USB keyboard" codes in the scanner's leaflet.
- Digits appear in Notepad but not in the till: go on below.
It beeps, but the till does not react
- Open Hardware: is the simulator tile switched on? A real scanner still works with simulators, but check the Scanner card.
- In the Scanner card, press Test: scan something and scan. Nothing received means the till does not see this scanner: remove it from the card and add it again with Learn USB scanner (scan now): see How do I set up a barcode scanner?.
It types into the wrong box
The scanner is seen as a keyboard, and the cursor was in another box. Teach the till the scanner with Learn USB scanner (scan now): a learned scanner is read directly and never types into a box.
The barcode is "not known" although the product exists
- The keyboard is set to another language: see A barcode is not found when the keyboard is set to Arabic (or another language). Why?.
- The product's barcode in the till differs from the label by a digit: open the product and scan the label into Barcodes (one per line).
- The scanner adds or removes characters (a prefix, the first zero of a UPC code): reset it with its factory default code.
It adds the product twice
The scanner reads the same label twice in a row when held too long. Most scanners have a "same code delay" setting in their leaflet.
A barcode is not found when the keyboard is set to Arabic (or another language). Why?
Most scanners type like a keyboard, so Windows turns their digits into the characters of the active keyboard. The till turns such scans back into digits by itself. If a barcode is still not found, press the keyboard language button at the top until it shows EN, or teach the till the scanner so it is read directly.
What happens
A scanner sends key presses. With an Arabic keyboard active, Windows may deliver Arabic-Indic digits or other characters; with a French AZERTY keyboard, the digit keys give symbols unless Shift is held. The till converts the usual cases back to the digits of the barcode; a layout it does not know can still slip through.
If a scan still fails
- Press the language button in the top bar until it shows EN, and scan again.
- If that works, set the keyboard so the problem does not come back:
- Settings, Keyboard: choose how the keyboard language follows the screen: see How do I set the keyboard language and the on-screen keyboard?;
- or teach the till the scanner: Hardware, Scanner, Learn USB scanner (scan now). A learned scanner is read directly, whatever the keyboard language: see How do I set up a barcode scanner?.
Other causes that look the same
- Barcodes that contain letters (some in-store codes) depend on the keyboard layout more than plain digits do. A learned scanner solves it.
- The scanner itself can be set to a country layout in its leaflet. Set it to "US keyboard", the usual factory setting.
Typing names in Arabic and scanning barcodes can then be mixed freely at the same till.
The receipt does not print. What do I check?
Look at the dot next to the receipt printer at the bottom of the screen, then run the test in Hardware. The usual causes are paper, a cable, the printer being off, simulators switched on, or receipts set to "never".
Check in this order
- The printer: is it on, with paper, the lid closed and no red light? Switch it off and on.
- The cable: USB or network cable firmly in at both ends.
- The dot next to the receipt printer in the line at the bottom of the till: a filled dot means the till sees it as ready.
- Simulators: open Hardware. If the first tile says every device is simulated, receipts go to the screen, not to paper: see What are simulators, and why does nothing really print?.
- The setting: Settings, Receipt: is printing set to never, or to ask? See How do I change what is printed on the receipt?.
- The test: Hardware, Test hardware, Print a test receipt: see How do I test all the devices of the till in one place?.
- Windows: print a Windows test page to the same printer (Windows Settings, Printers). If Windows cannot print either, the driver or the printer is at fault, not the till.
It prints, but wrongly
| What you see | What to do |
|---|---|
| Strange characters, or pages of them | the printer is not an ESC/POS printer, or the wrong kind is chosen in the Printer card |
| Arabic as question marks or boxes | tick Print Arabic as image (works on every printer) |
| Text cut off at the right | wrong Paper width (mm): 58 or 80 mm |
| Blank paper | thermal paper is in upside down: turn the roll |
| No cut | the printer has no cutter, or needs its own setting |
| No QR code | untick Native QR in the Printer card |
The sale itself is safe when a receipt fails to print: reprint it once the printer works: see How do I print a receipt again?.
The cash drawer does not open. What do I check?
Check that the drawer is plugged into the receipt printer and that the printer is on, then run the drawer test: press Open drawer twice within 10 seconds at the till, or use Find the drawer setting in the hardware test page. To get at the cash now, use the drawer's key.
Right now
Most drawers open with their key, or with a release lever underneath. Serve the customer, then look for the cause.
Check in this order
- Does the receipt print? The drawer is opened through the printer. If the printer does not print, fix that first: see The receipt does not print. What do I check?.
- The cable: from the drawer into the printer's drawer socket, not into a network or phone socket, and firmly in.
- The lock: a drawer locked with its key does not open on a signal. Turn the key to the open position.
- Simulators: if Hardware says every device is simulated, the drawer "opens" on the screen only: see What are simulators, and why does nothing really print?.
- The signal: run the drawer test. At the till, press Open drawer twice within 10 seconds and accept the test; or open Test hardware and press Find the drawer setting. The till tries the common signals one by one; answer yes when the drawer opens, and that setting is saved: see How do I set up the cash drawer, and what is the drawer test?.
Other cases
- The drawer opens for card sales too: it should not; the till opens it only when cash is part of the payment. Check that the sale was not rung up as cash.
- It opens only sometimes: the cable is loose, or the drawer's coil is weak. Try the test's stronger signal, or another cable.
- The message says you may not open the drawer: that is a right, not a fault: see How do I open the cash drawer without a sale?.
My logo prints grey, blotchy or as a black block on the receipt. How do I fix it?
A thermal printer prints only black dots, so a colour or shaded logo comes out grey or blotchy. Convert it once in Settings, Receipt logo: choose the printing style, move the darkness slider while watching the preview, and print a test.
- Open Settings, Receipt logo.
- Choose the picture, or Use the store logo.
- Choose Logo: sharp black and white (recommended) for a logo, Photo: fine dots for shades for a picture with shades.
- Move Darkness:
- thin parts and small text disappear: move right;
- the logo prints as a black block: move left.
- Press Print test, look at the paper, adjust, and save.
Details: see How do I get a sharp logo on a thermal receipt printer?.
If it is still poor
- Start from a better picture: black on white, bold shapes, no gradients or shadows, about 384 pixels wide.
- A logo with a coloured or dark background rarely prints well. Ask whoever made your logo for a one-colour version.
- Faint print over the whole receipt, not only the logo, is the printer: a worn print head, cheap paper, or a low density setting on the printer itself.
No logo at all
- Print logo must be ticked in Settings, Receipt.
- The store needs a logo in Settings, Store, or one chosen in the receipt logo window.
Some names or texts appear in the wrong language. Why?
Two different things can be in another language: your own data (product, department and customer names), which shows the main name when no name was entered for that language; and the program's own texts, which should all be translated. Fill in the missing names; report a program text that is not translated.
Your own data
- Products, departments, categories: each has a name box per language of the store. On an Arabic or French screen the name in that language is shown; when the box is empty, the main name is shown. Open the item and fill it in: see How do I give a product a name in Arabic or French?.
- Customers and suppliers: they have a main name and an optional Arabic name.
- Demo products have names in the three languages; your own products have only what you typed.
- Store languages: if a language is not ticked under Store language in Settings, Store, its name boxes are not shown: see How do I change the language of the screens, and choose the languages my store uses?.
The program's texts
Buttons, menus, messages and reports are translated into English, Arabic and French. If you see a button or a message in English on an Arabic or French screen, that is a fault in the program. Report it with a picture of the screen: see How do I report a problem to Ironloom?.
The whole screen is in the wrong language
- Change it in Settings, Language / Theme, and restart when asked: see How do I change the language of the screens, and choose the languages my store uses?.
- A user can have a language of their own on their user record: the screen changes when they sign in.
- If you cannot read the screen at all: the Settings tile for language is the one with the two words separated by a slash; the first choice in its window is the language.
Receipts
A receipt is printed in the language of the screen at the moment of the sale, with the product names of that language.
The till says "The computer's date and time were moved back". What do I do?
The date of the PC is earlier than the last time the till ran, so the till stops selling until the clock is right. Correct the date and time in Windows, then start Ironloom POS again.
The message is: The computer's date and time were moved back. Correct the clock to continue.
Correct the clock
- Close Ironloom POS.
- Right-click the clock in the Windows taskbar and open the date and time settings.
- Switch on "Set time automatically" with the PC connected to the internet, or set the date, the time and the time zone by hand.
- Start Ironloom POS again.
Why the till checks
Receipts, shifts, the audit log, promotions and the licence all depend on the date. A date in the past would put today's sales before yesterday's and could reopen a trial that has ended, so the till refuses to sell rather than record sales with a wrong date.
If it keeps happening
- The PC forgets the date when it is switched off: the small battery on its main board is empty. A technician replaces it in a few minutes.
- The time zone is wrong: the time jumps by whole hours after each automatic update. Set the right time zone in Windows.
- Someone changes the clock by hand: use a Windows account without that right for daily work.
Good to know
- The change of clocks for summer and winter time is handled by Windows and causes no message.
- The time printed on receipts is the PC's local time. Before the first day of sales, check that it is right.
How do I report a problem to Ironloom?
Open About and press Report a problem. Write what happened, add a picture of the screen if it helps, look at what will be sent, and press Send to Ironloom. You get a report number, and the program tells you when the fault is fixed in an update.
- Open About in the menu and press Report a problem. After an error or an unexpected close, the program offers this window by itself.
- Fill in What happened? What were you doing just before? * The more exact, the faster the fault is found: which screen, which button, which product.
- Type an Email for our answer.
- Tick Add a picture of the screen if the problem is visible.
- Press Show what will be sent to read the report first.
- Press Send to Ironloom. The till shows your report number.
What is sent, and what is not
The report holds your description, the program's log of the last 3 days and technical details of the computer. Your database is never sent: no customers, sales, stock or prices. Emails, phone numbers and card numbers that appear in the log are hidden.
Without internet
Press Save as file. The till saves the report and tells you where; email that file to support@ironloomtechnologies.com with a few words about the problem.
Afterwards
- Ironloom looks at the report. If you gave an email, the answer comes there.
- When the fault is fixed, the program tells you the report number and the version that fixes it, and offers to install the update: see How do I update Ironloom POS to a new version?.
- About shows how many reports were sent from this computer.
A report is for faults of the program. For a question on how to do something, search this help first, then contact support: see How do I contact Ironloom support?.
How do I contact Ironloom support?
Write to support@ironloomtechnologies.com. Say which store you are, which version you use, what you were doing and what the screen said. For a fault of the program, send a problem report from About instead: it carries the details support needs.
Before you write
- Search this help with a few words of your question.
- Look at the chapter "If something goes wrong".
- Note the exact message on the screen, or take a picture of it.
What to put in your message
- The name of your store and the email you registered with.
- The version and edition, shown in About.
- What you were doing, step by step, and what happened.
- A picture of the screen, if it shows the problem.
- For a licence question: your licence key, or the installation id shown in Settings, Licence.
Which way for which problem
| Problem | Way |
|---|---|
| The program showed an error, closed, or does something wrong | About, Report a problem: see How do I report a problem to Ironloom? |
| A question, a licence, a purchase | email to support |
| The owner forgot the PIN | the request number from the sign-in screen, by email: see I forgot my PIN or password. How do I get back in? |
| A device does not work | first the hardware test page: see How do I test all the devices of the till in one place?; then the device's maker or seller |
What support can and cannot do
- Support can explain the program, check your licence, and look into faults.
- Support cannot see your sales, your stock or your customers, and cannot restore lost data: it is on your PC and in your backups only.
- Support will never ask for your PIN, your password, or a card number.