Signing in and the main screen
How do I sign in?
Type your user name or your short user ID, then your PIN, and press Sign in. On a touch screen the number pad is enough: user ID, then PIN.

- Start Ironloom POS from the Start menu or the desktop icon.
- In the box User name or user ID, type your user name, or your user ID: a short number such as 3. The screen greets you by name as soon as it recognises you.
- Type your PIN. The number pad on the screen types into the box you touched last.
- Press Sign in.
Other ways
- Password: press Use password to type your password in place of the PIN. Use PIN goes back.
- Badge: if you have a staff badge, scan it on this screen.
- No keyboard: touch the first box, tap your user ID on the number pad, touch the PIN box and tap your PIN.
After several wrong tries the account is locked for a while. Wait, or ask a manager. If you do not remember your PIN, see I forgot my PIN or password. How do I get back in?.
After signing in you land on your home page: the Dashboard for an owner or manager, the Checkout for a cashier or supervisor, Inventory for a stock clerk, Reports for an accountant.
What is on the main screen?
The menu on the left opens each part of the program, the bar at the top shows the store, the till, the open shift and who is signed in, and the line at the bottom shows your devices. You only see the parts your role allows.
The menu on the left
- Each line opens one part: Checkout, Dashboard, Products, Inventory, Purchasing, Customers, Promotions, Shifts & Cash, Reports, Returns, Smart Import, Hardware, Users & Roles, Plugins, Settings, About.
- A part your role may not use is not shown. If something is missing, ask the owner or a manager: see How do I decide what each person may do (roles and rights)?.
- The arrow under the logo shrinks the menu to icons and opens it again.
- The arrow beside the name at the top of the menu goes back one screen, like the Esc key.
The bar at the top
- The store, the till and since when the shift is open.
- During a trial, a small box with the days left.
- An orange button with the number of products that are low in stock, for users who may see stock. Press it to open the list.
- The date and time, the keyboard language, the on-screen keyboard button, the light / dark switch, help (?) and your name.
- Lock and Logout.
The line at the bottom
Each device (scanner, receipt printer, cash drawer, scale, customer display, card terminal) has a dot. A filled dot means the device is ready.
Messages
Short messages appear at the top, one at a time. They go away by themselves, or as soon as you press a key, touch the screen or scan.
How do I get help inside the program?
Press F1, or the question mark at the top. The help opens on the articles about the screen you are on. Type your question in the box at the top to search all articles. It works without internet.
- Press F1 on any screen, or press the question mark in the top bar.
- Under About this screen, tap a question to read its answer on the right.
- To search, type a few words of your question in the box at the top, for example “refund” or “drawer”. The matching questions are listed while you type. Press Enter to open the first one.
- To read everything on a subject, open a chapter under All chapters.
- Press Close or Esc to return to your work. Nothing you were doing is lost.
Good to know
- The words in colour and bold are the names of buttons and screens, written as the program shows them.
- Underlined text opens another article. The arrow at the top goes back to the one before.
- Keyboard shortcuts opens the list of keys: see What are the keyboard shortcuts?.
- The help is in the language of the screen: English, Arabic or French.
- The help is part of the program, so it matches your version and needs no internet. The Ironloom POS site has the same articles, with pictures, and guides to print.
- Small typing mistakes do not matter in the search.
If the help does not answer
- A fault of the program: send a problem report, see How do I report a problem to Ironloom?.
- A question: contact support, see How do I contact Ironloom support?.
Selling
How do I make a sale, from the first product to the receipt?
Open Checkout, scan the products, press PAY (F10), take the money and press Complete sale. The receipt prints and the drawer opens for cash.
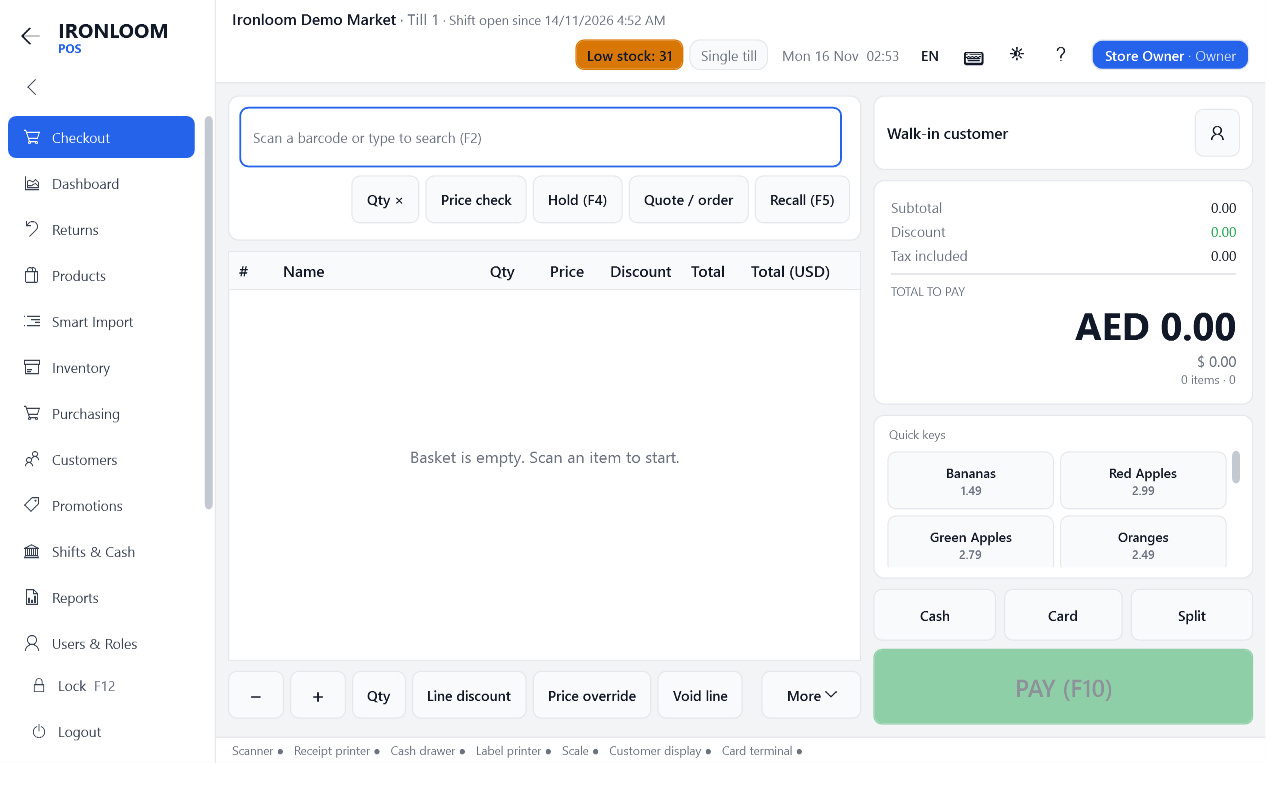
- Open Checkout in the menu. If no shift is open yet, the till asks for the cash in the drawer first: see How do I open a shift?.
- Scan each product. It appears as a line in the basket with its price. No barcode? See How do I add a product to the sale?.
- Check the total at the right, under TOTAL TO PAY.
- Press PAY (F10). For a simple sale you can press Cash or Card directly.
- Take the payment: see How do I take a cash payment and give change? or How do I take a card payment?.
- Press Complete sale. The receipt prints, the drawer opens when cash was paid, and a new empty basket is ready.
- A wrong line? Select it and press Void line: see How do I remove a product from the sale, or cancel the whole sale?.
- The customer has to fetch something? Park the sale with Hold (F4): see How do I put a sale on hold and bring it back?.
- The sale is saved while you work. If the program or the PC stops, the basket comes back: see The program or the PC stopped in the middle of a sale. Is the sale lost?.
Taking payment
How do I take a cash payment and give change?
Press PAY (F10), type the amount the customer hands you (or tap the button with that amount), press Cash, then Complete sale. The till shows the change in large figures and opens the drawer.

- Press PAY (F10) on the Checkout. The Payment window shows Amount due.
- Enter what the customer gives you:
- tap one of the amount buttons: the exact amount, or the next notes above it. This adds the cash payment in one step;
- or type the amount on the number pad and press Cash. Exact fills in the amount still due.
- Remaining shows what is still to pay, Change what to give back.
- Press Complete sale, or Enter.
- The drawer opens and the change is shown in large figures. Give the change and the receipt, and close the drawer.
- Quick way: with the Payment window open and nothing typed, Enter takes the whole amount in cash; Enter again completes the sale.
- Wrong amount entered: double-click the payment in the list and confirm to remove it, then enter it again.
- Money boxes add the thousands separators while you type (89,500).
- If the store rounds cash totals, the rounding is shown on the receipt.
Shifts and cash
How do I open a shift?
Count the cash you put in the drawer, open Shifts & Cash, press Open shift and type that amount as the Opening float. The till also asks for it by itself at the first sale when no shift is open.
- Count the notes and coins placed in the drawer to give change. This is the float.
- Open Shifts & Cash and press Open shift.
- Type the amount in Opening float. A store with two currencies types the float of each currency.
- Confirm. The top bar now shows since when the shift is open.
- A shift belongs to one till. Each till has its own shift and its own drawer.
- If you start selling without a shift, the till opens this window first. A user who may not open a shift is told No shift is open on this till. Open a shift to start selling. and must ask a supervisor.
- The float is counted back at the end, so type what is really in the drawer: see How do I close the shift and count the drawer?.
- A shift can stay open while cashiers change. Whoever closes it counts the drawer.
How do I close the shift and count the drawer?
Open Shifts & Cash, press Close shift (Z), count the notes and coins in the drawer and type how many of each. The till compares your count with what it expects, prints the Z report and makes a backup.
Before you start: finish or void any sale on the screen, and deal with held sales: see Where do I see the recent sales and the sales on hold?.
- Open Shifts & Cash and press Close shift (Z).
- The counting window opens. For each note and coin, type how many are in the drawer. The total adds up as you type. See How do I count the notes and coins, and what if the drawer holds two currencies?.
- The count is blind: the expected amount is not shown, unless your role may see it.
- Add a remark under Notes if something happened, and confirm.
- The till shows your counted total and asks to close. Confirm.
- If the store uses the card check, type the card total printed by the card terminal: see At closing the till asks for the card total. What do I type?.
- The Z report prints, the drawer opens so you can take the cash out, and a backup of the data is made.
- A message shows the Z number and the difference between the count and the expected cash: see The drawer count does not match. What does over / short mean and what do I check?.
- Closing a shift opened by another user needs an extra right.
- A closed shift cannot be opened again. Mistakes are corrected with the next shift, and the difference stays on the Z report.
- Selling is not possible until a new shift is opened.
Products
How do I add a product?
Open Products and press New product, or scan the product’s barcode on that screen. The till looks the barcode up, fills in what it finds, and you add the price. A product without a barcode is filled in by hand.

- Open Products and press New product.
- The till asks: Scan or type the barcode (leave empty to fill in everything by hand).
- With a barcode, Smart Scan looks it up and opens the review window with the name, brand, size and picture it found: see How do I check and import a product that Smart Scan found?. Without one, the product form opens empty.
- Fill in at least the name, the Price, the Department and the Tax.
- Save. The product can be sold at once.
The other fields
- Barcodes (one per line): one per line; a product can have several: see Can a product have several barcodes, and can two products share one?.
- Cost: what you pay for it. Only users who may see costs see this box.
- Unit, Sold by weight, PLU (scale code): for goods sold by weight: see How do I set up a product that is sold by weight?.
- Track stock, Reorder point, Reorder qty: whether the stock is counted, and when to reorder.
- Quick key and Short name (quick keys): a button on the till: see How do I put a product on a quick key of the till?.
- Allow discount, Allow price override, Minimum age, Has expiry (FEFO): see How do I set a minimum age, a deposit, an expiry date or a discount rule on a product?.
- Product picture and names in other languages: see How do I add a picture to a product? and How do I give a product a name in Arabic or French?.
To add many products quickly, scan them one after another in Smart Import: see How do I add many products quickly by scanning them?. To bring a list from a file, see How do I import or export my products as a spreadsheet?.
Smart Scan: unknown barcodes
How do I add many products quickly by scanning them?
Open Smart Import and scan the products one after another. Each barcode becomes a row that the till fills in from its sources. Set the prices, tick the rows you want and press Import selected.
- Open Smart Import in the menu.
- Scan the products one after another, without waiting for each answer. Add code is for typing a barcode by hand.
- Each row shows the barcode, the name, brand and department found, the source, the confidence and a status. Products you already have, and in-store codes, are marked and not looked up.
- Correct a row with Edit row: name, department, cost, price, opening stock.
- Set the prices:
- Set price for selected gives the ticked rows one price;
- or type Markup % on cost to work the price out from each cost, with End in .99 if you want;
- or type each price in its row.
- Tick the rows to import (Toggle select ticks or unticks) and press Import selected.
- The till warns when ticked rows have no price.
- Nothing is created before you press Import selected.
- It is the fastest way to start a store: walk along the shelves with the scanner and a laptop.
- Products without a barcode are added one by one: see How do I add a product?. A list from another program is imported from a file: see How do I bring my products and customers over from another point-of-sale program?.
Dashboard and reports
How do I read the Dashboard?
The Dashboard shows the store at a glance: sales, number of sales, margin, returns, low stock, a sales chart, payments by method and best sellers. Every figure opens the list behind it: click it, touch it, or press Enter on it. Esc comes back.
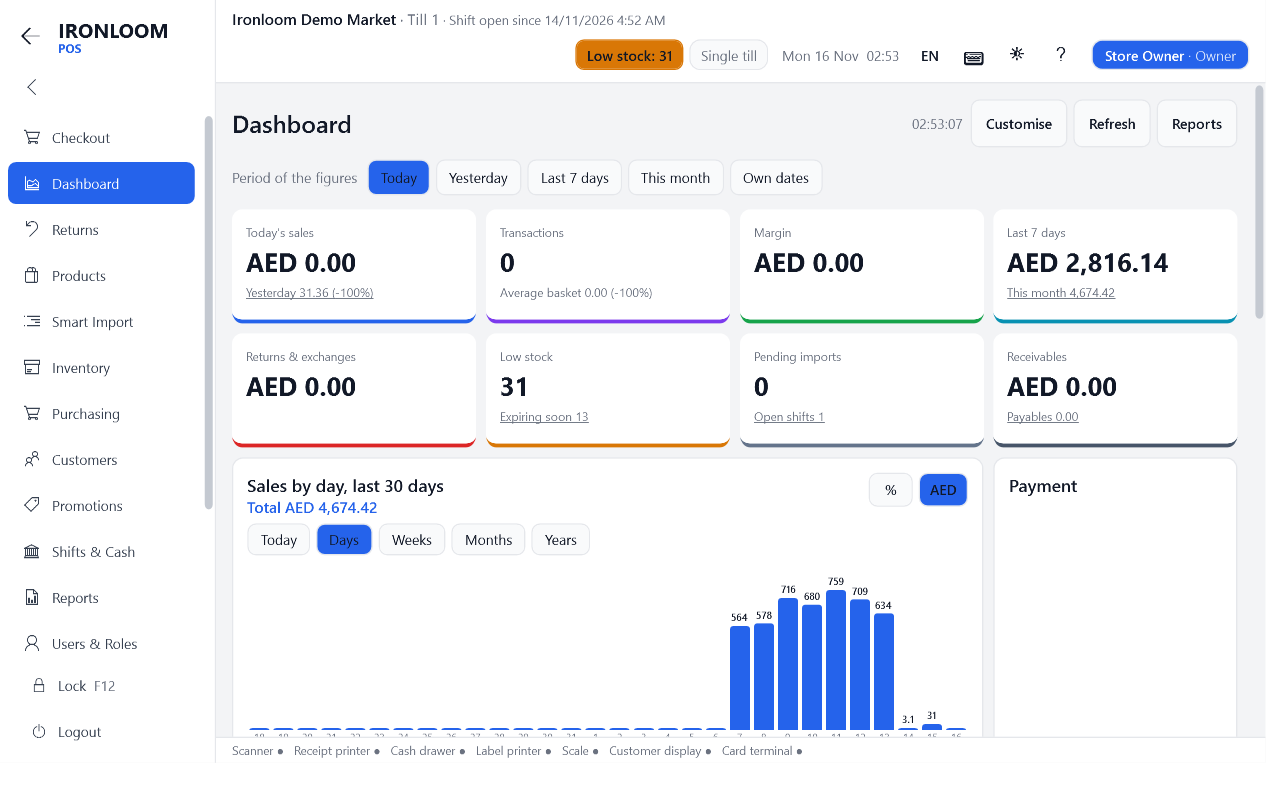
The figure cards
Today's sales, Transactions, Margin, Last 7 days, Returns, Low stock, Pending imports and Receivables. Most have a second line, such as the average basket or the change against the period before.
The blocks
| Block | What it shows |
|---|---|
| Sales chart | sales by hour today, or by day, week, month or year; the % and currency buttons choose what is written on the bars |
| Payment | the period’s sales by payment method |
| Top products | the best sellers |
| Sales by cashier, Sales by department, Busy hours | who sold, what sold, and when |
| Cash and shifts | the open shifts with their expected cash, held sales waiting |
| Loss watch | discounts, voids, price changes, drawer openings without a sale, items sold under cost: see How do I keep an eye on discounts, voids and other ways money can be lost? |
| Stock watch | out of stock, to reorder, dead stock, stock value, next expiry dates |
| Purchasing and money | orders to receive, supplier invoices due, tax collected, gift cards and store credit still owed |
| Customers and orders | new customers, open orders and deliveries |
| Alerts | devices, backup, licence, till sync, product lookups waiting |
| Daily target | progress towards the day’s sales target |
- Each block appears only if your role may see its data. A cashier’s Dashboard is not the owner’s.
- A bar of the chart opens the receipts of that hour, or the sales report of that day, week, month or year.
- The period of the figures can be changed: see How do I see yesterday or this month on the Dashboard, and set a daily sales target?. The blocks can be moved, resized and hidden: see How do I arrange the Dashboard the way I want it?.
Users and roles
How do I add a user?
Open Users & Roles, press New, type a user name and the person’s full name, choose a role, and set a PIN or a password. Give every person their own user, so each sale and each correction carries the right name.
- Open Users & Roles. The first tab is Users.
- Press New.
- Fill in:
- Username: short, without spaces, for example “sara”;
- Full name: shown in the greeting, on receipts and in reports;
- Role: what the person may do: see How do I decide what each person may do (roles and rights)?;
- User ID (1 to 4 digits, empty = next free number): the short number for signing in on the number pad: see What is the user ID, and how do I change it?;
- Badge code: the code of a staff badge, if you use badges;
- Language: the screen language for this person, if different from the store’s;
- Max discount % and Max refund (0 = role default): only to give this person other limits than their role: see How do I limit the discounts and refunds a cashier may give?.
- Save, then give the person a way to sign in: Set PIN or Set password: see How do I set a new PIN or password for someone, or unlock their account?. The till asks for one of them: Set a password or a PIN.
- Adding users needs the right to manage users.
- The list shows each user’s role, whether they are active and their last login.
- Do not share one login among several people: discounts, voids and the cash count are checked per user.
- Your licence counts computers, not users. Add as many users as you need.
Settings
How do I change the store's name, address, tax number, logo or country?
Open Settings, Store. What you type here is printed at the top of receipts and invoices, and the country decides the store’s formats and rules. Press Save when done.

- Open Settings and the tile Store.
- Fill in or correct:
- Store name and Legal name: the name customers know, and the registered name for invoices;
- Address, Phone, Email;
- Tax number: your tax or VAT registration number, printed on receipts where the law asks for it;
- Store logo: press Browse and choose the picture;
- Receipt header and Receipt footer: lines of your own, such as opening hours or a thank-you;
- Country: sets date, phone and address formats, tax wording and country rules;
- Measurement system: see How do I switch between kilograms and pounds (the measurement system)?;
- Store language: the languages your store works in: see How do I change the language of the screens, and choose the languages my store uses?.
- Save.
Tills
The tile Tills lists the tills of the store. For each: its Name, a Receipt prefix so receipts of different tills cannot be confused, the Next receipt number, and which one is the Master PC. Lowering the receipt counter can create duplicate numbers; the till warns you.
- Only users with the right to change store settings see these tiles.
- A logo for a thermal receipt printer needs converting once: see How do I get a sharp logo on a thermal receipt printer?.
- In many countries the receipt must show the store’s legal name, address and tax number. Check with your accountant.
How do I tell the till what kind of business I run?
Open Settings, Type of business, and choose between a shop or supermarket, a café or restaurant, and a clothing or shoe store. The till then shows only the buttons and screens that fit, and the demo data matches.
- Open Settings and the tile Type of business.
- Choose:
- Shop / supermarket: scanning, weighed goods, quick keys;
- Café / restaurant (tables, kitchen tickets): tables, kitchen tickets and the restaurant extras: see How do I set the till up for a café or restaurant?;
- Clothing / shoes (sizes and colours, seasons, exchanges): one price per article, ordering by size, seasons and one-step exchanges: see How do I set the till up for a clothing or shoe store?.
- For a café, restaurant or clothing store that also sells by weight, tick Café / restaurant or clothing: we sell by weight (show Read scale and Tare at the till).
- Save.
What changes
- The buttons of the till: no exchange button in a café, no kitchen buttons in a shop, the scale buttons only where goods are weighed. In a café the returns screen is called refunds: see I cannot find a button on the till. Where is it?.
- The row of buttons under the basket starts with the usual ones for that type; you can change it per till: see How do I choose which buttons are in the row under the basket?.
- A store that already has products in sizes or colours keeps the clothing extras whatever its type.
- If the store still holds the demo products of another type, the till offers to replace them. Only demo data is touched: see How do I remove the demo data and start with my own store (Demo ON / OFF)?.
The first-start setup asks the same question, so most stores never need this tile.
How do I change the language of the screens, and choose the languages my store uses?
Open Settings, Language / Theme, choose the language and save: the till restarts in that language. Which languages are offered, and which name boxes products have, is set by Store language in Settings, Store.
The language of the screens
- Open Settings and the tile Language / Theme.
- Choose Language: English, Arabic or French.
- Save. The till asks The language changes after a restart. Restart now? Answer yes.
In Arabic the whole screen runs from right to left, receipts included. A user can have a language of their own, set on their user record.
The languages of the store
- Open Settings, Store.
- Under Store language, tick the languages your store works in. At least one.
- Save and restart when asked.
The store’s languages decide:
- which languages are offered for the screens;
- which name boxes products, departments and categories have: see How do I give a product a name in Arabic or French?;
- in which language names are shown: on an Arabic screen the Arabic name, and so on.
Also in this window
- Theme: Light or Dark;
- Look: the standard look or a theme you got from Plugins: see How do I change the look of the program with a theme?;
- Sound when a button is pressed: see How do I switch the click sound of the buttons on or off?.
The installer and the licence agreement are offered in the same three languages.
How do I set up my tax rates?
Open Settings, Taxes. Create one line per rate your store charges, say whether your prices include it, and mark one as the default. Each product then points to one of these rates.
- Open Settings and the tile Taxes.
- Press New, or open a rate to change it.
- Fill in:
- Name: as it should read on receipts, for example “VAT 20 %”;
- Tax rate %: the percentage;
- Prices include tax: ticked when your shelf prices already contain the tax; unticked when tax is added at the till: see Should my prices include tax, or is tax added at the till?;
- Parts of this tax, if it has several (e.g. State 6.25; County 1; City 1.5): for taxes made of parts: see My tax is made of several parts (state + county + city, GST + PST, CGST + SGST). How do I set it up?;
- Active.
- Save. Mark the rate most products use as the default: new products get it.
Good to know
- A product has one tax rate, chosen on its form. A department can propose a rate to its new products: see What are departments, categories and brands, and how do I manage them?.
- A store that charges no tax keeps one rate of 0 %.
- A rate changes by law: do not edit the old rate on the day; past sales keep what they were charged either way, but it is clearer to create the new rate and move the products to it. With many products, change them through an export and import of the product list.
- Tax holidays: Settings, Tax holidays lists days on which named departments are sold without tax.
- Customers who pay no tax: see How do I mark a customer as tax exempt?.
Which rate applies to which goods is set by your country’s tax law. Ask your accountant before the first sale.
How do I back up my data, and how do I restore a backup?
The till backs itself up every day and at each Z report. In Settings, Backups, choose a folder on a USB stick or another computer, so a broken PC does not take the backups with it. Restore brings a backup back.
Set it up once
- Open Settings and the tile Backups.
- Backup folder (local, USB or network path): choose a place that is not the till’s own disk: a USB stick left in the PC, or a shared folder on another computer.
- Keep last N backups: how many to keep; older ones are removed.
- Keep Daily automatic backup and Backup on Z report ticked.
- Save, then press Back up now and check that a file appeared in the folder.
The tile shows the date of the Last backup, and the Dashboard warns under Alerts when there is none or it is old.
Restore
- Open Settings, Backups, and press Restore.
- Choose the backup by its date.
- Confirm. The current data is kept as a safety copy, and the program restarts to finish.
Everything entered after that backup is gone from the till: sales, products, customers. Restore only when you mean to.
What a backup holds
The whole store: products, stock, sales, customers, users, settings, the audit log, and product pictures. The till also makes a backup by itself before risky steps: an import, a change of main currency, a unit conversion, switching the demo off.
On a new PC
Install Ironloom POS, copy the backup file to it, and restore it. Then move the licence: see How do I move Ironloom POS and its licence to another computer?.
A backup on the same disk as the till protects against mistakes, not against a broken, stolen or burnt PC. Keep one copy elsewhere, and try a restore once on a spare PC so you know it works.
How do I remove the demo data and start with my own store (Demo ON / OFF)?
Open Settings and press the Demo tile. Switching it OFF erases the demo and every other piece of business data, starts receipt numbers at 1 and makes the till use its real devices. Switching it ON, possible only in an empty store, loads demo products and sales for your type of business.
Demo OFF: start for real
- Open Settings and press the tile Demo, which shows ON.
- Read the message and confirm. A backup is made first.
Erased for good: products, departments, stock, sales, returns, shifts and Z reports, customers, suppliers, promotions, purchases, gift cards and vouchers. Receipt numbers start again at 1.
Kept: store details, users, settings, currencies, taxes, receipt layout, hardware and licence.
Afterwards the till uses its real devices, and offers to open Hardware to set up the printer, scanner and drawer.
Demo ON: try the program
- In an empty store, press the tile Demo, which shows OFF.
- Confirm. The demo of your type of business is loaded: a supermarket catalogue, a café menu, or clothing in sizes and colours, with customers, suppliers, promotions and a week of sales. The till uses simulated devices.
Demo ON is refused when the store already has products or sales.
Good to know
- Switch the demo OFF before the first real sale. Everything rung up while the demo is on is erased with it.
- When Type of business is changed, the till offers to replace the demo products of the old type. Products, customers and sales you entered yourself are not touched.
- Demo OFF is refused when strict record keeping is on and the store has real sales, or when invoices were already reported to a tax authority. Records of real business are corrected, never erased: see What is strict record keeping?.
Devices
How do I let the till find and set up my devices?
Open Hardware and press Detect devices. The till looks for receipt and label printers, a second screen, point-of-sale devices on USB and, if you agree, a scale. It lists what it recognised with a tick box each; tick what to set up and confirm.
- Connect the devices, switch them on, and install the Windows driver of each printer first.
- Open Hardware and press Detect devices.
- The till searches and shows a wait message with a Cancel button. Stopping changes nothing.
- It asks whether to listen on the COM ports for a scale, for a few seconds. Put something on the scale if you answer yes.
- Under Suggestions, each device found has a tick box: a receipt printer with the cash drawer through it, a label printer, a customer display or second screen, a scale.
- Tick what you want and press Set up the ticked devices.
- Test each device from its card: see How do I test all the devices of the till in one place?.
- Show the full detection report lists everything Windows reports: COM ports, printers, keyboard devices (USB scanners show here), webcams and screens.
- Nothing new to set up. Printers need their Windows driver installed first; scales and pole displays need their COM port. means exactly that: install the driver, or check the cable.
- A new till sets up a recognised receipt or label printer by itself at its first start.
- A USB scanner that types like a keyboard needs no setup at all.
Installing, licence and updates
What do I need to run Ironloom POS?
A PC with Windows 7 Service Pack 1, 8.1, 10 or 11, 32-bit or 64-bit, with 2 GB of memory and 500 MB of free disk space. Internet is needed at the first start; after that the till sells without it. No special hardware is required to begin.
| Need | Detail |
|---|---|
| Windows | 7 SP1, 8.1, 10 or 11; 32-bit and 64-bit both work |
| Memory and disk | 2 GB of memory, 500 MB of free disk space, more as your sales history grows |
| Microsoft .NET Framework 4.8 | Windows 10 and 11 normally have it; on older Windows the installer adds it |
| A Windows account that may install programs | for the installation only; cashiers then use ordinary accounts |
| Internet | at the first start, to begin the trial or activate a licence; later now and then: see Does Ironloom POS work without internet? |
| Screen | any; the screens are checked down to 1024 × 768. A touch screen is optional |
Not needed to start
A scanner, a receipt printer, a drawer: the till works with a keyboard and a mouse, and devices can be added later: see Which devices work with Ironloom POS?.
What it does not run on
Ironloom POS is a Windows program. It does not run on a Mac, an iPad, an Android tablet or in a web browser. A Windows tablet or an all-in-one touch PC works.
Good to know
- One PC is enough for one till. Each further PC is one more till and needs its own licence seat: see How do I use more than one till in the same store?.
- The data is kept on the PC itself, not in the cloud. Plan a backup to a USB stick or another computer from the first day: see How do I back up my data, and how do I restore a backup?.
How do I install Ironloom POS?
Download the installer from the Ironloom POS site, open it, choose the language, accept the licence agreement and click Install. It takes a few minutes. The program goes into Program Files; your data is kept apart in its own folder.
- Download the installer from the download page of the Ironloom POS site.
- Open the file. If Windows shows “Windows protected your PC”, click More info, then Run anyway. Check first that the file came from the Ironloom site.
- Choose the language of the installer: English, Arabic or French.
- Read and accept the licence agreement. It is shown in the language you chose.
- If Microsoft .NET Framework 4.8 is missing, the installer adds it. Windows may ask to restart; setup continues afterwards.
- Choose the options:
- a desktop icon;
- start Ironloom POS when Windows starts: useful on a PC that is only a till;
- allow other tills to connect to this PC: tick it only on the PC that will be the master for other tills: see How do I use more than one till in the same store?.
- Click Install, then Finish.
After installing
Start Ironloom POS from the Start menu or the desktop icon. The first start opens the setup of your store: see What happens at the first start, and how do I set up my store?.
Good to know
- The data folder is separate from the program, so updating or reinstalling does not touch your sales: see Where is my data kept, and who can see it?.
- On Windows 7 the installer also switches on the secure connection settings (TLS 1.2) the program needs to reach the internet.
- Install with a Windows account that may install programs. Daily use does not need such an account.
What happens at the first start, and how do I set up my store?
The first start opens a short setup: language, store details, type of business, currency and tax, the owner’s name and PIN, and whether to load a demo. It takes a few minutes, and everything can be changed later in Settings.
- Language: English, Arabic or French. The rest of the setup is in that language.
- Store: the store name, address, phone and email (required), and optionally the legal name, the tax number and the logo. They are printed on receipts.
- Type of business: shop or supermarket, café or restaurant, clothing or shoes. The till, the menus and the demo products follow it.
- Currency and tax: the main currency, an optional second currency with today’s exchange rate (fetched from the internet, or typed), your tax rate and whether your prices include it.
- Owner: your full name and a PIN of 4 to 8 digits, typed twice. The owner is the highest role and signs in as “owner” with this PIN. Keep it safe.
- Demo: choose whether to start with a demo store to practise, or with an empty store.
- Press Finish. The sign-in screen opens.
Good to know
- Your full name, email and phone are sent to Ironloom with the free trial, so support can help you and tell you about your licence. They are not shared with anyone.
- With internet, the trial starts at this moment: see How does the free trial work?.
- With the demo on, the till uses simulated devices and holds sample products and sales. Switch it off before your first real sale; that empties the store: see How do I remove the demo data and start with my own store (Demo ON / OFF)?.
Next steps for a real store
- Connect and test your devices: see How do I let the till find and set up my devices?.
- Add your products: see How do I add a product? and How do I add many products quickly by scanning them?.
- Add your staff: see How do I add a user?.
- Set up backups to a USB stick or another computer: see How do I back up my data, and how do I restore a backup?.
- Open a shift and make a first sale: see How do I make a sale, from the first product to the receipt?.