Signing in and the main screen
How do I sign in?
Type your user name or your short user ID, then your PIN, and press Sign in. On a touch screen the number pad is enough: user ID, then PIN.

- Start Ironloom POS from the Start menu or the desktop icon.
- In the box User name or user ID, type your user name, or your user ID: a short number such as 3. The screen greets you by name as soon as it recognises you.
- Type your PIN. The number pad on the screen types into the box you touched last.
- Press Sign in.
Other ways
- Password: press Use password to type your password in place of the PIN. Use PIN goes back.
- Badge: if you have a staff badge, scan it on this screen.
- No keyboard: touch the first box, tap your user ID on the number pad, touch the PIN box and tap your PIN.
After several wrong tries the account is locked for a while. Wait, or ask a manager. If you do not remember your PIN, see I forgot my PIN or password. How do I get back in?.
After signing in you land on your home page: the Dashboard for an owner or manager, the Checkout for a cashier or supervisor, Inventory for a stock clerk, Reports for an accountant.
How do I lock the till when I walk away?
Press Lock at the top, or F12 (Ctrl+L on a laptop). The sign-in screen covers everything until someone signs in. The till also locks by itself after a time without use, which the owner sets.
Lock it yourself
- Press Lock in the top bar, or the F12 key. On a laptop whose F-keys change the volume or brightness, press Ctrl+L.
- The sign-in screen appears. While it is shown the menu is hidden and no screen can be opened.
- To continue, sign in again with your user ID and PIN.
The automatic lock
The till locks by itself when nobody touches it for a set number of minutes.
- Open Settings, then Checkout rules.
- In Auto-lock after minutes (0 = off), type whole minutes. 0 switches the automatic lock off.
- Save.
Locking is not the same as lock mode. Lock mode keeps the program full screen and on top of Windows: see How do I keep the till full screen so staff cannot leave the program (lock mode)?.
How do I get help inside the program?
Press F1, or the question mark at the top. The help opens on the articles about the screen you are on. Type your question in the box at the top to search all articles. It works without internet.
- Press F1 on any screen, or press the question mark in the top bar.
- Under About this screen, tap a question to read its answer on the right.
- To search, type a few words of your question in the box at the top, for example “refund” or “drawer”. The matching questions are listed while you type. Press Enter to open the first one.
- To read everything on a subject, open a chapter under All chapters.
- Press Close or Esc to return to your work. Nothing you were doing is lost.
Good to know
- The words in colour and bold are the names of buttons and screens, written as the program shows them.
- Underlined text opens another article. The arrow at the top goes back to the one before.
- Keyboard shortcuts opens the list of keys: see What are the keyboard shortcuts?.
- The help is in the language of the screen: English, Arabic or French.
- The help is part of the program, so it matches your version and needs no internet. The Ironloom POS site has the same articles, with pictures, and guides to print.
- Small typing mistakes do not matter in the search.
If the help does not answer
- A fault of the program: send a problem report, see How do I report a problem to Ironloom?.
- A question: contact support, see How do I contact Ironloom support?.
Selling
How do I make a sale, from the first product to the receipt?
Open Checkout, scan the products, press PAY (F10), take the money and press Complete sale. The receipt prints and the drawer opens for cash.
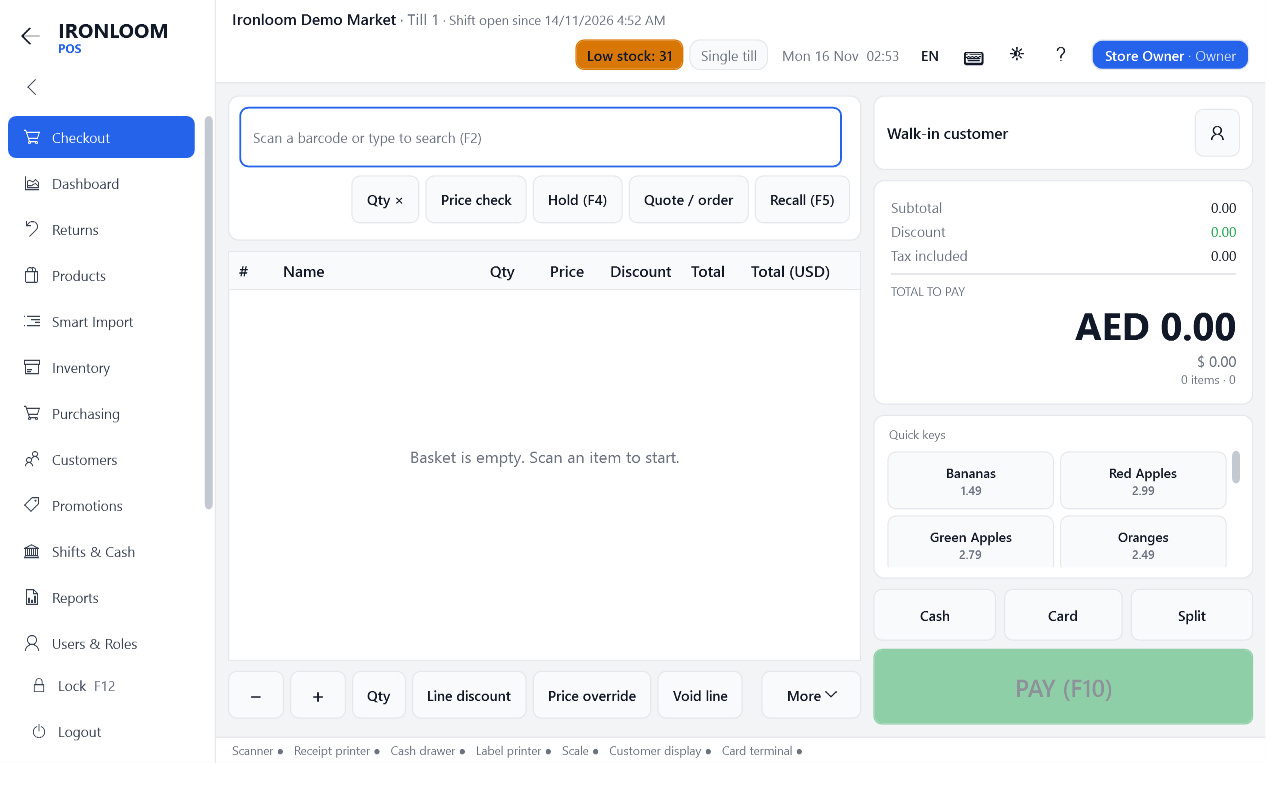
- Open Checkout in the menu. If no shift is open yet, the till asks for the cash in the drawer first: see How do I open a shift?.
- Scan each product. It appears as a line in the basket with its price. No barcode? See How do I add a product to the sale?.
- Check the total at the right, under TOTAL TO PAY.
- Press PAY (F10). For a simple sale you can press Cash or Card directly.
- Take the payment: see How do I take a cash payment and give change? or How do I take a card payment?.
- Press Complete sale. The receipt prints, the drawer opens when cash was paid, and a new empty basket is ready.
- A wrong line? Select it and press Void line: see How do I remove a product from the sale, or cancel the whole sale?.
- The customer has to fetch something? Park the sale with Hold (F4): see How do I put a sale on hold and bring it back?.
- The sale is saved while you work. If the program or the PC stops, the basket comes back: see The program or the PC stopped in the middle of a sale. Is the sale lost?.
How do I add a product to the sale?
Scan its barcode. Without a barcode, type part of the name in the box at the top and pick the product from the list, or tap its button under Quick keys.
- Scan: point the scanner at the barcode. You do not have to click anywhere first: the till catches a scan on every screen.
- Type the barcode: if the label does not scan, type its digits in the box at the top and press Enter.
- Search by name: type two letters or more. The matching products are listed while you type. Tap one, or use the down arrow and Enter. F2 puts the cursor in the box.
- Quick keys: tap the product’s button at the right. They are meant for products without a barcode, such as fruit or bread.
- PLU code: for a product with a short scale code, type the code and press Enter.
When the same product is added twice, the till adds it to the line already in the basket.
What can happen next
- The till asks for a weight: the product is sold by weight. See How do I sell a product by weight?.
- The till shows several products: the barcode is shared. See After a scan the till asks me to choose between several products. Why?.
- The till says the barcode is not known and looks it up online: see The barcode is not known. What do I do?.
- The till asks for a serial number, a size or the customer’s age: see The till asks for a serial number. What do I do?, How do I choose a size or colour at the till?, The till asks about the customer's age. What do I do?.
How do I sell several of the same product, or change the quantity of a line?
Before scanning, press Qty × (F7), type the number, then scan once. After scanning, select the line and use +, − or Qty.
Before you scan
- Press Qty × or F7 (Ctrl+M on a laptop).
- Type the number, for example 6, and confirm.
- Scan the product once. The line is added with quantity 6.
A quick way with the keyboard: type 6* or 6x in the box at the top, press Enter, then scan.
After the product is in the basket
- Select the line.
- Press + for one more or − for one less. The + and − keys of the keyboard do the same.
- Or press Qty, type the quantity and confirm. On a touch screen, one tap on a line opens its quantity.
- Bringing the quantity down to zero removes the line.
- For a weighed product, + and − change the weight by 0.1.
- A product with serial numbers is always one unit per line: scan the next unit to add another. See The till asks for a serial number. What do I do?.
How do I remove a product from the sale, or cancel the whole sale?
Select the line and press Void line (Del key) to remove one product. Press Void sale to empty the whole basket. Both are recorded with your name.
Remove one product
- Select the line in the basket.
- Press Void line, or the Del key.
Cancel the whole sale
- Press Void sale (the red button).
- The till asks Void the whole sale? Confirm.
- If your role may not void, the till asks for a manager’s approval: a manager types their PIN and you continue. See The till says "Manager approval needed". What do I do?.
- Every void goes into the audit log with the user, the product and the amount. The owner sees them in Reports and on the Dashboard: see How do I keep an eye on discounts, voids and other ways money can be lost?.
- The sale is already paid and finished? That is a return or a void of a finished sale: see A finished sale was a mistake. Do I void it or return it?.
How do I give a discount?
For one product, select its line and press Line discount. For the whole sale, press F8. Type a number for a percentage (10), or a number followed by the letter a for an amount (2.50a).
Discount on one line
- Select the line.
- Press Line discount. It is in the button row or under More.
- Type the discount: 10 means 10 %. 2.50a means 2.50 off the line.
- Type the reason, or leave it empty, and confirm.
Discount on the whole sale
- Press F8 (Ctrl+D on a laptop).
- Type the discount the same way: 5 for 5 %, 5a for an amount of 5.
- Type the reason and confirm.
To remove a discount, do the same and type 0.
Limits
- Each role has a highest percentage. Above it, the till asks for a manager’s approval: see How do I limit the discounts and refunds a cashier may give? and The till says "Manager approval needed". What do I do?.
- Some products are set to never take a discount. The till says so.
- An item sold once from Smart Scan cannot be discounted.
- Promotions apply by themselves; you do not type them: see A promotion did not apply at the till. Why?.
- Every discount is kept with its reason and shown in the discounts report.
How do I check a price without adding the product to the sale?
Press Price check or F3, then scan the product or type its name. The till shows the name, the price and the stock on hand, and adds nothing to the sale.
- Press Price check at the top of the Checkout, or F3 (Ctrl+P on a laptop).
- Scan the barcode, or type the barcode or part of the name, and confirm.
- Read the name, the price and the quantity in stock. For a weighed product the price is per unit of weight.
- Close the window. The basket is unchanged.
- With a customer attached to the sale, the price shown is that customer’s price.
- The price is also sent to the customer display, if you have one.
How do I put a sale on hold and bring it back?
Press Hold (F4) to park the basket and serve the next customer. Press Recall (F5) and choose it from the list to continue.
Put the sale on hold
- Press Hold (F4), or the F4 key (Ctrl+H on a laptop).
- Type a label so you recognise it, such as the customer’s name, and confirm.
- The basket empties and you can start the next sale.
Bring it back
- Press Recall (F5), or the F5 key (Ctrl+R on a laptop).
- Choose the sale from the list. Each line shows the label, the total and the time.
- If you are in the middle of another sale, the till offers to hold that one first.
- A held sale is not a sale yet: nothing is paid and stock has not moved.
- Held sales are also listed in Shifts & Cash: see Where do I see the recent sales and the sales on hold?. Finish or void them before closing the shift.
- For a customer who will come back another day, use a quote or an order: see How do I give a customer a quote?. In a café, use tables: see How do I open a table, add to it and come back to it later?.
How do I attach a customer to the sale?
Press the person button or F6, type the customer’s phone, name or card number, and pick them. The customer then earns points, gets their own prices and can buy on account.
- Press the person button at the right of the Checkout, or F6 (Ctrl+U on a laptop).
- Type the phone number, part of the name or the card number, and confirm.
- One match is attached straight away. With several, choose from the list.
- The customer’s name, level, points and balance appear above the totals.
- Customer card: scanning the card attaches the customer in one step.
- New customer: when nobody matches and your role may create customers, the till offers to add one: name, phone and email.
- Prices: lines already in the basket change to the customer’s price level, except lines whose price you changed by hand.
- Tax-exempt customer: the till says that no tax is charged on this sale: see How do I sell to a customer who does not pay tax?.
- Remove the customer: press the person button again and confirm.
What a customer on the sale allows: points (How do I use a coupon or the customer's loyalty points?), payment on account (How do I sell on account, or use a customer's store credit?) and the sale in their history.
The barcode is not known. What do I do?
The till looks the barcode up by itself and opens a window with what it found. If you may create products, check the details, type the price and import it. If not, press Sell once as pending item, type a name and a price, and a manager approves the product later.
- You scan a barcode that is not in the store’s catalogue. The till says it is looking it up online. This takes a few seconds and does not block the till.
- A review window opens. It shows the name, brand, size and picture that were found, or empty boxes when nothing was found.
- Then:
- You may create products: correct what is wrong, type the selling price and import the product. It is added to the sale and stays in the catalogue. See How do I check and import a product that Smart Scan found?.
- You may not: press Sell once as pending item, type or correct the name, type the price. The item is sold in this sale and waits for a manager under Products, Pending imports. See What does "Sell once" do?.
Other messages
- Offline: barcode queued for lookup: there is no internet. The barcode is kept and searched later; you can still sell the item once. See What does Smart Scan do when there is no internet?.
- Invalid barcode (check digit). Scan again.: the scan was read badly. Scan again, or type the digits under the bars.
- Scanning the same code again while the search runs does nothing: wait for the window.
Ask before guessing a price. An item sold once is checked by a manager afterwards.
How do I print a receipt again?
Press Reprint, choose the sale from the list of recent sales, and the receipt prints again as a copy.
- Press Reprint. It is in the button row or under More.
- The window Recent sales lists the last 30 sales with receipt number, total and time. Choose one.
- The receipt prints, marked as a copy. The drawer stays closed.
- Reprinting needs the right to do so; otherwise the till asks for a manager’s approval.
- For an older receipt, the owner or a manager finds it in Reports, Receipts, by date, hour or payment method: see How do I find an old receipt and print it again?.
- Nothing prints at all? See The receipt does not print. What do I check?.
Taking payment
How do I take a cash payment and give change?
Press PAY (F10), type the amount the customer hands you (or tap the button with that amount), press Cash, then Complete sale. The till shows the change in large figures and opens the drawer.

- Press PAY (F10) on the Checkout. The Payment window shows Amount due.
- Enter what the customer gives you:
- tap one of the amount buttons: the exact amount, or the next notes above it. This adds the cash payment in one step;
- or type the amount on the number pad and press Cash. Exact fills in the amount still due.
- Remaining shows what is still to pay, Change what to give back.
- Press Complete sale, or Enter.
- The drawer opens and the change is shown in large figures. Give the change and the receipt, and close the drawer.
- Quick way: with the Payment window open and nothing typed, Enter takes the whole amount in cash; Enter again completes the sale.
- Wrong amount entered: double-click the payment in the list and confirm to remove it, then enter it again.
- Money boxes add the thousands separators while you type (89,500).
- If the store rounds cash totals, the rounding is shown on the receipt.
How do I take a card payment?
Press Card. The till shows the amount in large digits: type it on your card terminal, let the customer pay, then press APPROVED on the till. Only then is the payment added.
Ironloom POS works with a stand-alone card terminal: the terminal from your bank is not connected to the till, and you confirm the result on the screen.
- In the Payment window, press Card (or F2). To take only part by card, type that amount first.
- The till shows: Type this amount on the card terminal: with the amount in large digits.
- Type the amount on the card terminal and let the customer tap, insert or swipe the card.
- Look at the terminal:
- it says approved: press APPROVED;
- it says declined: press DECLINED and see The card was declined. What now?;
- the card was never tried: press Cancel (card not tried).
- If the store asks for them, type the Approval code printed on the terminal slip, and the Last 4 card digits.
- Press Complete sale. The drawer stays closed for a card-only sale.
- The till never asks for the full card number. Do not type it anywhere.
- Whether the approval code and the last 4 digits are asked, optional or required is the owner’s choice: see How do I set the rules for card payments?.
- At the end of the shift, the card total of the till is compared with the terminal’s own total: see At closing the till asks for the card total. What do I type?.
Press APPROVED only after the terminal has said so. A sale completed by mistake as a card payment makes the card total wrong at the end of the day.
How do I split a payment between two methods?
In the Payment window, type the first amount and press its method, then do the same for the next. Remaining shows what is still due after each one. Press Complete sale when it reaches zero.
- Press PAY (F10), or Split on the Checkout.
- Type the first amount, for example 20, and press the method, for example Card.
- The payment appears in the list and Remaining shows the rest.
- Enter the next payment the same way. For the last one you can leave the amount empty: the till takes what remains.
- When Remaining is zero, press Complete sale.
- Only cash may be more than the amount due; the difference is the change. A card, gift card or account payment is never more than what remains.
- To remove a payment entered by mistake, double-click it in the list and confirm.
- Any methods can be mixed: cash, card, gift card, voucher, account, store credit, wallet, cheque.
- The receipt lists each payment.
Splitting a restaurant bill between guests is something else: see How do I move guests to another table, or split the bill?.
Returns and exchanges
How do I take a product back when the customer has the receipt?
Open Returns (F11), scan the QR code on the receipt or type its number, choose the items and quantities coming back, then press Refund and choose how the money is given back.
- Open Returns in the menu, or press F11 at the Checkout (Ctrl+T on a laptop). Scanning a receipt’s QR code at the Checkout opens it directly.
- Scan the QR code on the receipt, or press Find receipt and type the receipt number. The sold items are listed, with what was already returned.
- Choose what comes back:
- Return all takes every line;
- or select a line, press Set qty and type the quantity returned.
- For an item that cannot be sold again, select its line and press Damaged: see Does a returned product go back into stock, or is it damaged?.
- Press Refund. Choose Refund to, type the Reason and confirm: see How is the money given back for a return?.
- The return receipt prints. For a cash refund the drawer opens.
- You cannot return more than was sold, and what was returned before is counted.
- A refund above your limit needs a manager’s approval: see How do I limit the discounts and refunds a cashier may give?.
- In a café or restaurant this screen is called Refunds.
Shifts and cash
How do I open a shift?
Count the cash you put in the drawer, open Shifts & Cash, press Open shift and type that amount as the Opening float. The till also asks for it by itself at the first sale when no shift is open.
- Count the notes and coins placed in the drawer to give change. This is the float.
- Open Shifts & Cash and press Open shift.
- Type the amount in Opening float. A store with two currencies types the float of each currency.
- Confirm. The top bar now shows since when the shift is open.
- A shift belongs to one till. Each till has its own shift and its own drawer.
- If you start selling without a shift, the till opens this window first. A user who may not open a shift is told No shift is open on this till. Open a shift to start selling. and must ask a supervisor.
- The float is counted back at the end, so type what is really in the drawer: see How do I close the shift and count the drawer?.
- A shift can stay open while cashiers change. Whoever closes it counts the drawer.
How do I record cash put into or taken out of the drawer?
Open Shifts & Cash, press Cash in or Cash out, type the amount and the reason. The drawer opens, and the movement is counted in the cash the till expects at closing.
- Open Shifts & Cash.
- Press Cash in when money is added to the drawer (more change), or Cash out when money is taken out.
- Type the amount. A store with two currencies also chooses the currency.
- Type the reason and confirm. The drawer opens.
- Every movement is listed in the second tab of Shifts & Cash, with the time, the amount, the reason and the user, and is printed on the X and Z reports.
- Each needs its own right; without it the till asks for a manager’s approval.
- A shift must be open.
Use the right tool
| What happened | Use |
|---|---|
| Change added, or cash removed for safekeeping during the shift | Cash in / Cash out |
| Something was bought with drawer money (bread, cleaning, a taxi) | an expense, so the accountant sees what it was for: see How do I record an expense, such as something paid from the drawer? |
| Cash goes to the safe or to the bank | Safe & bank: see How do I record money moved to the safe or deposited at the bank? |
Money that leaves the drawer without being recorded shows up as “short” when the shift is closed.
How do I close the shift and count the drawer?
Open Shifts & Cash, press Close shift (Z), count the notes and coins in the drawer and type how many of each. The till compares your count with what it expects, prints the Z report and makes a backup.
Before you start: finish or void any sale on the screen, and deal with held sales: see Where do I see the recent sales and the sales on hold?.
- Open Shifts & Cash and press Close shift (Z).
- The counting window opens. For each note and coin, type how many are in the drawer. The total adds up as you type. See How do I count the notes and coins, and what if the drawer holds two currencies?.
- The count is blind: the expected amount is not shown, unless your role may see it.
- Add a remark under Notes if something happened, and confirm.
- The till shows your counted total and asks to close. Confirm.
- If the store uses the card check, type the card total printed by the card terminal: see At closing the till asks for the card total. What do I type?.
- The Z report prints, the drawer opens so you can take the cash out, and a backup of the data is made.
- A message shows the Z number and the difference between the count and the expected cash: see The drawer count does not match. What does over / short mean and what do I check?.
- Closing a shift opened by another user needs an extra right.
- A closed shift cannot be opened again. Mistakes are corrected with the next shift, and the difference stays on the Z report.
- Selling is not possible until a new shift is opened.
Users and roles
The till says "Manager approval needed". What do I do?
Your role may not do this action by itself. Call a manager or supervisor: they type their own PIN or password in the window, the action goes through once, and you stay signed in.
- You press a button your role does not cover, or go above your limit. The window Manager approval needed opens.
- A manager types their user ID and PIN, or user name and password, in that window.
- The action is done once. Your own rights do not change, and the manager is not signed in on your till.
- The manager must have the right you lack. A cashier’s PIN does not approve another cashier.
- The approval is recorded in the audit log with both names: who asked and who approved.
- Managers: look at what you approve. Your name is on it.
- Never ask for a manager’s PIN to type it yourself, and managers must never give it away.
Actions that often ask: a discount above the limit, voiding a line or a sale, changing a price, a refund in cash or above the limit, a return without a receipt, opening the drawer without a sale, selling on account.
If you need an action many times a day, ask the owner to add the right to your role: see How do I decide what each person may do (roles and rights)?.
Keyboard shortcuts
What are the keyboard shortcuts?
At the Checkout: F2 search, F3 price check, F4 hold, F5 recall, F6 customer, F7 quantity, F8 discount, F9 open drawer, F10 pay, F11 returns. Everywhere: F1 help, F12 lock, Esc back. Each has a Ctrl shortcut for keyboards whose F-keys do something else.
At the Checkout
| Key | Ctrl shortcut | What it does |
|---|---|---|
| F2 | Ctrl+F | puts the cursor in the search box |
| F3 | Ctrl+P | price check |
| F4 | Ctrl+H | hold the sale |
| F5 | Ctrl+R | recall a held sale |
| F6 | Ctrl+U | attach a customer |
| F7 | Ctrl+M | quantity for the next scan |
| F8 | Ctrl+D | discount on the whole sale |
| F9 | Ctrl+O | open the drawer |
| F10 | Ctrl+Enter | pay |
| F11 | Ctrl+T | returns |
| Del | remove the selected line | |
| + and − | one more, one less on the selected line | |
| Enter | add what is typed; in a list, open the selected line |
Everywhere
| Key | What it does |
|---|---|
| F1 | opens the help for the screen you are on |
| F12, Ctrl+L | lock the till |
| Esc | back: closes a panel, clears the search, or returns to the previous screen |
| F5 | on list screens, reload the list |
| Enter | on list screens, open the selected line |
In the Payment window
| Key | What it does |
|---|---|
| Enter | take the amount in cash; when nothing remains, complete the sale |
| F2 | card |
| F10 | complete the sale, when nothing remains |
| Esc | back to the Checkout without paying |
The shortcuts work whether a button is shown in the row or sits under More. Del, + and − act on the basket only when the search box is empty.